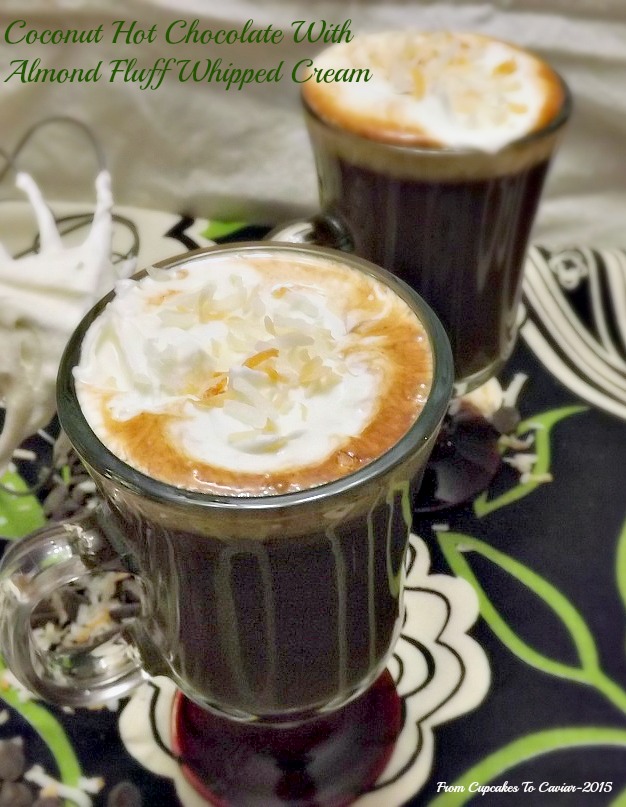
Coconut Hot Chocolate With Almond Fluff Cream

I’m one of those weirdos who loves Winter. I love the coziness, the enforced family time (helpful for seeing ones kids when they’re teens. They simply can’t get away in the Winter. Buahahahahaaaa!), the foods (mmm, soups and stews), the clothes. I mean, what woman doesn’t love cozy fluffy sweaters, right?
But one thing I don’t care for is extreme cold. I grew up in Chicago, so it’s not like I didn’t get used to it back in the day. But I’ve been in Kentucky for 26 years now (yes, longer than some of you have been alive, lol) and my body has acclimated to the temps here. I think I would probably just whimper and die in Chicago now. The last few years though, our part of Kentucky has been getting some pretty frigid cold fronts coming through that are very reminiscent of my growing up days. One is expected to hit tonight putting the temp down to about 1 degree with wind chills of about 15 below. Time to get the outdoor cats locked in the garage with the kerosene heater to make sure they stay safe and warm. Time to keep the wood burning fire going. On a side note from that, I have to laugh every time we need to start a fire because it kills my husband that I can get a fire going with a stick and some paper and he can barely get one going with a blow torch, a gas can and 3 full grown trees. I keep teasing him that I’m going to steal his man card.
One thing I love when it’s cold is any excuse to make a hot, soothing drink. Sometimes I like them spiked, but more often than not, I just like drinks that are booze free and creamy. Creamy and I are bff’s from way back.
Now, I’m not usually a fan of The Food Network. I tend to turn a cynical eye towards many of the people who have shows on that channel or recipes online. But I do buy the Winter issues of their magazine since, well, I buy the Winter issues of pretty much every Winter food magazine published. Because soups, stews, cozy food. Enough said.                   So, in the March 2012 issue (yes, it’s taken me this long to get to it), there was the “He Made, She Made” column where two of their cooks make recipes based on a certain food or theme. It was Bobby Flay up against Anne Burrell, making hot chocolate. I’ve had Bobby Flay’s recipe cut out from the magazine since then. I don’t even remember what Anne Burrells was, so it must not have excited me that much. But Bobby’s had a can of coconut milk in it. The words coconut milk are a siren call for me. I have been known to have to open an extra can of coconut milk when making curries because I eat too much of it straight from the can. Yes, yes I do like hardened arteries. Why do you ask?
So, this drink was wonderful. I’m one who can never decide if I want whipped cream or marshmallows on top of hot chocolate. With this, I get both because you combine whipped cream with marshmallow fluff. WooT! I was happy! Plus, you get hot chocolate. With coconut milk. Really; do I need to say more? The only thing I did differently here was to up the amounts of extracts. I like more intense flavors. 🙂
You know the drill… 🙂
Mrs. Cupcake, who wants to be swimming in a vat of coconut milk.
Coconut Hot Chocolate With Almond Fluff Whipped Cream
- Fluff whipped cream-
- 3/4 cup heavy cream
- 1/2 cup marshmallow fluff (store the rest in the fridge for another time… or just eat it straight from the jar. I won’t tell)
- 2 tablespoons Amaretto or sub with 1/4 to 1/2 teaspoon almond extract
- 1/2 teaspoon vanilla extract
- Hot chocolate-
- 1 cup whole milk
- 1 can coconut milk (NOT coconut cream.)
- 2 tablespoons unsweetened cocoa powder
- 3 tablespoons packed light brown sugar
- 1/2 cup dark or bittersweet chocolate chips (I used more; I admit it.)
- 1 teaspoon vanilla extract
- 1/8 teaspoon of sea salt
- 1/2 cup toasted coconut for garnish (to me, this is definitely optional. I don’t want hot chocolate with texture 😛 )
- Make the whipped cream and set aside- Combine the topping ingredients in a medium bowl. You can use either your stand mixer with the whisk or a hand mixer at medium speed, though I suggest starting at low so you don’t wear the splattering cream. Whip until it forms nice soft, fluffy peaks.
- Combine the coconut milk and the whole milk in a saucepan. Bring it to a simmer over medium heat. Add in the cocoa powder, brown sugar (your best bet is to combine the cocoa with the sugar to help avoid the cocoa lumping up), chocolate chips, vanilla extract and salt.
- Continue to cook over medium heat, whisking the whole time, until the chocolate is melted and the sugar is dissolved. Pour into cups and top with a dollop of the whipped topping, then some of the toasted coconut if you’re using it.
Copyright Notice: From Cupcakes To Caviar images and original content are copyright protected. Please do not publish these materials anywhere without prior permission.