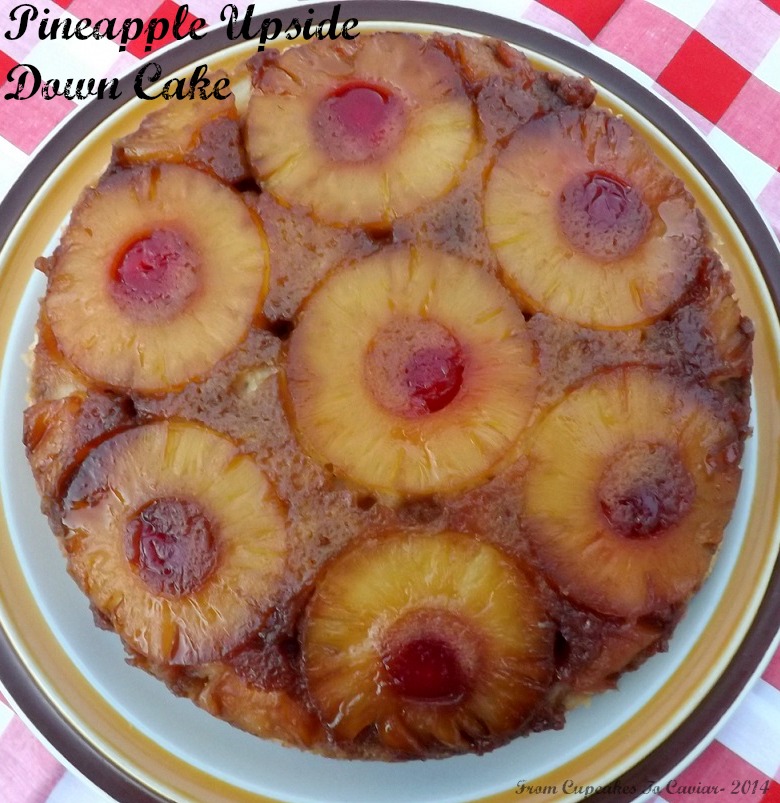
Pineapple Upside Down Cake

This is going to be one of my shorter, less wordy posts. I know…ME… not long winded. What can I say? We all have our days… or in my case, our brief moments. It’s been a long difficult day, I’m totally pooped and I have a headache. But I lurves you all enough that I wanted to get this recipe up before the end of the day anyway. See how good I am to you? 😛
You know the drill… 🙂
Love you all!!!!! <3
Pineapple Upside Down Cake
- 1 20 ounce can pineapple slices in juice, drained and (you will use about 8 of the slices), slices lain on a paper towel and patted dry
- 6 Maraschino cherries, drained (optional)
- 1 2/3 cups flour
- 2 teaspoons baking powder
- 1 teaspoon salt
- 1 tablespoon vanilla extract
- 1 cup sour cream or plain Greek yogurt
- 1 1/2 sticks unsalted butter, room temp
- 1/2 cup firmly packed dark brown sugar
- 1 cup sugar
- 2 eggs, room temp
- Preheat oven to 350 and get out a 10 inch cast iron pan (you can sub a ten inch cake pan, but a cast iron pan is more traditional). In a small bowl, whisk together the flour, baking powder and salt and set aside.
- In another small bowl, combine the sour cream or with the vanilla. Also set aside. 😀
- Melt 1/2 stick of the butter in the cast iron pan. Just toss the butter in the pan and shove it in the oven for a couple of minutes. When it is melted, sprinkle the brown sugar evenly over the butter. Lay the pineapple slices around the outer edge of the pan. You should be able to fit 6. Use 2 more, broken in quarters, in the spaces in between each slice.
- In a large bowl, combine the remaining stick of butter and the sugar. Beat at medium speed with a hand mixer for about 2 minutes; until light and fluffy.
- Add the eggs, one at a time, beating well after each addition.
- Transfer over to a wooden spoon or rubber spatula- alternately fold in the flour mixture and the sour cream mixture (flour, sour cream, flour, sour cream, flour), mixing well after each addition.
- Spoon the batter over the pineapple slices and smooth it out.
- Bake at 350 for 25 to 30 minutes, or until it is golden brown and a toothpick inserted in the middle comes out clean.
- Immediately run a butter knife around the edges of the cake and then invert the pan onto a plate large enough to hold the cake. If any of the fruit sticks to the pan (if you are using a well seasoned pan, it shouldn’t, but…) just lift it out and place it on the cake.
- If you actually have any left over, cover well and store at room temp.
Copyright Notice: From Cupcakes To Caviar images and original content are copyright protected. Please do not publish these materials anywhere without prior permission.