Soft, Fresh, Multi Grain Bread

Soft, Fresh Multi Grain Bread

Soft, Fresh Multi Grain Bread


I can just see many of you now. “Ewwwww, she said multi grain! That must mean its healthy and tastes like old cat litter!!” Fine, so maybe I’m transferring my own reaction to hearing the words multi grain. But I know SOME of you are like me. We hear those words and automatically close the page or go look for something made with heavy cream, tons of sugar and chocolate. Again, maybe that’s mainly me. No, no, nooooo, I KNOW others do it.

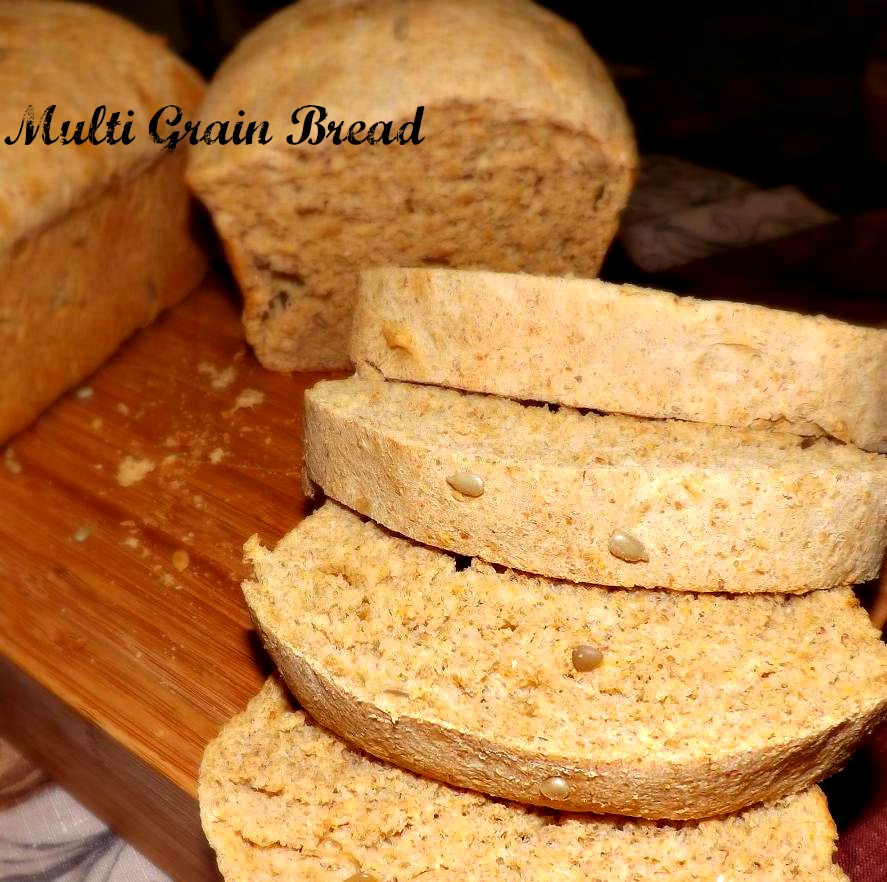
That said, I DO however like fresh breads. But even I know that ones made with all white flour have little to no nutritional value. They’re just empty (albeit extremely tasty) calories made up of carbs. But oh my, they are delicious. I have tried the store bought whole grain breads and it is nearly impossible t find one that doesn’t taste like cardboard. So I make my own. Until you try it, you can never know how tasty a FRESH loaf of whole grain bread is. Soft, fluffy (no, not as fluffy as white bread but nowhere near as dense as store bought cardboard multi grain bread. The only drawback with this bread is it doesn’t store well. It gets rather crumbly with age. But it rarely lasts long enough around here for that to be a problem. Sliced thin (if cutting for sandwiches, always wait until bread is totally cool before slicing), it makes great sandwiches. Sliced a bit thicker and slathered with butter and jam, this is a fantastic snack or side for a meal. We had it tonight with a yummy creamy turkey dumpling soup. Sooooo good together!

You know the drill… git to cookin’!

With this recipe, make sure to premeasure your grains and have them ready to go. It’s easy to get flustered and forget one or more when using this many different types of grain in one bread.

Multi Grain Bread

  • 3- 3 1/4 cups bread flour
  • 2 teaspoons salt
  • 2 packages dry yeast
  • 1 1/2 cups water
  • 1 cup milk
  • 1/4 cup vegetable or canola oil
  • 1/4 cup molasses
  • 2 cups whole wheat flour
  • 1/2 cup rye flour (you can buy rye flour in fairly small bags and once you try this recipe, believe me, it won’t go to waste)
  • 1/2 cup rolled oats
  • 1/2 cup cornmeal
  • 1/2 cup shelled sunflower seeds or pepitas, your choice
  • 2 tablespoons vital wheat gluten (optional but I recommend it. It helps make a typically dense loaf like this much lighter plus helps it keep better. You can find it with the flours and yeasts at the grocery store)
  • 1/4 cup wheat germ (if you want a touch more sweetness, feel free to use the honey wheat germ)
  1. In the bowl of a stand mixer fitted with the dough hook, combine two cups of the bread flour, the salt and the yeast.
  2. Combine the rye flour, oats, cornmeal, sunflower seeds, vital wheat gluten if using and wheat germ in a small bowl. Set aside.
  3. In a large microwave safe measuring cup, heat the water, milk, oil and molasses to between 120 degrees and 130 degrees.
  4. Add the warmed liquid to the flour mixture in the stand mixer bowl. Beat 2 minutes at low speed.
  5. Add in the combined grain mixture you set aside along with an additional 3/4 cup bread flour. Let the mixer combine and then knead this for about 5 minutes.
  6. Turn the mixer off and feel the dough. It should be just VERY slightly tacky to the touch, but your finger shouldn’t stick to it at all.
  7. Turn the dough out onto a lightly floured counter and knead for just a minute or so. Put into an oiled bowl and turn the dough to make sure all sides get oil on them.
  8. Cover with a clean towel and let rise until doubled in bulk, about 30 to 45 minutes.
  9. When risen, punch down and shape into two loaves. Put them into 2 well greased 9 inch loaf pans and again, let rise until nearly doubled in bulk. While they rise, preheat your oven to 350 degrees.
  10. When risen, bake at 350 degrees until the loaves are golden brown and firm to the touch on top, about 20 to 25 minutes. Turn bread out onto a rack to cool for about one hour. I know, I know, you will end up slicing it while it’s still warm, but I have to at least try to pretend I don’t know this and that I think you’ll leave it to cool.

Copyright Notice: From Cupcakes To Caviar images and original content are copyright protected. Please do not publish these materials anywhere without prior permission.


Snickerdoodle Banana Bread

Snickerdoodle Banana Bread

Snickerdoodle Banana Bread


Wow. Been almost two weeks since I’ve posted. Well, Christmas break is over. Right now is the perfect time for some baking since the bulk of the nation is feeling their wittle toesies freeze off and baking gives you a chance to stand in front of the oven and cry out “oh, my God, I’m freezing to death!” Then again, maybe it’s just me that whines that much when I’m cold. But, native Chicagoan I may be, but I’ve lived in Kentucky since 1988, so a temp of -1 with a wind chill of just about 20 below zero is a weeeee bit chilly. So I whine. I wear 32 pairs of socks, 12 hoodies and 8 pairs of gloves. Try walking in 32 pairs of socks. I look like a fat drunk penguin.

When I was trying to figure out what to bake, I went to my Pinterest account to look through my Foods/Recipes To Try board. I found one I pined ages ago- Snickerdoodle Bread. The recipe, as far as my google digging can tell, originally comes from Barbara Bakes though there are now a bazillion incarnations on the web. When I started baking, I saw I had a ton of bananas I needed to use up, so I figured I’d try making this into Snickerdoodle Banana Bread. I thought i was being sooooo original. Then, just before I got ready to post this, I googled it only to find out that 900000 other people were just as “original” as I was lol. Just goes to show that the old saw about there is no original thought, is rather true. Either way though, I was really pleased with how this turned out and 900000 versions aside, mine was still MY version. This is a nice moist bread and as I made it, has a really nice banana flavor along with a yummy cinnamon sugar one.

You know the drill…. 🙂

Snickerdoodle Banana Bread

  • 3 cups flour
  • 2 teaspoons baking powder
  • 1/2 teaspoon salt
  • 1 tablespoon cinnamon
  • 1 cup unsalted butter, room temp
  • 2 cups sugar
  • 1 cup mashed banana (about 4 medium)
  • 4 eggs
  • 1 tablespoon vanilla extract
  • 1 teaspoon banana flavoring (optional but adds flavor)
  • 1 cup sour cream
  • 1 bag Hersheys Cinnamon Chips
  • 2 tablespoons each of sugar and cinnamon, mixed
  1. Preheat oven to 350 degrees and either spray 2 loaf pans with Bakers Joy or grease them and lightly flour them.
  2. In a medium bowl, combine the flour, baking powder, salt, cinnamon chips and 1 tablespoon cinnamon.
  3. In a large bowl, cream together the butter and sugar. Add in the mashed banana and sour cream and mix well. Add in the vanilla extract and banana flavoring. Add the eggs, one at a time, beating well after each addition.
  4. Dump the flour mixture into the butter/egg mixture. Stir just until thoroughly combined. Don’t overbeat.
  5. Divide the batter evenly between the two prepared pans. Sprinkle the tops of the batters with the combined sugar cinnamon mix.
  6. Bake at 350 until the bread is golden brown and a skewer inserted into the center comes out clean. let cool in the pan for five minutes, then carefully turn out onto a wire rack to finish cooling.

Copyright Notice: From Cupcakes To Caviar images and original content are copyright protected. Please do not publish these materials anywhere without prior permission.


Lemon Poppy Seed Scones With A Honeyed Glaze

Lemon Poppy Seed Scones With A Honeyed Glaze

Lemon Poppy Seed Scones With A Honeyed Glaze


I’ve mentioned more than once that I was born and raised in Chicago. Right on “Da Sout’ Side” in the neighborhoods you didn’t want to be stuck in alone after dark. I didn’t know enough to be frightened then; it was just home.

One Winter, after my parents were divorced, I think when I was about 7 or so, my dad had us for the weekend. He and my older brother Steve used to play this driving game of sorts. Steve would have his eyes closed while dad drove and when dad pulled in, Steve had to say whether or not we were at our destination. or if dad had pulled in somewhere else. One day, a particularly snowy Chicago early evening, they were playing the game as my sister Sandra and I tittered every time Steve got it wrong. So then dad pulled into a random driveway and stopped the car. Steve guessed whether or not we were home (it escapes me now if he got it correct or not) and opened his eyes. They went through the typical “awwww mannnn” stuff and dad tried to start the car. It didn’t start. He tried again. Still didn’t start. There we were, with it getting dark outside, very gray, dreary and cold, in a strangers driveway, in a broken down car lol I wish I could tell you that the strangers invited us in, we all had hot cocoa and became fast friends, or even better that they came out with an Uzi,  they and dad got into a wild west shootout and we made the WGN news that night, but in truth, I don’t remember what happened. I know dad went to their door to ask to use the phone (WAYYYYYYYY before cell phones here. Remember, I’m old.) but I have no idea how we eventually got home or if dad got his car fixed. Lol. I am willing to bet however, that that game never got played again on a snowy cold night. 😛

Today has been dreary as all git out here in Kentucky. No snow unfortunately which would have made it worth it in my eyes, just very gray skies, cold weather and a ton of rain. I keep trying to tell myself that it is good for the trees we recently planted but I’m not convincing myself very well. So I had a baking therapy session. It’s hard to feel blah when surrounded by the scent of fresh lemon zest and then the scent of baking scones.

These scones are quite yummy if I do say so myself. They are also huge lol. I think next time I make these I will use a square cut and make about 12 of them rather than the 8 wedges. I used wedges out of habit but these are some big arse scones! But it’s easy to eat a whole one which is another reason to make them smaller hehe. They are just lemony enough; not tart but with that lovely lemon peel flavor. They aren’t overly sweet but the glaze adds a nice touch of sweetness to them and a bit of that tart lemon flavor many of us like.

These are simple to make and perfect for Christmas morning breakfast. Nothing can make a Winter day brighter than something citrus.

You know the drill. 🙂

Lemon Poppy Seed Scones With A Honeyed Glaze

  • 3 cups flour
  • 1 cup sugar
  • 4 tablespoons poppy seeds
  • 1 tablespoon baking powder
  • 1 teaspoon salt
  • 1 tablespoon lemon zest
  • 1/2 teaspoon Boyajian Lemon Oil (optional but highly recommended. If you can’t get any, add in an extra tablespoon lemon zest)
  • 2 teaspoons vanilla extract
  • 1 teaspoon almond extract
  • 10 tablespoons unsalted butter, chilled and sliced thin
  • 1 egg
  • 2 tablespoons lemon juice
  • 1 cup heavy cream
  • Glaze-
  • 1/2 cup honey
  • 1/2 cup powdered sugar
  • 1 tablespoon cream (more if you want a thinner glaze)
  • 1 tablespoon lemon juice
  1. Preheat oven to 375 degrees and lightly grease a cookie sheet.
  2. In a large bowl, mix together the flour, sugar, Poppy seeds, baking powder, salt and lemon zest. Make sure to mix well because lemon zest has a tendency to clump.
  3. In a medium bowl, combine the egg, cream, lemon juice, lemon oil and extracts. Set aside.
  4. Using a pastry blender, cut the butter into the flour mixture until it resembles coarse crumbs.
  5. Pour the entire bowl of cream mixture into the flour/butter mix. Use a fork to mix well, until the dough forms a bowl. The dough will be slightly sticky. Don’t be tempted to add more flour.
  6. Dump the ball of dough onto a lightly floured counter or board. Pat down into a circle about 3/4 of an inch thick. Cut the circle into 8 wedges and place next to each other, but not touching, on the prepared cookie sheet.
  7. Bake at 375 degrees until the tops of the scones are lightly browned (the edges and bottoms will look browner than the tops) and firm. Transfer to a rack to cool.
  8. For the glaze, simply mix together the glaze ingredients. Use a pastry brush to brush the glaze over the scones or dip each scone, top side down, into the glaze and let the excess drip off.

Copyright Notice: From Cupcakes To Caviar images and original content are copyright protected. Please do not publish these materials anywhere without prior permission.


Honey Blueberry Corn Muffins

Honey Blueberry Corn Muffins

Honey Blueberry Corn Muffins

Hello! I hope everyone had a wonderful Thanksgiving? We did here… too much food, then we followed that with some more food and after we were done, we had a little something to eat. Thanksgiving…. the holiday to be grateful for what you’ve got and gain 10 pounds in the process.

While I know no one is going to lose weight between now and the new year (do you believe it will be 2014 in less than a month!!?), I figured I would put up something that while delicious, isn’t quite a decadent as most of what I post. Still baked, still indulgent but not 4000 calories per bite :-D  By the way however, if you DO lose weight between now and the new year, please go away because I don’t like you anymore. Just sayin’ 😛

I have said before that I love cornbread, though I’m not a huge fan of sweet cornbread. So this recipe was right up my alley. It is mildly sweet (I’ll give an idea for making it a bit sweeter in the recipe, if you prefer it that way), tangy from the blueberries and wonderful warm spread with some butter. You also can’t get much easier than these. Five minutes and they are ready to be baked, so these are perfect for a weeknight bread side.

The baking oil from Boyajian I mention below? I was very kindly sent some of their products and I have to say, I love them. Their citrus oils are about as pure an essence of the real fruit as you will come by; no dilution with alcohol, just the fresh scent and taste of the fruit. You have GOT to try them. Trust me on this.

On a side note, am I the only weirdo who sees a dog wearing sunglasses in the top muffin? Lol.

You know the drill… 🙂

Honey Blueberry Corn Muffins

  • 1 1/4 cup flour
  • 3/4 cup cornmeal
  • 1 tablespoon baking powder
  • 1/2 teaspoon salt
  • 1/2 teaspoon lemon oil (use a good brand such as Boyajian. You can’t get much better than their oils and they are well worth the price
  • 2/3 cup milk
  • 1/2 cup honey
  • 1/4 cup sugar (optional; use this if you like a sweeter corn muffin)
  • 1/3 cup oil
  • 1 egg, slightly beaten
  • 12 ounce bag frozen blueberries ( this makes these chock full of berries. If you’d prefer less, just cut the amount in half)
  1. Preheat the oven to 375 degrees and either grease 12 muffin cups or line them with paper liners.
  2. In a large bowl, combine the flour, cornmeal, baking powder, sugar if using and salt. Stir to mix.
  3. In a small bowl, combine the milk, oil, honey, lemon oil and egg.
  4. Pour the liquid into ingredients into the dry ones
  5. Use a fork to combine, mixing just until combined. Overbeating muffin batter will result in tough muffins with tunnels throughout.
  6. Pour the batter evenly into the prepared muffin tin.
  7. Bake at 375 until the tops are light golden brown and a toothpick inserted into the middle of one comes out clean, about 15 minutes.
  8. Turn out onto a rack to cool. Best served warm dripping with butter and drizzled with some more honey. 😀

Copyright Notice: From Cupcakes To Caviar images and original content are copyright protected. Please do not publish these materials anywhere without prior permission.


Cinnamon Roll Coffee Cake

Cinnamon Roll Coffee Cake

Cinnamon Roll Coffee Cake

I have a confession to make… again. I have a lot of those, don’t I? When my brother, sister and I were kids, we would swipe money from my mothers coat pocket (she was a waitress and that”s where she hid her tips) and go to the corner store to buy junk food (I was the youngest so I blame them for corrupting me). It was usually either ice cream (Steve got vanilla, Sandra got Butter Pecan and I always got Neapolitan) or what we referred to as “pop and things”. Things were generally Hostess snacks; again, we all had our favorites. I got Ho Hos, San got Cupcakes and Steve got Suzy Q’s. Sometimes however, I would change it and with my ill gotten wealth, I would buy an entire Hostess coffee cake. You know the ones I mean. They were rectangular in shape with this white icing on top that was so slick and so plastic in texture that you could practically peel the whole thing off in one sheet. Which I did. And then ate. Often.  I have to admit, that until Hostess went out of business (and even though they are back, I’ve seen no signs of the coffee cake), I would still buy one every couple of years (using my own money now lol) and eat it. I no longer peeled off the icing and ate it, but I still loved them. Nasty, dry, preservative filled… but they were a taste of childhood. That’s all that mattered was the momentary chance to be 8 again… to be free of major life worries and also to not think about the empty calories.

Now however, I DO tend to make coffee cakes form scratch when I want them. I prefer yeast risen ones but every once in a while I just want one quicker. So when I saw this recipe in Cuisine magazine, I knew I wanted to try it. The idea of cinnamon roll flavor without the rolling and cutting was too much to resist.

Be warned- this is rather fussy in the prep for a coffee cake. Is it worth it though? Yes. If you like cinnamon, like sticky toppings and tender cake, you’ll find it worth the time and fuss. You will use more than one bowl, which I try to avoid but you can’t with this and you need to be quick turning this out onto a plate or the topping sticks to the pan. So basically, follow the directions I have here to a T and you should be fine. The changes I made to this were the addition of some orange zest, nutmeg and more cinnamon in the streusel as well as some vanilla extract, cinnamon and nutmeg in the batter as it didn’t call for any spice at all.

You know the drill…

Cinnamon Roll Coffee Cake

  • Caramel Topping-
  • 3/4 cups packed brown sugar
  • 1/4 cup heavy cream
  • 1 cup toasted chopped pecans
  • Streusel-
  • 1/2 cup packed brown sugar
  • 1/3 cup flour
  • 1/4 cup unsalted butter, cold
  • 1 tablespoon cinnamon
  • 1/2 teaspoon nutmeg
  • 1 tablespoon orange zest
  • 1/4 teaspoon salt
  • Cake-
  • 1 1/2 cups flour
  • 1/2 teaspoon baking powder
  • 1/2 teaspoon baking soda
  • 1/2 teaspoon salt
  • 1 1/2 teaspoons cinnamon
  • 1/2 teaspoon nutmeg
  • 1/2 cup buttermilk
  • 1/4 cup vanilla yogurt or plain sour cream (if you use Greek yogurt, use an extra 2 tablespoons buttermilk to offset the thickness of the yogurt)
  • 1 1/2 teaspoons vanilla extract
  • 2 eggs
  • 1/2 cup unsalted butter, room temp
  • 3/4 cup sugar
  1. Preheat oven to 350 degrees. Butter a 9 inch  cake pan or spray with cooking spray.. Make SURE to use a 2 inch deep pan, not the typical 1 1/2 deep one. I found mine at Target so I have now given you a good excuse to go shopping at Target 😀 if you use a shallower one, it WILL overflow.
  2. In a small bowl, mix together all your caramel topping ingredients except the pecans; stir well to mix. Spread in the prepared pan, sprinkle the pecans on top and wash the bowl; trust me, otherwise you’ll finish this and have 628 bowls to wash :-p
  3. For the streusel, whisk together the brown sugar, flour, spices and orange zest in a small bowl. Using a pastry blender, cut in the cold butter until fine crumbs form. Set aside.
  4. For the cake, combine the flour, spices baking powder, salt and baking soda. Set aside.
  5. In a large measuring cup, whisk together the buttermilk, yogurt or sour cream, eggs and vanilla. Set aside.
  6. In a large bowl (hey, I warned you about all the bowls 😛 ) cream together the 1/2 cup butter and the 3/4 cup sugar just until combined. Alternately add the flour mixture and the buttermilk mixture, starting and ending with the flour mix. Only beat until just combined each time.
  7. Spoon half of the batter  on top of the topping in the pan. Smooth to the edges (I started with a rubber spatula for this but ended up using my clean finger. it worked better.) then sprinkle on half of the streusel. Spoon on the rest of the batter, smooth, then sprinkle on the rest of the streusel.
  8. Bake cake at 350 degrees for 50 to 60 minutes or until a toothpick (or my usual one; a wooden skewer) comes out clean.
  9. Leave in pan for only about 2 minutes; then run a knife along the edge to loosen it and quickly invert it onto a plate. If any of the topping sticks to the pan, scrape it off and smooth it onto the top of the cake. Either finish cooling or eat it while it’s nice and toasty warm.


Copyright Notice: From Cupcakes To Caviar images and original content are copyright protected. Please do not publish these materials anywhere without prior permission.


Amish Shoofly Pie Muffins

Amish Shoofly Pie Muffins

Amish Shoofly Pie Muffins


One of my most liked/pinned posts has always been the one for Amish Sugar Cake. In today’s world, it makes perfect sense that that one would be popular. Whether or not it’s 100% accurate (I mean, they are human too and I’m positive life isn’t some romantic ideal for them either, just would be in different ways), the Amish have the reputation for leading simple lives with less conflict, less heartache and less stress. We who survive in the “modern world” are dealing with wars, a political climate (in the U.S.) that is dividing our country’s people, an economy that is getting steadily worse, and so on and so forth. This makes it very easy to yearn for simplicity,  for no technology to invade our lives, for what we all think of as the days of old.

Plus the Amish also have a well earned reputation for fantastic food. It’s the type of food my blog is aiming for; simple but not boring, homey, comforting, stick to your ribs foods. One of the classic Amish dishes is Shoofly Pie. I admit to never having tried it because I was afraid it would be far too sweet. But when I saw this recipe for Shoofly Muffins on the  Mr. Food site, I knew I wanted to try them. I mean, you have automatic portion control (in theory anyway. I take no responsibility if you eat six of them), plus even if it’s sweet, it’s a small muffin.

These are a cinch to throw together and they are really really good. The top and edges gets all crispy chewy and the muffin itself is soft and tender. The flavor is mildly reminiscent of gingerbread so if that’s a flavor you like, you’ll like these.

You know the drill… 😛

Amish Shoofly Pie Muffins

  • 2 cups flour
  • 1 1/2 cups dark brown sugar
  • 2 teaspoons cinnamon
  • 1 teaspoon baking soda
  • 1/4 teaspoon salt
  • 5 tablespoons butter, chilled and sliced thin
  • 1 cup boiling water
  • 1/2 cup molasses
  • 3 tablespoons oil
  • 1 1/2 teaspoons vanilla extract
  1. Preheat your oven to 350 degrees and either line cups with liners or spray with something like Bakers Joy to prevent sticking.
  2. In a large bowl, combine the flour, brown sugar, baking soda and salt. Mix well.
  3. Add in the sliced butter and using a pastry blender or your fingers, cut the butter into the mixture until it resembles fine crumbs. Set aside 1/2 cup of the mix.
  4. Add the boiling water to the rest of it all at once, Add in the molasses, vanilla and oil. Stir well.
  5. Spoon into the prepared muffin cups, about 2/3 full n each. Sprinkle evenly with the reserved crumb mixture.
  6. Bake at 350 for about 25 minutes or until a wooden skewer inserted in the center comes out clean. let cool in the pan for ten minutes, then turn out onto a rack to finish cooling.
  7. These are wonderful still warm, with a ton of little butter spread on them.

Copyright Notice: From Cupcakes To Caviar images and original content are copyright protected. Please do not publish these materials anywhere without prior permission.


Maple Pumpkin Bread With Maple Glazed Pepitas

Maple Pumpkin Bread With Maple Glazed Pepitas

Maple Pumpkin Bread With Maple Glazed Pepitas

Up until recently, Starbucks and I were very good friends. We had sleepovers, braided each others hair, talked about boys and cried together over all the other mean coffee places. Then one day, I cheated on my friendship with Starbucks. I found a NEW bff. It’s name was The Daily Grind. I played there one day on a whim and well, I’m ashamed to say, that after that, I never gave Starbucks coffee a second thought. Though every once in a while, I go back there for nostalgia’s sake. But Starbucks can’t make Milky Way Lattes; The Daily Grind can.

There’s one problem with this new relationship however. My new bff coffee place doesn’t sell baked goods. Oh, they have some wrapped stuff that was mass produced in somewhere like Taiwan, the best place ever to get fancy pastries :-p  But they don’t have the pumpkin bread you can get at Starbucks.  I can’t go to Starbucks anymore though. They all look at me funny, like I’m wearing a big red letter A on my chest. It’s just too awkward, too painful remembering the good times *sobs a little and takes a sip of my Milky Way Latte to calm down*

So what did I do? I made my own. Yes, you heard that right, Starbucks!!! I don’t need your  high priced pumpkin bread anymore! I have no reason to come crawling back to you groveling for forgiveness just so that I can sneak a piece of pumpkin bread. Buahahaaaaaaa!!! Guess what else? My pumpkin bread? It’s better than yours. Yep. Better. It’s moist and spicy and pumpkiny (yes, that too is now a word. I swear, the world needs ME to revise the dictionary. Language would be so much more interesting.) with a hint of maple in the bread. It’s also not as overly sweet as your bread and MINE is covered in sweet/salty maple glazed pepitas. Take THAT, Starbucks!

Sorry. I’m calm now. You all know how those break up moments can be, right?

You know the drill….

Maple Pumpkin Bread With Maple Glazed Pepitas

  • 3 cups flour
  • 2 teaspoons baking soda
  • 1 teaspoon baking powder
  • 1 teaspoon salt
  • 4 teaspoons cinnamon
  • 1 1/2 teaspoons ground ginger
  • 3/4 teaspoon ground cloves
  • 3/4 teaspoon ground allspice
  • 3/4 teaspoon ground nutmeg
  • 7 eggs
  • 4 tablespoons molasses
  • 1 tablespoon vanilla extract
  • 1 1/4 teaspoons maple flavoring
  • 1 3/4 cups sugar
  • 2/3 cup dark brown sugar
  • 1 16 ounce can pumpkin (NOT pumpkin pie filling)
  • 1 3/4 cup vegetable oil
  • 1/2 cup dry roasted Pepita’s
  • 3 tablespoons pure maple syrup
  1. Preheat your oven to 350 degrees. Grease and flour two 9 inch loaf pans (or use a product such as Bakers Joy and spray them)
  2. In a large bowl, combine the flour, baking powder, baking soda, salt, regular sugar and spices.
  3. In another large bowl, at low speed with a hand mixer, combine the eggs, molasses, brown sugar, vanilla extract and maple flavoring. Mix well. Pour in the vegetable oil and the can of pumpkin in and mix well.
  4. Pour the dry ingredients into the bowl of wet ones and mix at low speed just until well combined. It’s fine if there are some small lumps left.
  5. Divide the batter evenly between the two loaf pans.
  6. In a small bowl, toss the pepitas with the maple syrup. Sprinkle evenly between the two pans of batter.
  7. Bake at 350 degrees until a wooden skewer inserted in the center of the bread comes out clean, with at most a few loose crumbs on it.
  8. Cool in the pans set on a rack for five minutes.
  9. Loosen the breads from the pans by running a butter knife around the edges then turn the loaves out onto the rack to finish cooling.

Copyright Notice: From Cupcakes To Caviar images and original content are copyright protected. Please do not publish these materials anywhere without prior permission.


Honey Oatmeal Wheat Bread

Honey Oatmeal Wheat Bread

Honey Oatmeal Wheat Bread


I’ve mentioned before that I’m not a huge store bought bread sort of a person. I prefer my carbs in junk food form, preferably with a label that says “Ben & Jerry” or “Brachs Juicy Berries Gummi Candy” (yes, I’m still addicted to those.) I DO however, love artisan breads, good bakery breads or homemade breads. In a nutshell? I’m a bread snob. Well, confession time, unless I’m having Chicago public school flashbacks and craving a ham sandwich on mushy store bought white bread spread with butter. Don’t judge.

So, all of that said, I rarely have the budget for the good artisan breads that a lot of grocery stores carry now and I don’t live near a bakery. So if I want good bread, I have to make it myself. I’ve been baking bread long enough now that I am able to play with recipes without ending up with a disaster so that’s what I did here. I took a recipe I’ve had for years for oatmeal bread/rolls and mixed it up a bit. The results were completely awesome! This bread tastes great, not as strongly flavored as whole wheat would be but not as bland as white bread. It has a mild nutty flavor from the oats and the wheat flour. And the texture is out of this world. It is soft, ALMOST but not quite as soft as store bought which will please the mushy bread addicts lol. Yet it has a nice chewy bite to it and a density to please those of us who like breads with more character. Another plus is that the wheat gluten keeps it fresh longer plus adds a bit to the texture. I have it listed as optional but you really really need to buy some. It’s inexpensive and worth getting.

You know the drill. 🙂

Honey Oatmeal Wheat Bread

  • 4 1/2 to 5 1/2 cups bread flour
  • 1 1/2 cups whole wheat flour
  • 1 1/2 cups old fashioned oatmeal  plus extra for sprinkling on the loaves
  • 2 tablespoons Vital Wheat Gluten, optional but highly recommended (you can find it in the flour aisle, usually on the top shelf. It contributes a LOT to bread texture and freshness so please buy some.)
  • 2 packs dry yeast (I use the Red Star Platinum yeast)
  • 1 tablespoon salt
  • 2 cups milk, warmed to between 115 and 120 degrees (NO hotter)
  • 4 tablespoons unsalted butter, room temp
  • 1/3 cup warm water
  • 1/2 cup honey plus more for brushing on top of loaves
  • sea salt for sprinkling on top
  1. Lightly grease two 9 inch loaf pans and set aside. In the bowl of a stand mixer, combine the wheat flour, 4 1/2 cups of the bread flour, oatmeal, yeast and salt. Mix well on low speed.
  2. Combine the milk and butter in a measuring cup. Stir to melt the butter, then add in the warm water and the honey. Pour this over the flour mixture, and using the dough hook, mix on low speed until it all comes together as a dough. Knead for about 2 to 3 minutes on low. If the dough is still more than just a LITTLE bit sticky and tacky, add more flour, 1/2 cup at a time. Machine knead after each addition for a minute or so, then check stickiness again. You want a nice firm but not dry dough. Your finger should just barely stick to it and it should have a sheen rather like what a semi gloss paint looks like when dry.
  3. Turn the dough out into an oiled bowl, turning it once to make sure all sides get the oil on them. Cover with a clean towel and put somewhere warm to rise. I usually turn my oven to it’s lowest setting, then turn it off after about 2 minutes of preheating. That leaves it a nice warm 80 degrees or so which is a perfect rising temp. Let it rise until it is doubled in bulk, about 60 to 90 minutes.
  4. When it’s doubled, punch it down (that’s always the fun part hehe) and divide it into two equal pieces. Start your oven preheating to 350 degrees. Now you can go one of two ways.
  5. First way to shape your dough is free hand- just…well, shape it into a dough shape. Not hard and the pro of it is it leaves you with less seams to pinch shut. it’s usually how I shape my loaves. Con is it takes some time to learn to free hand shape and not have a misshapen loaf.
  6. Two is to roll or pat the dough out into about a 9 inch rectangle and then roll it up tightly and pinch shut the seams with a damp finger. Pro to that is a prettier loaf (unless you miss a seam like I did on the one loaf in the photo…oops), con is if you don’t roll tightly enough, you end up with a loaf that has a hole running through the middle.
  7. Either way you go, shape the dough into two loaves and place in the prepared pans.
  8. Warm up about 1/4 cup of honey until it’s liquidy. Brush it evenly over the two loaves. Sprinkle with some extra oats and then with some coarse grained (I use kosher, same kind you see on pretzels) salt. Let the bread rise again in a warm place (NOT in the preheating oven lol) for 30 minutes or until it is almost doubled in bulk
  9. Bake at 350 degrees until the bread is golden brown and crusty looking, about 45 to 55 minutes.
  10. Let cool in the pan for five minutes, then turn out onto a rack to finish cooling, though we all know half a loaf, at least, won’t make it to cooled before it gets eaten hehe.
  11. When cooled, what doesn’t get eaten can be stored in ziploc bags for a few days. I made mine 4 days ago and it’s still wonderfully soft and fresh. THAT is why you need to buy the vital wheat gluten. Trust me on this.

Copyright Notice: From Cupcakes To Caviar images and original content are copyright protected. Please do not publish these materials anywhere without prior permission.


Herbed Onion, Shallot & Cheese Bread

Herbed Onion, Shallot & Cheese Bread

Herbed Onion, Shallot & Cheese Bread

I love baking. I betcha never knew that, did you? I run a quiet little blog full of main dish recipes, vegan yummies (is it just me or the phrase “vegan yummies” a total contradiction in terms? hehe) and no baking whatsoever. or something like that. But really… I do love to bake. I don’t bake so that I have something to post on the blog. I blog because I love to bake. There is something about combining a bunch of ingredients, tossing them into a pan and creating something homey and comforting that appeals to the nurturer in me. And I love to share the recipes. And watch you all get fat with me. And buy stock in “fat girl pants” companies.

I especially love baking this time of year. Doesn’t most everyone? that whole colder weather, cozy house, yummy smells thing is great incentive. It’s also great incentive to buy a treadmill and a gym membership, but we won’t go there. Please see above about that stock option idea. 😀

My house smells amazing right now. I swear, one of the best smells ever is practically ANYTHING made with either cheese or onions. So combine cheese and onions with shallots, more cheese, Herbes De Provence, more cheese and make it all into a loaf of quick bread, and Janet is one happy camper. In all reality, I’d probably be a  miserable camper unless said camp had a jacuzzi tub, king sized bed, room (campfire) service and the campfire was a large fireplace overlooking either the mountains or the ocean. Ahhh, daydreams. They make life worth living, huh?

If you like savory quick breads and need something fairly quick to serve with dinner (or lunch or breakfast or a midnight snack) give this a try. Beyond the fact that I promise that your house will smell divine, this tastes so good. the top is slightly crispy form the cheeses, then you get the soft tender inside with more cheese and the flavor of the shallots, onions and garlic. This is great by itself. I can also see it going well with a bowl of soup or stew as the weather gets cooler. Shovel a boatload of butter on there (use two boatloads… I won’t tell) and eat half the loaf. I won’t tell if you do that either. I’ll just be counting my money from the fat girl pants stock.

Herbed Onion, Shallot & Cheese Bread

  • 2 1/4 cups flour
  • 4 and a half teaspoons baking powder
  • 1 teaspoon salt
  • 3 tablespoons unsalted butter, cold
  • 1 cup sharp cheddar cheese, divided
  • 3/4 cup fresh grated Parmesan cheese, divided
  • 2/3 cup diced onion
  • 2 shallots, diced
  • 2 cloves garlic, minced
  • 1/2 cup chopped green onions
  • 1 tablespoon unsalted butter
  • 1 egg
  • 1 egg yolk
  • 3 tablespoons vegetable oil
  • 1/2 cup milk
  • Preheat oven to 375 degrees. Grease and flour (or use a cooking spray) a 9 inch loaf pan.

1)- In a large bowl, combine the flour, baking powder and salt. Using a pastry blender, cut in the 3 tablespoons unsalted butter until fine crumbs form. Add in 3/4 cup of the cheddar cheese and 1/2 cup of the Parmesan cheese and the green onions. Stir well to combine.

2)-I n a small pot, melt the one tablespoon butter. Saute the onions (just the regular onion, not the green onion), shallots and garlic over medium heat, stirring frequently, until soft and tender. Remove from heat and let cool for five minutes.

3)- When cool, add the milk to the onion mix. Stir well, then add the egg, egg yolk and vegetable oil. Stir.

4)- Pour the onion mixture into the center of the bowl of flour. Using a wooden spoon (not a mixer) mix just until thoroughly combined and there are no dry spots left. This is a thick almost biscuit like dough so don’t expect it to be pourable.

5)- Dump the dough into the prepared loaf pan and pat down, smoothing the top.

6)- Sprinkle with the reserved cheese.

7)- Bake at 375 degrees for about 30 minutes or until the top is golden brown and a skewer inserted into the middle comes out clean. Let cool in the pan for 2 minutes, then turn out onto a wire rack to finish cooling.

Copyright Notice: From Cupcakes To Caviar images and original content are copyright protected. Please do not publish these materials anywhere without prior permission.

Raspberry Coconut Sweet Rolls With Orange Cream Cheese Icing

Raspberry Coconut Sweet Rolls With Orange Cream Cheese Icing

Raspberry Coconut Sweet Rolls With Orange Cream Cheese Icing


What kind of idiot bakes in 90 degree weather, while living in a house with a central air unit that hates to go below 80 degrees inside when it’s hot outside!!? What kind of idiot I ask you!!??

Erhmmmm *looks sheepish*, that would be me.

I can’t help it! It’s a sickness. Many many food bloggers have it. We tell you and ourselves that it is all because we love you and want to create yummy things for you to drool over but in reality we’d bake anyway. Like I said, it’s an illness.

And ill is what I’m going to be if I keep shoving these sweet rolls into my chubby mouth. But oh my gosh, I’m rather proud of myself here. These are delicious! You get a tender sweet roll with a touch of coconut flavor in it, then the raspberry/coconut filling with it’s tang and mild crunch, then the rich creamy orange cream cheese icing. When this idea first came to me (lying in bed, trying to get to sleep. Many ideas come to me then. I’m strange.), I wasn’t sure how it would work. I was afraid that all of the flavors would clash with each other but they don’t do that at all. As a matter of fact, this will be going down as one of my favorite ways to make a sweet roll.

You know the drill. Git to cookin’.

Raspberry Coconut Sweet Rolls With Orange Cream Cheese Icing

  • Sweet Roll Dough-
  • 2 packages dry yeast
  • 1/4 cup warm water (about 110 degrees)
  • 1 cup milk, warmed (about 110 to 115 degrees)
  • 1 teaspoon vanilla extract
  • 2 teaspoons coconut extract
  • 2/3 cups sugar
  • 2 teaspoons salt
  • 1/2 cup unsalted butter, room temp
  • 3 eggs
  • 5 1/4 cups to 5/12 cups flour (you can use bread flour or all purpose- I use bread flour when making almost any yeast dough)
  • Filling-
  • 12 ounces raspberry preserves
  • 12 ounces fresh raspberries, rinsed, drained and gently blotted dry
  • 1 7 ounce bag sweetened grated coconut, toasted at 350 degrees until light brown
  • Icing-
  • 1 8 ounce package cream cheese, room temp
  • zest of one large orange (about 3 tablespoons zest)
  • 4 tablespoons fresh orange juice
  • 1/2 teaspoon orange extract
  • 2 to 2 1/2 cups powdered sugar
  1. Preheat oven to 150 then immediately turn it off. The purpose is to have a nice warm oven to proof the dough in but not to have it too hot. Butter 2 9 inch round cake pans (or one 13×9 inch baking pan) and set aside.
  2.  In a small bowl, combine the yeast and warm water. let sit for about 5 minutes to activate the yeast.
  3. In the bowl of a stand mixer, fitted with the paddle hook (can all be done by hand but it makes it a bit more work and work scares me 😛 ), combine the milk, extracts, sugar, salt and butter. On low speed, mix just until combined.
  4. Pour in the yeast mixture and again, mix just until combined. Change over to the dough hook, then add 2 1/2 cups of the flour. Beat on low speed until it is a shaggy mass. Add another 2 1/2 cups of flour and mix on low speed for about 2 minutes. Feel the dough and if it it is still very sticky or tacky, add about another 1/4 cup of  flour. You want the dough to be just a tiny bit sticky, not enough that it sticks to your hands or fingers. By the same token, you don’t want dry dough because that equals dry finished product. Either way, beat on low speed until the dough is smooth, silky and has come away from the bowl in a solid mass, about 5 minutes.
  5. Dump the dough out onto a lightly floured board. Knead for just a minute (that is the reason you did all this in a stand mixer, so you didn’t have to knead by hand) then put into a greased bowl, turning it so that all sides are greased.
  6. Cover with a damp cloth and put into the previously preheated, now nicely warm oven. Let rise until it has doubled in bulk, about 45 minutes.
  7. Punch dough down and then turn out onto a lightly floured board or counter. Roll it into a rectangle that is roughly 28 by 12 inches.
  8. Spread the dough with the raspberry preserves. Then sprinkle all but 2/3 of a cup of the toasted coconut on top of the preserves. Then place the fresh raspberries on top of that.
  9. Starting at one of the long ends, carefully roll up the dough into a tight log. Don’t squeeze too hard though or you’ll squeeze out the preserves.
  10. Cut the log into 16 large rolls. Place them in the prepared pan(s) Preheat the oven to 350 degrees. Again allow the dough to rise in a warm place (NOT the oven) until doubled in bulk, about 30 to 45 minutes.
  11. Meanwhile, make the icing- In a medium bowl, combine the cream cheese, orange zest and orange juice. Beat at medium speed until smooth.
  12. Add in the 2 cups powdered sugar and at LOW speed (unless you like being covered in sugar), beat until smooth and creamy. Add  in another half a cup sugar if the icing is too thin to spread. Cover and set aside.
  13. Bake the rolls at 350 degrees until they are golden brown, about 25 minutes. Set on a wire rack to cool completely.
  14. When cool, frost with the cream cheese icing (if you haven’t already eaten most of it straight from the bowl 😀 ) then sprinkle with the reserved toasted coconut.

Copyright Notice: From Cupcakes To Caviar images and original content are copyright protected. Please do not publish these materials anywhere without prior permission.