Caramel Apple Toffee Dip

Caramel Apple Toffee Dip

Caramel Apple Toffee Dip

My family has a serious apple addiction. We are equal opportunity fruit lovers but apples always seem to be eaten the most by the guys in the house. Well, except for my husband for whom fruit means Blueberry flavored coffee, though I CAN get him to eat some if it’s cooked or covered in homemade caramel :-P. We’re working on the line between good for you and dessert with him. But the rest of us love it. As I age, I unfortunately have to cut my apples up before I eat them because aging teeth and jaws don’t do whole ones well lol. I look like a mouse trying to eat an elephant whole  Excuse me while I go get my walker and take some Geritol, you young whippersnappers!

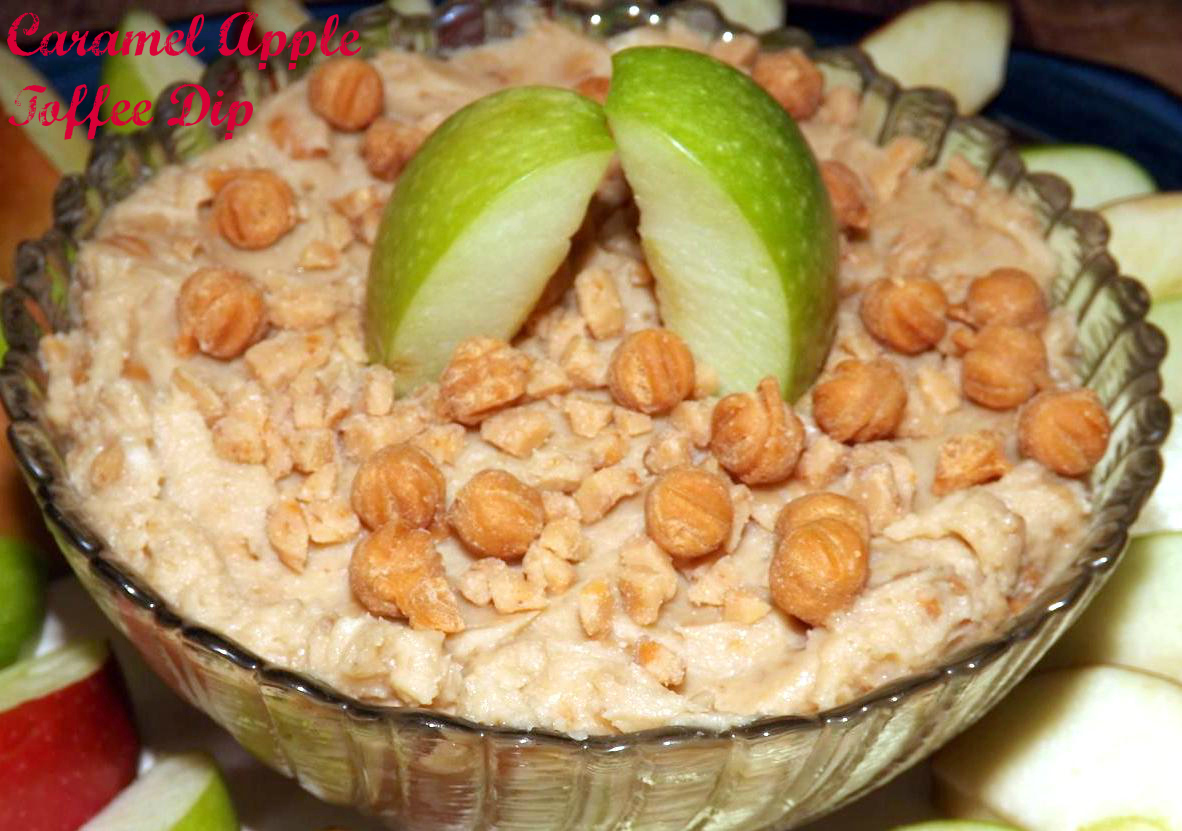
Which brings this dip into play. There are variations of  this all over the web. I won’t claim to be the first nor will I claim that the changes I made make this into an entirely new dip and oh my gosh, I’m unique! Lol. That wasn’t the point. I saw it, I thought it sounded yummy and figured some of you would like it too. I DID make some changes, one of which was to add some Kahlua to this, making it a perfect treat for an adult Halloween party or a fruit tray some other time of the year (Christmas buffet maybe?). But you can easily omit the booze and make this kid friendly. Just pour the small amount of Kahlua into a cup and drink it yourself. 😀 See how I make your day better? I also added some caramel bits to it to make this even more of an Autumnal treat. The toffee chips and the caramel combine so well with the apple slices. The original recipe called for cream cheese but 1) I adore Mascarpone and 2) I had some I needed to use up, but feel free to sub cream cheese in this. This is good when it’s first made but it’s even better when the flavors have time to meld and the toffee chips get softer. YUMMY! Also, this isn’t just good with apples. Try some on a cinnamon bagel or one of the limited edition (out right now) Pumpkin Spice Bagels. Oh, my gosh, it’s good. It kind of melts right into it and…*swoons*

You know the drill… git to cooking! Or erhmmmm, mixing in this case.

Caramel Apple Toffee Dip

  • 8 ounces mascarpone or cream cheese, room temp
  • 1/4 cup dark brown sugar
  • a scant 1/4 cup sugar
  • 1 teaspoon vanilla extract
  • 2 tablespoons Kahlua (optional)
  • 3/4 cup toffee bits (in the baking aisle near the chocolate chips)
  • 1/2 cup Kraft Caramel Bits
  • sliced apples for dipping (dip them in a lemon juice/water mix to prevent browning)
  1. In a medium bowl, combine the mascarpone (or cream cheese), both kinds of sugar, the vanilla and the Kahlua if using. Beat well, until smooth and creamy.
  2. Fold in the toffee bit and the caramel bits.
  3. Sprinkle top with more toffee bits and caramel.
  4. Serve with the apples for dipping or just sit down in front of the TV with a spoon and the bowl. I won’t tell. But I’m also not buying you any new fat girl pants. Just sayin’.

Copyright Notice: From Cupcakes To Caviar images and original content are copyright protected. Please do not publish these materials anywhere without prior permission.


Browned Butter Vanilla Bean Pound Cake

Browned Butter Vanilla Bean Pound Cake

Browned Butter Vanilla Bean Pound Cake


Years back, when I was still in the learning stages of baking, not to mention more broke than a Timex watch that was stepped on by an Elephant (I don’t care what the commercials said back in the day. if an elephant steps on your watch, it’s broken.), I used to use imitation vanilla. It was inexpensive, it smelled vanilla-y enough to me and I didn’t realize (nor would I have cared back then when I was young and stupid) that it is made from wood pulp. Yum. Vanilla wood cake. Wood ice cream anyone? Then, as I learned more and my budget expanded a little, I would get the real vanilla. If you’re one of those who thinks they are both ok, do me a favor just one time. Buy a bottle of real vanilla, then cover your eyes and have someone wave them, one at a time, under your nose. You will know IMMEDIATELY (unless you can’t smell, or are drunk, or have a cold, or forgot to take the clothespin off your nose when you were ten and trying to get a laugh and your mom was right; your face froze that way, in which case I’m sorry) which one is real and which is fake.

Now however, while I still use real vanilla extract in most things, I also have a stash of vanilla beans I keep around. I use those sparingly because they are as expensive as all hell, but oh so worth it for aroma alone. You can buy some on Amazon. Do NOT buy the ones in the glass bottle from McCormick at the grocery store. I normally love their products but not the vanilla beans. You may as well cook with a twig as hard and flavorless as those are.

This cake came about because of my love for both vanilla and browned butter. The two flavors make practically anything taste better. Except liver. Liver is hopeless. I used a basic whipping cream pound cake recipe and subbed in browned butter for the regular and vanilla bean (as well as extract) for just extract. I also added TOUCH, just a touch, of lemon. I wanted a complementary flavor to bring out the vanilla, but not overpower it. It is NOT a lemon pound cake so if you see lemon in there and think it will be, you’ll be disappointed. The lemon is there, but it’s subtle which is what I wanted. If you want more lemon, double the amount of lemon in the batter and use lemon juice in the glaze instead of cream. This isn’t a spur of the moment cake to make for dinner three hours before serving time. You need to chill the butter after browning plus the cake itself will taste better and cut better if you leave it alone overnight, same as with any pound cake.

You know the drill…

Browned Butter Vanilla Bean Pound Cake

  • 1 1/2 cups unsalted butter
  • 3 vanilla beans
  • 2 1/3 cups sugar
  • 6 eggs
  • 2 3/4 cups flour
  • 1 cup heavy cream
  • 1 1/2 teaspoons vanilla extract
  • 1/4 teaspoon lemon extract
  • 2 teaspoons lemon zest
  • 1 tablespoon lemon juice
  • Glaze-
  • 2 1/4 cups powdered sugar
  • 1 1/2 teaspoons vanilla extract
  • 1/4 cup heavy cream
  1. Place the butter in a medium saucepot. Cook over medium high heat, stirring frequently, until it is a golden brown color. Take off of the heat immediately as it can go from golden to black in a second.
  2. Pour the butter into a glass bowl and set to the side.
  3. Split the vanilla beans in half and carefully scrape out all of the seeds. Scrape all of the seeds into the bowl of butter and stir well to mix. Refrigerate the butter for about 45 to 70 minutes, just long enough where when stirred, it is the consistency of softened butter.
  4. Preheat oven to 325 degrees. Butter and flour a a ten inch bundt pan or use Bakers Joy and spray the pan well. Scrape the butter into a large bowl, making sure to get all the little bits from the bottom of the bowl. Add in the sugar and beat well. Add the eggs, one at a time, beating well after each addition. Add in the extracts, lemon zest and lemon juice; beat well.
  5. Add the flour alternately  with the cream, about a third at a time of each, beating well after each addition.
  6. Pour the batter into the prepared pan and bake until a skewer inserted into the center comes out mostly clean, with just a few moist crumbs on it, about 90 minutes.
  7. Cool for 30 minutes in the pan on a rack, then use a butter knife to loosen the cake from the edges of the pan and invert onto the rack to finish cooling.
  8. For the glaze, pour the vanilla into the cream. Whisk this into the powdered sugar in a small bowl until smooth and creamy. If it’s too thick, just add more cream, a tablespoon at a time, to get the desired consistency. Slowly pour over the cake.

Copyright Notice: From Cupcakes To Caviar images and original content are copyright protected. Please do not publish these materials anywhere without prior permission.


Caramel Apple Bread Pudding

Caramel Apple Bread Pudding

Caramel Apple Bread Pudding


I’ve said before, and will probably say again because I’m getting old and like redundancy, that I used to have a love/hate relationship with bread pudding. Back before the world grew so much smaller (or larger depending on ones perspective) with the internet, recipes for bread pudding consisted of stale white bread, soaked in a custard base of plain milk. Raisins and cinnamon were usually added and then it was baked. British nursery food to the max. Great thing to feed a small child who likes bland or an invalid or say, someone with no taste buds who is also blind and can’t see the mushy mess in their bowl. The rest of us however would probably prefer something with a little oomph to it, some flavor, more than just soggy bread. And nowadays you can find whatever kind of bread pudding trips your trigger, including savory ones for that matter. But I prefer the sweet kinds for the most part.

So, being the time of year it is, I wanted to make one that fits the season and the flavors people love this time of year. If I do say so myself, I outdid myself with this one. This is sweet but not too sweet, crispy at the edges, covered in delicious satiny caramel as well as caramel bits inside plus tart sauteed apples all through it. This is damn good! It makes a ton though (you have to remember I have teen boys lol) so cut it in half if you’re not feeding a small country. I got a 2.5 quart baking dish and 3 ramekins from this. When I invent, I invent big lol.

You know the drill… 🙂

Caramel Apple Bread Pudding

  • 8 large apples, peeled and chopped into bite sized chunks (I used Braeburn apples)
  • 1/2 cup unsalted butter
  • 1/2 cup sugar
  • 1/2 cup cream
  • 1 teaspoon cinnamon
  • 1 loaf Kings Brand Hawaiian Bread, cut into about one inch pieces
  • 6 eggs
  • 1 1/2 cup heavy cream
  • 1/2 cup milk
  • 1 tablespoon vanilla extract
  • 1/2 cup sugar
  • 1/2 cup dark brown sugar
  • 1 jar ( 12.25 ounces) caramel topping (or you can make homemade caramel sauce I simply went the easy route this time)
  • 1 bag Kraft caramel bits
  1. In a large pan, melt the butter. Add in the apple chunks and over medium heat, stir to blend with the butter. Cover the pan and turn the heat to medium low (about 3 on an electric stove). Let the apples cook until soft and about half of them have broken down and turned saucy. Stir in the cinnamon.
  2. Add the 1/2 cup sugar into the pan. Stir well. Pour in the 1/2 cup cream and cook over medium heat until the cream has cooked into the apples. Remove from heat and set aside.
  3. In a large bowl, beat the eggs until foamy. Pour in the 1 1/2 cups heavy cream, 1/2 cup milk and the vanilla extract. Whisk in the 1/2 cup sugar and 1/2 cup brown sugar. Dump the bread pieces into the cream mixture and stir well. Press down with a spoon to make sure all the bread is submerged in the liquid. Let sit for anywhere from 30 minutes to 60 minutes.  Pour the bag of caramel bits into the bread mixture and stir well.
  4. Meanwhile, preheat oven to 325 degrees. Grease either a 3 quart baking dish or a 2.5 quart dish and 3 8 ounce ramekins with butter.
  5. Pour half the pudding into the prepared pan(s). Cover with half the jar of caramel topping. Cover with another layer of pudding and more caramel sauce. If doing a 3.5 quart dish and ramekins, I’d suggest filling the ramekins first so you don’t end up with too much in the baking dish. Put a 13×9 inch pan half filled with hot water on the bottom rack of the oven.
  6. Bake pudding at 325 degrees for about 45 to 55 minutes for the ramekins (if you insert a butter knife in the middle and twist it, there should be no liquid there, just a moist pudding) and 90 minutes for the baking dish (same test for doneness)
  7. Let cool a little and serve warm, drizzled with more caramel sauce. Can also be served chilled. Reheats well in the microwave.

Copyright Notice: From Cupcakes To Caviar images and original content are copyright protected. Please do not publish these materials anywhere without prior permission.


Pumpkin Cheesecake Streusel Bars

Pumpkin Cheesecake Streusel bars2

I remember Thanksgiving when I was a kid. I’ve mentioned before that my mom was not much of a cook. In her defense, as I’ve said, she was a single mom who worked ungodly hours and even had she been home, it just wasn’t her passion. Thanksgivings that I remember were fairly rushed because her long term b/f worked as a train engineer and we always had Thanksgiving dinner at like 2pm so he could get to work. Always pissed off my brother, sister and myself. I think that, being the children of divorce, we wanted that whole Norman Rockwell ideal on holidays and that just doesn’t happen in real life. I remember a fairly dry turkey, stuffing that was actually pretty good, mashed taters, the ubiquitous sweet potatoes covered in marshmallows which I still love, (on a side note, I remember the year my brother wanted something different and made sweet potatoes with oj in them and no marshmallows. No one ate them lol. Sorry, Steve.), plus two store bought pies- pumpkin and pecan.

Nowadays, even before I blogged, I go a bit more all out. Holidays give me an excuse to make all those seasonal things that I’ve had tabbed in cookbooks and magazines for like 37 years. The end result is enough food to feed 478 people which was great when I had a ton of people at home, not so much now, especially this year when there will be only 5 of us here. But will that stop me? No. I’ll still make far too much and be grateful we are able to do so. That will include a pumpkin pie or two, a pecan pie and quite possibly this cheesecake.

One of the holiday-ish recipes I have had tabbed forever was this recipe. I found it in a 2006 issue of Bon Appetit, their 50th anniversary issue which was pretty awesome as magazines go.

Now, if you try this, like I told my husband, remember, this is a cheesecake, not a typical pumpkin pie. So it’s tangier and the texture is different. But trust me, this is NOT a bad thing. The crust and the topping are one and the same, just used differently. Both are crunchy, sweet enough to be a good foil to the filling and topping and just plain yummy. The filling is creamy, spicy, slightly tangy and nice and pumpkiny.  I doubled the recipe (because it used only a partial can of pumpkin and I HATE that) and added a good bit more in the way of spices as well as some vanilla plus the crust/crumbs didn’t have any spice at ALL which bored me so I added some there too. If you like pumpkin pie, if you like cheesecake, if you like “normal” pumpkin cheesecake, you need to try this one. It’s pretty yummy and I’m glad I doubled the recipe though I’m sure my thighs and hips aren’t so happy with me. For the record, I’m posting this in the quantities they used, If you want to double it as I did, it’s easy enough to do 🙂

You know the drill…

This looks like it has a lot of steps and ingredients, but really, it all comes together quickly since the bulk of the ingredients are just the spices.

Pumpkin Cheesecake Streusel Bars

  • Crust/crumb topping-
  • 1 cup flour
  • 1/4 cup dark brown sugar
  • 1 1/2 teaspoons cinnamon
  • 1/2 teaspoon ground ginger
  • 1/2 teaspoon nutmeg
  • 1/2 teaspoon salt
  • 1/2 cup cold unsalted butter
  • 1 cup chopped pecans
  • 3/4 cup old fashioned oatmeal
  • Filling-
  • 1 8 ounce package cream cheese, room temp
  • 3/4 cup pumpkin puree
  • 1/2 cup sugar
  • 1 egg
  • 1 1/2 teaspoons vanilla extract
  • 1 tablespoon cinnamon
  • 1 1/2 teaspoons ground ginger
  • 3/4 teaspoon nutmeg
  • 1/2 teaspoon ground cloves
  • 1/2 teaspoon allspice
  • Topping-
  • 1 cup sour cream
  • 3 tablespoons sugar
  • 1/2 teaspoon vanilla extract
  1. Preheat oven to 350 degrees.  Butter a 9 inch square pan (or use something like Bakers Joy which is what I did) and set aside. Have ready a 9×13 inch rimmed baking sheet.
  2. To make the crust/crumbs, combine the flour, salt, brown sugar and spices. Using a pastry cutter, cut in the cold butter until it resembles small crumbs. Stir in the pecans and oats.
  3. Press 3 1/2 cups of the mixture firmly into the bottom of the 9 inch pan to form the crust. Spread the rest of the mixture onto the 13×9 inch pan. Put both in the preheated oven.
  4. Bake the sheet pan for about 15 minutes or until golden brown, stirring once or twice during baking. When it’s done, break it up into smaller bits and set aside. For the crust, bake for about 30 minutes, until golden brown and firm.
  5. For filling- Using a hand mixer, combine all the filling ingredients. Beat until smooth. Pour onto the hot crust and return to the oven.
  6. Bake at 350 for about 20 minutes, until it is set, looks dry at the center and is beginning to puff up around the edges.
  7. While it bakes, make the topping. Simply combine all the ingredients in a small bowl and mix well.
  8. When cheesecake is done, remove from the oven and spread the topping over it. Return to the oven for five minutes. Take out and set onto a rack to cool completely, about 2 hours. When it is totally cool, take the reserved broken up crumbs and sprinkle evenly over the cheesecake. Press down lightly to make them adhere. Chill the cheesecake until cold. To serve, use a sharp knife dipped in hot water to make clean cuts.

Copyright Notice: From Cupcakes To Caviar images and original content are copyright protected. Please do not publish these materials anywhere without prior permission.


Coconut Chocolate Fudge Truffle Cookies


Coconut Chocolate Fudge Truffle Cookies

Coconut Chocolate Fudge Truffle Cookies


I think we’ve all learned by now that I like the combination of chocolate and coconut. I don’t think I realized it myself until I started this blog. But now, when I look back through the blog and see the recipes for different treats with that flavor combo, like Mounds Bar Brownies or Chocolate Bundt Cake With A Creamy Coconut Filling orrrrrr Browned Butter German Chocolate Chip Cookies or 😛 Samoa Wanna Be Cookies, it makes me realize that umm, yeah, I guess I use that combo a lot. But my family hasn’t killed me yet and they are actually some of my more popular postshere so it seems I’m not the only one who likes it. That of course means I feel perfectly safe posting yet another hehe.

These cookies, like practically everything else I make, started out somewhat different. The original recipe comes from The Gourmet Cookbook I actually wasn’t that thrilled with that  cookbook. I only found two recipes in the book that interested me enough to try them and their Truffle Cookies was one of them. On a side note however, if you can get a hold of a copy of Gourmet Today  grab a copy. I personally found about 25 recipes in there that I tabbed, which for me, was enough to make it worth buying from Amazon. Just got it in the mail today actually and I’m looking forward to making some recipes from it.

But, as I was saying, the recipe was somewhat different when I saw it in the book. I didn’t make a ton of changes to it but enough to make the flavor profile of it quite a bit different. The original was just a plain chocolate truffle cookie and while there’s nothing wrong with that lol, I am, as we know, incapable of keeping a recipe the same. So I went to that favorite of mine… chocolate coconut. I love Almond Joy candy bars so I also threw in some sliced toasted almonds. I’ve mentioned before that while I like coconut, I won’t use it unless it is toasted. I just don’t like the texture of it untoasted. But if you don’t mind it, feel free to omit the toasting of the coconut and almonds. But I highly suggest doing it. It adds a nutty crunchiness to the cookies. If you want to try the cookies the way the book wrote it, just omit the coconut and almonds altogether as well as the coconut extract.

You know the drill…

Coconut Chocolate Fudge Truffle Cookies

  • 4 ounces unsweetened chocolate, chopped
  • 6 tablespoons unsalted butter, sliced thin
  • 1 12 ounce package semi sweet chocolate chips, divided
  • 1/2 cup flour
  • 2 tablespoons unsweetened cocoa powder
  • 1 cup coconut
  • 1/2 cup sliced almonds
  • 1/4 teaspoon baking powder
  • 1/2 teaspoon salt
  • 1 cup sugar
  • 2 teaspoons vanilla extract
  • 1 teaspoon coconut flavoring
  • 3 eggs
  1. Preheat oven to 350 degrees. In a small baking dish, combine the coconut and the almonds. Toast at 350, stirring once during cooking, until both are light golden brown. Don’t overcook. Nothing worse than the smell of scorched coconut. Don’t ask me how I know this *whistles innocently* Go ahead and shut off the oven after that because the dough has to chill.
  2. Melt together the unsweetened chocolate, butter and one cup of the chocolate chips in a small heavy bottomed saucepan, stirring occasionally. Set aside to cool.
  3. In a small mixing bowl, combine the flour, baking powder, salt, cocoa powder and the coconut almond mixture.
  4. Beat together the sugar, extracts and eggs. Pour in the melted chocolate mixture and beat until well blended, then add the flour mixture and mix until well combined. Stir in the remaining chocolate chips.
  5. Chill the dough in the fridge in a covered bowl for about two hours or until firm.
  6. Preheat oven to 350. Using your lightly dampened hands, roll the dough into small (about 1 inch) balls and place 2 inches apart on ungreased baking sheets.
  7. Bake at 350 until puffy and set, about 11 minutes. They will still be soft in the center
  8. Cool on the baking sheet for ten minutes, then remove to a rack to finish cooling.
  9. Hide from the family and eat them all yourself because you love them and want to save them from overeating.

Copyright Notice: From Cupcakes To Caviar images and original content are copyright protected. Please do not publish these materials anywhere without prior permission.


Maple Pumpkin Bread With Maple Glazed Pepitas

Maple Pumpkin Bread With Maple Glazed Pepitas

Maple Pumpkin Bread With Maple Glazed Pepitas

Up until recently, Starbucks and I were very good friends. We had sleepovers, braided each others hair, talked about boys and cried together over all the other mean coffee places. Then one day, I cheated on my friendship with Starbucks. I found a NEW bff. It’s name was The Daily Grind. I played there one day on a whim and well, I’m ashamed to say, that after that, I never gave Starbucks coffee a second thought. Though every once in a while, I go back there for nostalgia’s sake. But Starbucks can’t make Milky Way Lattes; The Daily Grind can.

There’s one problem with this new relationship however. My new bff coffee place doesn’t sell baked goods. Oh, they have some wrapped stuff that was mass produced in somewhere like Taiwan, the best place ever to get fancy pastries :-p  But they don’t have the pumpkin bread you can get at Starbucks.  I can’t go to Starbucks anymore though. They all look at me funny, like I’m wearing a big red letter A on my chest. It’s just too awkward, too painful remembering the good times *sobs a little and takes a sip of my Milky Way Latte to calm down*

So what did I do? I made my own. Yes, you heard that right, Starbucks!!! I don’t need your  high priced pumpkin bread anymore! I have no reason to come crawling back to you groveling for forgiveness just so that I can sneak a piece of pumpkin bread. Buahahaaaaaaa!!! Guess what else? My pumpkin bread? It’s better than yours. Yep. Better. It’s moist and spicy and pumpkiny (yes, that too is now a word. I swear, the world needs ME to revise the dictionary. Language would be so much more interesting.) with a hint of maple in the bread. It’s also not as overly sweet as your bread and MINE is covered in sweet/salty maple glazed pepitas. Take THAT, Starbucks!

Sorry. I’m calm now. You all know how those break up moments can be, right?

You know the drill….

Maple Pumpkin Bread With Maple Glazed Pepitas

  • 3 cups flour
  • 2 teaspoons baking soda
  • 1 teaspoon baking powder
  • 1 teaspoon salt
  • 4 teaspoons cinnamon
  • 1 1/2 teaspoons ground ginger
  • 3/4 teaspoon ground cloves
  • 3/4 teaspoon ground allspice
  • 3/4 teaspoon ground nutmeg
  • 7 eggs
  • 4 tablespoons molasses
  • 1 tablespoon vanilla extract
  • 1 1/4 teaspoons maple flavoring
  • 1 3/4 cups sugar
  • 2/3 cup dark brown sugar
  • 1 16 ounce can pumpkin (NOT pumpkin pie filling)
  • 1 3/4 cup vegetable oil
  • 1/2 cup dry roasted Pepita’s
  • 3 tablespoons pure maple syrup
  1. Preheat your oven to 350 degrees. Grease and flour two 9 inch loaf pans (or use a product such as Bakers Joy and spray them)
  2. In a large bowl, combine the flour, baking powder, baking soda, salt, regular sugar and spices.
  3. In another large bowl, at low speed with a hand mixer, combine the eggs, molasses, brown sugar, vanilla extract and maple flavoring. Mix well. Pour in the vegetable oil and the can of pumpkin in and mix well.
  4. Pour the dry ingredients into the bowl of wet ones and mix at low speed just until well combined. It’s fine if there are some small lumps left.
  5. Divide the batter evenly between the two loaf pans.
  6. In a small bowl, toss the pepitas with the maple syrup. Sprinkle evenly between the two pans of batter.
  7. Bake at 350 degrees until a wooden skewer inserted in the center of the bread comes out clean, with at most a few loose crumbs on it.
  8. Cool in the pans set on a rack for five minutes.
  9. Loosen the breads from the pans by running a butter knife around the edges then turn the loaves out onto the rack to finish cooling.

Copyright Notice: From Cupcakes To Caviar images and original content are copyright protected. Please do not publish these materials anywhere without prior permission.


Old Fashioned Chocolate Cake With Chocolate Icing


Old Fashioned Chocolate Cake With Chocolate Icing

Old Fashioned Chocolate Cake With Chocolate Icing


I’m not normally big on cakes. One reason is because I stink at the whole frosting and decorating process. Thus why you get a highly cropped photo lol. Editing is a great way to hide the flaws. The other reasons? I don’t know. Simply that when it comes to desserts, I’m a creamy type of girl, i.e., ice cream, mousses, puddings etc. After that, I love a good pie.

But there are times I just want a big old slab of plain old chocolate cake with chocolate frosting. It’s one of those simple pleasures, one of those foods that takes you back to childhood birthdays immediately. Well, for most people anyway. When I think of childhood birthdays, I think of Dressels cakes, which were sold in grocery stores in Chicago back in the day  (whipped cream and strawberries. YUM!) and of my brother “accidentally” telling me to cross the street on my 8th birthday and my getting thrown about 72 miles by an oncoming car. Really. Seventy two miles. Maybe even 722 miles.  He had it out for me. My brother, not the car driver. 😛

Where was I? Oh yeah, chocolate cake. Years ago, I got a free sample copy of Cuisine Magazine. On the back cover was a luscious looking chocolate cake. I have saved that issue, mainly for that recipe, ever since. Today, I made it. This is chocolate cake nirvana. Old fashioned moist, dense chocolate cake filled and topped with a smooth rich chocolate icing. Not a bit of powdered sugar in sight in this frosting, this is the kind that uses cocoa, sugar, cream and butter that are heated, then cooled until thick enough to spread. Basically, a richer than usual ganache. This is extremely easy to make. No 500 steps, no adding things in 2 tablespoon increments then beating for a year. You mix your dry, you mix your wet, then you combine. Don’t overbeat this however. I did to mine a little and it became a bit tough. Just beat until it’s combined and there is no dry flour mixture left showing, rather like you do when you make brownies or pancake batter. The frosting is also easy. Just melt your butter, pour in the other ingredients, heat and voila, there you go. Just chill until it’s spreadable, then eat it out of the bowl spread onto the cake.

You know the drill. 🙂

Old Fashioned Chocolate Cake With Chocolate Icing

  • Cake-
  • 3 cups all purpose flour
  • 2 cups sugar
  • 1/2 cup unsweetened cocoa powder
  • 2 teaspoons baking soda
  • 1 teaspoon salt
  • 2 cups hot water
  • 3/4 cup vegetable oil
  • 2 tablespoons white vinegar (it helps the leavening process)
  • 1 teaspoon instant coffee granules
  • 1 tablespoon vanilla extract
  • Icing-
  • 1/2 cup unsalted butter
  • 1 1/2 cups sugar
  • 1 1/4 cups unsweetened cocoa powder
  • 1/8 teaspoon salt
  • 1 1/4 cup heavy cream
  • 1/4 cup sour cream
  • 2 teaspoons vanilla extract (I also used a touch of orange extract just because it’s one of our families favorite flavor combos)
  1. Preheat the oven to 350 degrees. Spray two 8 or 9 inch cake pans with cooking spray (I always use Bakers Joy when making any sort of cake) or grease and lightly flour your pans.
  2. In a large bowl, combine the flour, sugar, baking soda, salt and cocoa.
  3. In a large measuring cup, combine the hot water, oil, vinegar, coffee granules, and vanilla. Pour all at once into the dry ingredients and whisk (no mixer here please) just until combined. It’s ok if there are some small lumps left. Remember, don’t overbeat this.
  4. Bake at 350 degrees for 35 to 40 minutes or until a wooden skewer inserted in the middle comes out clean.
  5. Cool cake layers in the pan for fifteen minutes, then invert out onto a wire rack. The inverting helps you have layers that are flatter rather than domed.
  6. While they cool, make your icing. In a large saucepan, over medium heat, melt the butter.  Stir in the sugar and coca powder. The mixture will be thick and grainy. Remove from the heat
  7. Combine the heavy cream, sour cream and vanilla in a measuring cup. Put the pan back over medium heat and whisk gradually into the cocoa mixture. Cook until the sugar dissolves and the mixture is smooth, glossy and hot to the touch. Do NOT boil.
  8. Remove from heat and then either cool at room temp until totally cool and thick enough to spread or, better method, chill in the fridge for about 30 to 40 minutes, until thick enough to spread.
  9. Lay one layer flat side up on a plate. Spoon about 1 cup of the frosting onto to it and spread to cover. Lay the other layer carefully on top, pressing down lightly to help prevent sliding. Use the remaining frosting to cover the tops and sides of the cake, making sure to eat a bite or six as you do so. No one will notice. 😀
  10. Enjoy chocolate nirvana. You’re welcome. 🙂

Copyright Notice: From Cupcakes To Caviar images and original content are copyright protected. Please do not publish these materials anywhere without prior permission.


Oatmeal Raisinet Cookies

Oatmeal Raisinet Cookies

I feel sorry for my husband at times. Why? He’s type 2 diabetic but man, does he love his sweets. Though he would deny that to his death bed. He also loves his savory snacks mind you but when I bake, he is all over it. There was a time I would buy him sugar free treats from the store, but he has come to realize that he prefers a few of the ‘real thing” as opposed to more of the artificial ones. He gets jealous as can be of me (in a loving way of course lol) because, even though I’m overweight (perils of food blogging) I have great blood sugar readings. If anything, I run too low. He also hates me for my low blood pressure too hehe. I am one weird fat woman physically. :-p

One of the things he loves is cookies. Non sweet lover or not (yeah, right. You know better, darlin’), he can eat his weight in cookies. Especially if it’s chocolate chip or oatmeal raisin. So I have had to make sure I have good recipes for both to keep the man supplied. The things we do for love, huh? *Bats eyes in my husbands direction and attempts to look flirtatious* But hey, the man willingly makes me cups of tea whenever I ask and sometimes, I don’t even have to ask. PLUS, he is the one who gets our 16 year old up for school in the mornings. He’s pretty awesome.

Ok, I’m done gushing now lol.

These are some pretty good oatmeal cookies. The original recipe came from food.com and I have just barely adapted it. One thing I do is just make half the recipe because the full recipe makes an ungodly amount of cookies, which is fine for say, Christmas goodie trays but not for everyday unless I’m serving cookies for dinner. The half recipe makes about 5 dozen smallish cookies. I also added the raisinets as the original just called for chocolate chips as we love raisins in oatmeal cookies here, plus I added more vanilla, some cinnamon and a little less sugar because they were far too sweet as written. Ok, so maybe I adapted it a bit more than I thought lol. When cooking these, watch them carefully. With a 375 temp, they can get overdone quickly. If you want chewier cookies, go for the lower cooking time. If you prefer crispier, go for the higher cook time. Either way though…

You know the drill. 🙂

  • 1 cup unsalted butter, room temp
  • 3/4 cup sugar
  • 1 cup dark brown sugar
  • 2 eggs, room temp
  • 2 teaspoons vanilla extract
  • 2 cups flour
  • 2 1/2 cups oatmeal, divided in half
  • 1/2 teaspoon salt
  • 1 teaspoon baking powder
  • 1 teaspoon baking soda
  • 18 ounces raisinets (one bag and 2 individual sized boxes equals this amount)
  1. Preheat oven to 375 degrees. Lightly grease cookie sheets (I do two at a time) with cooking spray. Set aside.
  2. In the bowl of a stand mixer (you can do this with a heavy wooden spoon or hand mixer but it’s a fairly thick dough so it will be harder to stir) cream together the butter and sugars.
  3. Scrape down the sides of the bowl if needed, then add in the eggs and vanilla. beat well on low speed.
  4. In a food processor or blender, pulverize 1 1/4 cups of the oatmeal. In a large bowl, combine it with all the other dry ingredients, including the rest of the oatmeal. Don’t add the raisinets yet. Stir well to combine.
  5. Pour the dry ingredients into the wet ones, about 1/3 at a time, and mix well.
  6. Scrape down the bowl again, take the bowl off the base and stir in the raisinets.
  7. Use a small scoop to make cookies on the prepared sheets.
  8. Bake at 375 for 8 to 10 minutes. Let sit on sheet for one minute, then transfer to a wire rack to finish cooling.


Copyright Notice: From Cupcakes To Caviar images and original content are copyright protected. Please do not publish these materials anywhere without prior permission.


Browned Butter Chocolate Chip Caramel Pie With Salted Caramel Sauce

Browned Butter Chocolate Chip Cookie Pie With Salted Caramel Sauce-001

I am one of those weirdos who owns enough cookbooks to fill a room. It would be a small room yes, but a room nonetheless. Adding in cooking magazines like those Holiday ones that come out yearly and old issues of Gourmet and Food And Wine, etc etc, as well as paper cookbooks like the ones Pillsbury used to put out monthly (do they even still do that?) I have over a thousand cookbooks. It’s a sickness. Honest. And in our modern era, it’s a sickness that has gotten worse. How? Because now, I can get a cookbook out of the library and if it’s one that I find I’ve put about 10 or more sticky tabs in to save the pages, that means it a keeper. That used to mean that I would have a bazillion overdue books lol. But now it means that I can find the same cookbook on Amazon and buy it, sometimes for as little as 4 bucks with shipping, and tab the hell out of that bad boy.

But a lot of my favorite cookbooks are older ones that have proved to be tried and true. My Fanny Farmer Baking Book is one that I use often as are, surprisingly enough, a handful of the old Pillsbury paper cookbooks. Probably because, back when I was still learning to cook for a family, I found many recipes that went into our traditional holiday routine from them.

Another that I use is an old spiral bound Nestle Toll House cookbook. I was looking through it for inspiration the other day when I saw a recipe for Toll House Pie. It’s one that many home cooks have made… a chocolate chip cookie dough set into a pie shell. Sounded like something I could play with. The first time I made it, I undercooked it. Plus, the recipe had NO vanilla in it at all and far too much butter, to the point where I had to clean my oven because it lefts puddles of scorched butter on the bottom of it.

This time, I did it MY way. I added in some vanilla extract, used less butter, browned the butter for a nutty flavor (on a side note, with the browned butter, this batter was good enough to just eat out of the bowl! OMG, it was yummy!), added some caramel bits and topped the slices with some salted caramel sauce and chocolate sauce. All in all, made that way, it can be either a special dessert for the family or something worthy of guests.

Don’t be tempted to add extra chocolate chips or caramel to this. You know you’ll want to (we ALL do it 😛 ) but I think that was part of the reason my first pie didn’t cook correctly. There was just too much in it for it to cook through even though it seemed done. Stick to the measurements here.

You know the drill. 🙂

Browned Butter Chocolate Chip Caramel Pie With Salted Caramel Sauce

  • 2 eggs
  • 1/2 cup flour
  • 1/2 cup sugar
  • 1/2 cup dark brown sugar
  • 3/4 cup unsalted butter, browned to a golden brown, then cooled to room temp
  • 1 1/2 teaspoons vanilla extract
  • 1 cup semi sweet chocolate chips
  • 1/2 cup Kraft caramel bits (you can also use whole caramels; just cut into quarters to get the 1/2 cup measure)
  • 1 9 inch pie shell, unbaked (you can use store bought or homemade. I went the lazy route this time and used a frozen shell)
  • A half batch of this caramel sauce or you can use pre-jarred (I used Trader Joes Salted Caramel sauce because it’s amazing and almost as good as homemade) for drizzling…pouring…eating plain…bathing in…whatever
  • Chocolate sauce for drizzling
  1. Preheat your oven to 325 degrees.
  2. In a large bowl, beat the eggs until foamy.
  3. Add in the flour, sugar, dark brown sugar and vanilla extract.
  4. Blend in the browned butter, then fold in the chocolate chips and the caramel bits.
  5. Spoon into the pie shell and smooth top with a rubber/silicone spatula. Eat what’s left on the spatula. Make sure it’s a lot. You can thank me later.
  6. Bake at 325 for 60 to 70 minutes. The top should be golden brown and dry looking. Let cool to room temp before slicing then use a hot sharp (preferably serrated) knife to get clean cuts. Cut this into VERY thin slices as it’s quite sweet and rich. You should be able to get ten slices from this pie easily.
  7. Top each slice with a (large) dollop of salted caramel and drizzle with chocolate sauce. Sprinkle each slice with a little sea salt if you’re so inclined. If you’re really into overkill and diabetic comas, spoon on some whipped cream too. I won’t judge.

Copyright Notice: From Cupcakes To Caviar images and original content are copyright protected. Please do not publish these materials anywhere without prior permission.


Lemon-White Chocolate Pound Cake With A Lemon Honey Glaze

Lemon White Chocolate Pound Cake With A Lemon Honey Glaze

Lemon White Chocolate Pound Cake With A Lemon Honey Glaze


I have a thing for pound cake. I may have mentioned that before. While I love fancier desserts too, especially those that are rich, creamy and filled with 5000 sticky calories per serving, I also love the simple desserts. Pound cake is just so homey, comforting, and darned easy. And if you want creamy, all you need to do is top it with whipped cream, 12 scoops of ice cream and chocolate sauce. Not that I’d do that of course. Nope, nope, nope, not me *wipes chocolate sauce off chin*


I was torn between making a lemon pound cake, which I’ve been promising my husband for weeks lol, or Pumpkin Bread, because personally, I’m ready to get my Autumn on. But the followers on my facebook page voted for the pound cake (you meanie butts you!!! You’d better be glad I lurves you all! 😛 ) so here you go.

As I mentioned to them, I can’t, however, make just a “normal” pound cake. I’ve said before (and will probably say again because I’m getting old and forgetful. Did I mention that I’m getting old and forgetful?) and will say again (because I’m old and forgetful) that I lack the gene that makes me capable of making a recipe as listed. Nope… gotta either drastically change one so that it is like giving plastic surgery to Justin Bieber and making him look like Madonna or I have to just make up one of my own.

This one is just your basic pound cake incarnation. But I added a ton of lemon flavor as well as a touch of ginger for zing to the batter. Then for good measure I dumped some white chocolate chunks in there. They melted entirely into the batter, leaving these little pockets of slightly crispy sweetness. And if you’ve never had white chocolate with lemon, you’re in for a treat. They go SO well together! Then I topped this with a tart lemony glaze that has a subtle hint of honey.

This is NOT a mild little cake. It’s quite sweet, so serve small slices.

You know the drill…

Lemon-White Chocolate Pound Cake With A Lemon Honey Glaze

  • 1 1/2 cups flour
  • 1 cup sugar
  • 1 teaspoon ground ginger
  • 1/2 teaspoon baking powder
  • 1/2 teaspoon salt
  • 1/2 teaspoon baking soda
  • 2 tablespoons lemon zest
  • 1 cup white chocolate chips
  • 3 eggs
  • 1 teaspoon vanilla extract
  • 1 1/2 teaspoons lemon extract (if you have an emulsion, even better, Use 1 teaspoon)
  • 1/2 cup lemon juice
  • 2/3 cup oil
  • GLAZE-
  • 1 cup powdered sugar
  • 2 tablespoons honey
  • 2 teaspoons sour cream
  • 1 teaspoon lemon zest
  • 1/4 teaspoon lemon extract
  • 2 tablespoons lemon juice
  1. Preheat oven to 350 degrees. Spray a 9 inch loaf pan with a non stick spray such as Bakers Joy.
  2. In a large bowl, combine the flour, sugar, baking powder, salt, baking soda, lemon zest and white chocolate chips. Stir well.
  3. In a medium bowl, combine the eggs, extracts, lemon juice and oil. Whisk to combine.
  4. Pour the wet ingredients into the dry ones, all at once. Stir well to combine until there are no dry floury spots left.
  5. Pour the batter into the prepared pan Bake at 350 until a wooden skewer inserted into the middle comes out clean, about 60 minutes. If it starts to get too brown on top, cover loosely with foil.
  6. When done, cool in pan for five minutes, then run a butter knife along the edges to loosen the cake and turn it out onto a wire rack to finish cooling.
  7. For glaze, combine all the glaze ingredients in a small bowl. Whisk to combine, making sure to get rid of all the lumps.
  8. Pour or spoon glaze over the cooled cake.

Copyright Notice: From Cupcakes To Caviar images and original content are copyright protected. Please do not publish these materials anywhere without prior permission.