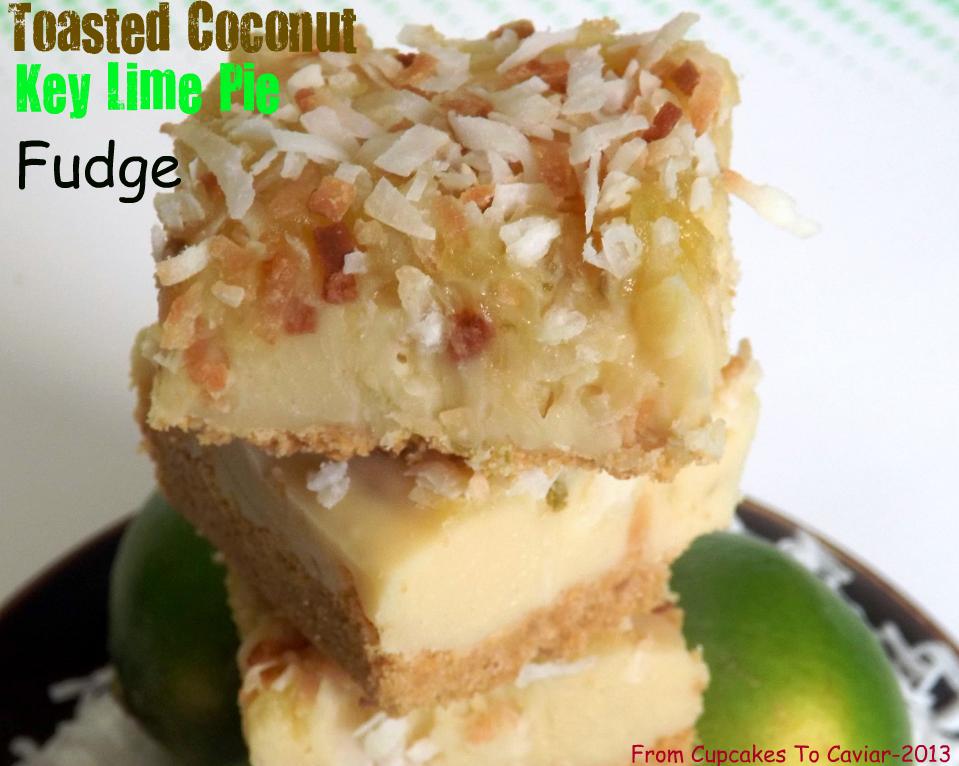
Toasted Coconut Key Lime Pie Fudge

Last post I made was an ode to Autumn because our weather had been so unseasonably cool and wet. Now however August is back with a vengeance. It’s hot as Hades out there and extremely humid. So my mind is back to thinking of Summery foods. And what is more Summery than key lime pie? Why, key lime pie made into fudge with some tropical coconut flavors thrown in there for good measure, of course.
On another note, today is my birthday! I am 49 years old today. Damn… I’m old. Lol. The only 49 year old I know of with a 4 year old son. So what were my birthday meals like? Totally not exciting, that’s what they were like hehe. I made smoked sausage, rice a roni and carrots. Woohoo?? And my birthday cake is from Wal mart. I have got to learn that it’s ok to make myself a nice birthday dinner the same as I do for the rest of the family. Why do we women do that anyway? But all in all, it’s been a nice birthday. I have my kids, I have the worlds best husband who is still happy to make cups of tea because he loves me. I have books to read, food to eat and lifes little luxuries. I’m good. 🙂
This fudge is quite yummy. Even the non sweets loving hubby loved it. I was originally going to make just key lime pie fudge but do you have any idea how many of those there are online?! At least 99,999,999,999,999 (please don’t ask me to say out loud what number that is). I could NOT bring myself to just repeat the version someone else made. Nope, not me. So I made this MY way. How, you ask? You did ask, I hope? T’was easy. I topped this with swirls of a homemade lime curd, added some coconut flavor to the fudge itself and topped it all off with some toasted coconut. Oh… my…gosh… this is good! I will definitely be making this again and I am pretty sure it will make into my Christmas treats too. Smooth, creamy, very rich, but saved from overwhelming sweetness by the lime curd and the toasted coconut. The lime curd is just the same recipe I use for lemon curd, with lime juice and zest subbed in there. It makes a pint of curd and you only need half a cup or so for the recipe, but I totally promise you, you won’t mind having extra. This stuff is amazingly good. I keep sneaking spoonsful of it on a spoon. You can do that, spread it on a muffin or scone, top ice cream with it…
You know the drill. Git to cookin’!
Toasted Coconut Key Lime Pie Fudge
- 1/4 cup sugar
- 1 1/4 cups graham cracker crumbs
- 6 tablespoons unsalted butter, melted
- 1 lb GOOD white chocolate, chopped (please don’t use, say, “Acme Brand White Baking Chips”. Use the real thing here. It will make a difference.
- 1 14 oz can sweetened condensed milk (NOT evaporated milk)
- 1 tablespoon butter
- zest of one small lime
- 3 tablespoons lime juice (this will take about 2 small limes t get)
- 1/2 cup Lime Curd (Use this recipe for lemon curd, just substituting limes where it calls for lemons)
- 1 teaspoon coconut flavoring
- 1 teaspoon vanilla extract
- 1/2 cup sweetened coconut, toasted
- Preheat your oven to 350 degrees and line a 8 or 9 inch square pan with foil Butter the foil, then set the pan aside.
- In a medium bowl, combine the sugar, graham cracker crumbs and melted butter. Stir well. Dump mixture into the prepared pan and press down into the bottom of the pan to form a crust.
- Bake at 350 degrees for about 10 minutes. Take out and set aside to cool.
- In a medium non stick saucepot, combine your white chocolate, a tablespoon butter and sweetened condensed milk.
- Cook over medium heat, stirring constantly, until mixture is smooth and all the chocolate is melted. Remove from heat and add in the lime zest, lime juice and extracts.
- Quickly pour into the prepared pan. Spoon dollops of the lime curd over the top of the fudge then using a butter knife (or your fingers. I won’t tell), swirl it into the fudge. Top that with the toasted coconut, pressing down lightly to make sure the coconut sticks.
- Refrigerate until firm, about 3 hours.
- Using a knife you heat under hot water and wipe dry is the easiest way to cut this (or any) fudge. You’ll get much cleaner cuts.
- Leftovers can be stored tightly wrapped or even better, wrap each piece individually and freeze them. When you need a sweets fix, there you have it… portion controlled fudge 🙂
Copyright Notice: From Cupcakes To Caviar images and original content are copyright protected. Please do not publish these materials anywhere without prior permission.