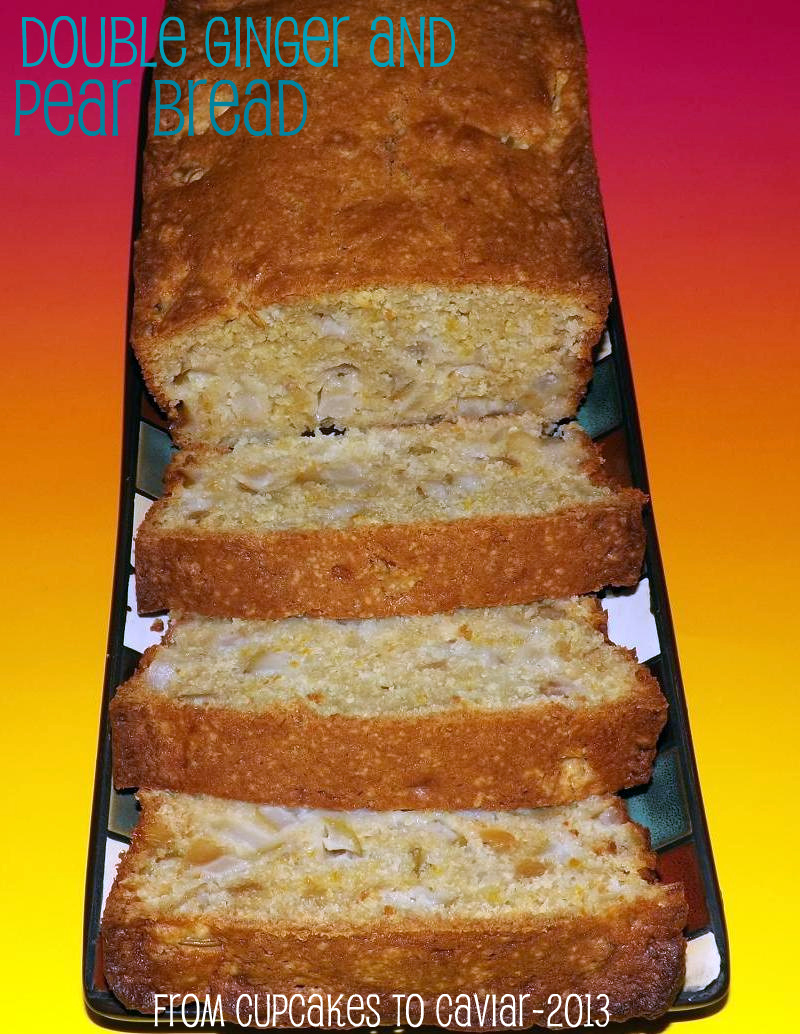
Double Ginger Citrus Pear Bread

I mentioned this bread on my facebook page a week or so ago when I gave the choice between it or scones. The scones won.  But I finally got around to making the bread yesterday.
I wish now that I’d waited until today to make it. Mother nature seems to be confused as to month and it’s rainy, chilly and totally ICK here right now. I think we MIGHT have made it up to 50 degrees. And while I know that that would still seem balmy to some in May and would have to me too had I stayed in my hometown of Chicago, here in Kentucky, high 40’s in May is COLD darn it! So having the oven on and baking sounds like a great idea.
I wasn’t sure about this bread when I first made it yesterday. You know how it goes… you make a quick bread, tell yourself to let it cool so it will slice better, then end up cutting it when it’s warm anyway because you just can’t resist. This however is one of those quick breads that NEEDS to meld for a day. yesterday, it seemed rather bland and boring and I wasn’t even sure I would blog about it. After sitting overnight however, I tried a piece and it was was quite good. It’s moist and dense; almost pound cakeish in texture, plus the ginger flavor is more pronounced as is the pear. Make sure though, that you use ripe flavorful pears in this. And I think that next time I make this I will add about a 1/2 teaspoon of fresh nutmeg. It just needs a bit of spice.
Make sure you actually grease and flour your pan. With the pear and crystallized ginger in it, you’ll end up with parts sticking to the bottom if you just use cooking spray.
Double Ginger And Pear Quick Bread
- 3 ripe pears, chopped (I left the peel on; your choice)
- 3 tablespoon freshly grated ginger
- 1/4 cup finely chopped crystallized ginger
- 1/3 cup buttermilk
- 1 tablespoon vanilla extract
- 1 tablespoon lemon juice
- zest of one lemon
- zest of one orange
- 2 cups flour
- 1 teaspoon baking powder
- 1/2 teaspoon baking soda
- 1/4 teaspoon salt
- 1/4 cup unsalted butter, room temp
- 1/4 cup vegetable oil
- 1 cup sugar
- 2 eggs
- Preheat oven to 350 degrees. Grease and flour a nine inch loaf pan.
- Stir the pears, ginger and zests together in a small bowl.
- Mix together the buttermilk, vanilla and lemon juice in a measuring cup.
- In a medium bowl, mix your dry ingredients.
- In yet another bowl (I know I know ) beat together your butter, oil and sugar. Beat in the eggs, one at a time, beating well after each.
- Add the flour mixture, alternating with the buttermilk mixture, beating on low speed, just until combined. Fold in the pear/ginger mixture.
- Pour the batter (it’s a fairly thick batter) into the prepared loaf pan.
- bake at 350 for about 50 to 60 minutes or until the top is a golden brown color, firm to the touch and a skewer inserted in the middle of the loaf comes out clean.
Cool on a wire rack in the pan for about five minutes, then carefully run a knife around the edges to loosen. Turn out onto the rack to finish cooling. - Now you can wrap it, wait a day and try it after flavors have blended or cut it now…but seriously, I advise the days wait. It’s delicious after the rest period