Creamy Homemade Boursin Cheese Spread

Creamy Homemade Boursin Cheese Spread

Creamy Homemade Boursin Cheese Spread


I am a Thanksgiving appetizer junkie.  By the time I finish cooking the actual meal, I am so filled up on appetizers that I have no interest in dinner. Of course, the taste testing I just HAVE to do *innocent smile* as I cook doesn’t help either. Mind you, none of this stops me from loading up a full plate just in case. I then eat three bites, cover the plate and become a total turkey pig a few hours later.

But nothing matches appetizers for me. I love small bites, love being able to pick and choose from nibbles of fun finger foods. One thing I particularly love is cheese. Combine that with what all of you know is one of my downfalls, something creamy, and I become a total glutton. Many years ago, I saw a recipe somewhere or another for Boursin cheese and just had to give it a try. The rest is history. Now I make it each Thanksgiving and Christmas. The original recipe has changed much over the years and I don’t even make it as per the recipe anymore.

This cheese is so darn good! If you love creamy spreads, you’ll love it. It goes great on crackers, veggies, and one way I love to use it to stuff chicken or pork chops with it. I’m a total peasant myself; this cheese spread and some Ritz crackers and I’m in heaven. Add in a glass of wine and yeah, baby, I’m good! 😀

This goes together so quickly you’ll think you missed a step. The most time consuming part; all of three minutes or so, is finely chopping the green onions and the garlic. Such a workout. :-p Then just put it into a pretty serving bowl, set out crackers and others dippers and watch your family and guests go crazy for it. You’re welcome. 😀

You know the drill….. <3

 Creamy Homemade Boursin Cheese Spread

  • 2 8 ounce packages cream cheese, room temp
  • 1/2 cup (one stick) unsalted butter, room temp
  • 1/4 cup good quality Parmesan Cheese (not the grated stuff you sprinkle on spaghetti)
  • 3 tablespoons finely minced green onion (about 1.5 green onions should do it)
  • 2 to 3 cloves garlic, minced
  • 1 teaspoon dill weed
  • 1 teaspoon Fine Herbes
  • 1/2 teaspoon dry basil
  • 1/2 teaspoon salt (do NOT use more without taste testing. This is a simple mixture and easy to over salt)
  1.  In a medium bowl, combine the butter and cream cheese. Beat well on medium speed until creamy and fluffy. Scrape bowl once, and beat for another minute or so.
  2. Add in all the rest of the ingredients. Beat well to combine. Give it a small taste test for salt and seasoning. Keep in mind the saltiness of any dippers you may use before adding more salt to the cheese.
  3. Spoon into a serving bowl; smooth top. Serve immediately or refrigerate until about half an hour before serving time.

Copyright Notice: From Cupcakes To Caviar images and original content are copyright protected. Please do not publish these materials anywhere without prior permission.

Creamy Homemade Boursin Cheese Spread

Creamy Homemade Boursin Cheese Spread


Maple Butter Pecan Pie

Maple Butter Pecan Pie

Maple Butter Pecan Pie


I’m totally ready to get started with Thanksgiving and Christmas recipes. Hopefully, you’re totally ready to get those recipes, cause it’s probably the vast majority of what I’ll be posting for a while. 😀

I sometimes think to myself that I wouldn’t be as enamored of the holiday season if it fell in Summer. I mean… “let’s go grill out some chicken for Thanksgiving dinner” or “how about we make some nice cold ice cream to serve on Christmas”?? Those just don’t have the same ring to them, even though I’m well aware that it’s only on this half of the world that is deep into Autumn and Winter when Thanksgiving and Christmas hit. But I’m one of those people who gets sad if it isn’t bitter cold on both days. I want cozy, homey, preferably snowy. Plus, cooking a large meal in the oven and making the house a sauna when it’s not cold out kinda sucks.

I already have two pecan pies up here on the blog. But one can never have too many pecan pies, am I right? I rather like pecan pie, obviously. My husband isn’t fond of it. Yet I let him stay around anyway. Go figure.

I wanted to change up this years pecan recipe for the blog. So when I saw this in an old cooking magazine I have, I had to give it a try. I absolutely love real maple anything and I knew from the ingredients in this that it would be good. It came with it’s own pie crust recipe, but I forgot to get some photos of it, so I’ll post that separately next time I use it. Meanwhile, just use your own favorite 9 inch pie crust; even a store bought one is fine if you swing that way.

This was a delicious pie. Nice glazed looking pecans on top (the recipe called for pecan halves, but I prefer chopped. You do you.), a filling that wasn’t overly goopy nor overly sweet, but has a subtle maple edge to it. It IS pecan pie however; don’t go into this not expecting very sweet 🙂 I love to serve my own piece of pie simply; just the pie, gently warmed, with a small puddle of heavy cream poured over it. Serve this with strong tea or coffee or a glass of milk for the kiddos.

You know the drill… <3

Maple Butter Pecan Pie

  • 9 inch pie crust
  • 1 to 1 1/2 cups toasted pecan halves (I used more like just 1 cup because I prefer a higher ratio of filling to pecans)
  • 1 cup packed brown sugar
  • 1/2 cup pure maple syrup
  • 1/2 cup light corn syrup
  • 1/2 teaspoon salt
  • 4 eggs, lightly beaten (have them standing by in a large measuring cup)
  • 1 1/2 tablespoons vanilla extract
  • 4 tablespoons unsalted butter, melted
  1. Preheat oven to 400. Line a 9 inch pie pan with the pie crust; crimp as desired. Gently cover the crust with foil, making sure to press it snugly onto the sides. Dump about a cup or so of either dry beans or uncooked rice onto the foil (you can let these cool afterward and save them in a ziploc bag to use the same way again); spread evenly. Bake the crust for about 15 minutes; until it is set, but not browned at all. Remove from oven, take the foil off and turn the oven down to 325 degrees.
  2. In a medium pot, combine the brown sugar, maple syrup, corn syrup and salt. Cooking, stirring frequently, just until warmed and the sugar has melted.
  3. Slowly drizzle some of the warmed sugar mixture into the eggs, whisking constantly. You want to temper the yolks, but not scramble them by adding hot liquid to it too quickly. Do it nice and slow. When you have about half the sugar mix incorporated into the eggs, whisk the eggs into the pot containing the rest of the sugar mix. Stir in the butter and vanilla extract.
  4. Sprinkle the pecans over the bottom of the crust. Carefully pour the sugar/egg mixture on top of the pecans.
  5. Bake the pie at 325 for 35 to 45 minutes, until the filling is puffed (it will settle back down as it cools) and just off center looks set. It’s ok if there is still some jiggle right in the middle. That will firm as it cools.

Copyright Notice: From Cupcakes To Caviar images and original content are copyright protected. Please do not publish these materials anywhere without prior permission.

Maple Butter Pecan Pie

Maple Butter Pecan Pie

Cranberry White Chocolate Amaretto Oatmeal Cookies

Cranberry White Chocolate Amaretto Oatmeal Cookies

Cranberry White Chocolate Amaretto Oatmeal Cookies


I have a confession to make. *Takes a deep breath and sobs* No Amaretto was harmed in the making of this post. I lied!!! It’s just almond extract!!! *Throws myself at the mercy of the courts…. and cookie eaters. But, in my defense, how would Cranberry, White Chocolate and Almond Extract have sounded as a title? It needed excitement, pizzazz, oomph! Amaretto is exciting! Fine, maybe not so much, but you get my drift. So, when you make these cookies, just don’t tell anyone that the almond flavor is from almond extract and not amaretto. It will be our little secret. You, me and the 3 other people who actually read my blog. :-p

Now on to my whining weather report. WHAT HAPPENED TO AUTUMN!!!!??? It disappeared!! It’s the first week in November and I had to turn the A/C on last night because it was too hot in here to sleep comfortably. Who turned off the cold?! It is NOT, I repeat, NOT supposed to be 80 degrees during the day in November; not even in Kentucky. And other states that allow that nonsense need to stop it right now.

Because I said so.

On that note (as I watch two of my three readers back away slowly), let’s move on to the cookies.

I loved these. And they got the kid approved thumbs up too, which is always nice. One would think that any kid would give a thumbs up to cookies, but nope, not mine. With me having been baking all of their lives (heck, most of MY life) and running a food blog, they are more particular and have higher standards than the “normal” children. There is nothing more humorous than getting a verbose critique from a seven year old- “These are good momma, but they could be chewier/sweeter/crunchier”… whatever the specific food should be.

These have a nice nutty flavor from the toasted almonds. I deliberately toasted these a little browner than I usually do because I wanted a nuttier flavor. It worked wonderfully. So when you toast the almonds, get them to a nice medium brown color. Just make sure to give them a stir in the pan once to make sure they brown evenly. The cranberries added a nice tartness to the cookies and the white chocolate a creamy sweetness. Since these have oats and cranberries in them, feel free to eat them for breakfast. They’re good for you *coughcough*! Honest Injun! Even with the tablespoon of almond extract in these, the almond flavor is still fairly mild, so go ahead and add a teaspoon more if you want an extra punch of flavor.

You know the drill… 🙂

Cranberry White Chocolate Amaretto Oatmeal Cookies

  • 1 cup (2 sticks) unsalted butter, room temp
  • 1 cup packed dark brown sugar
  • 1 cup sugar
  •  2 eggs + 1 egg yolk
  • 1 tablespoon vanilla extract
  • 1 tablespoon (add an extra teaspoon if you want more almond flavor) almond extract
  • 3 cups flour
  • 1 teaspoon baking soda
  • 1 teaspoon baking powder
  • 1 teaspoon salt
  • 1 1/2 cups oats (if you REALLY want to punch up the flavor, toast your oats for about 6 minutes or so at 350. Just make sure to stir once and also to let them cool COMPLETELY before adding them to the dough.)
  • 1 12 ounce package white chocolate chips
  • 1 1/2 cups dried cranberries
  • 1 cup sliced almonds, toasted at 350 until medium brown
  1. Preheat oven to 350 degrees. Lightly grease two cookie sheets.
  2. In a large bowl, at medium speed using a hand mixer cream together the butter, the brown sugar and the sugar until light and fluffy.
  3. Scrape the bowl down and add the eggs and egg yolk. Stir in the vanilla extract and the almond extract. Beat just until blended.
  4. In a small bowl, whisk together the flour, baking powder, baking soda and salt. Add to the butter mixture. Stir in (use a nice heavy wooden spoon) the oats, cranberries, white chocolate and toasted almonds. Make sure to dig down there to the bottom of the bowl and stir so that you don’t have parts of the dough with no add ins in it.
  5. Make rounded tablespoons of the dough and place about 2 inches apart on the prepared cookie sheets. Bake at 350 for 12 to 14 minutes; 12 if you want slightly chewier, 14 if you want crispier.  If, by chance, the dough is too soft to work with, cover the dough and throw it in the fridge for maybe 30 minutes, then proceed.
  6. Let cool on the pan for 2 to 3 minutes to give them a chance to firm up, then transfer to a rack to finish cooling.
  7. FYI- this dough freezes well. I made just part of the batch and have the rest frozen to use closer to Christmas.
Cranberry White Chocolate Amaretto Oatmeal Cookies

Cranberry White Chocolate Amaretto Oatmeal Cookies

Copyright Notice: From Cupcakes To Caviar images and original content are copyright protected. Please do not publish these materials anywhere without prior permission.

Easy Spiced Applesauce Oatmeal Quick Bread


Easy Spiced Applesauce Oatmeal Quick Bread 1


It’s FINALLY starting to get chilly during the day here. Am I the only weirdo who does a cheer for that? We’ve been able to leave the windows open and get fresh air, but it’s been warm during the day and only cooled off at night. Now, I had to close all but one window and it’s 66 in the house; a bit chilly, but nothing that socks and a sweater don’t take care of. I’m ready for comfort food weather; for nesting inside with a cup of tea and a blanket over my lap. I’m ready to be standing in front of the wood burning stove, listening to the crackling wood. I want to breathe in crisp air that smells of coming snow.

Ok, enough rhapsodizing. Yes, I know. Another apple recipe. But how can I resist? It’s apple season and they taste so good this time of year before they get shoved into cold storage! While I’ve said before that I have the type of cooking personality that doesn’t always pay attention to season- chili in August, anyone, Pumpkin bread in April?, there are some things that simply begged to be made at specific times of the year.

My husband picked up a handful of gorgeous Gala apples about a week ago and I held back one for this bread. The original recipe for applesauce oatmeal bread that I got from the King Arthur website didn’t call for fresh apples, but I couldn’t resist. That recipe also didn’t call for raisins or crystallized ginger or as much spice or wheat germ or toasting the nuts. In a nutshell (see what I did there? Huh, huh huh? 😛 ), it was pretty boring. Not anymore. My seven year old told me I need to make this bread every day because, “it’s soooo good, momma!”. High praise from a little boy for something that is not overly sweet.

This bread is nice and moist. With applesauce, diced apples and a small amount of oil, it was bound to be. Add in the spices, raisins, toasted nuts, toasted wheat germ, and crystallized ginger and this is actually both quite tasty AND not totally bad for you. It goes together quickly. Just keep in mind… “Mise En Place”. I’ve said it before and I’ll say it again; having what you need already measured out and near your work space helps so much. When I don’t do this, that’s the times when I forget to add something. Don’t be me. 😛

You know the drill… get to cooking!

Easy Spiced Applesauce Oatmeal Quick Bread

  • 1 cup sugar
  • 2 eggs
  • 1/2 cup vegetable oil
  • 1 1/2 teaspoons vanilla extract
  • 2 tablespoons boiled cider (you could sub apple juice concentrate)
  • 1 cup diced apple (one medium apple)
  • 1/2 cup raisins
  • 1 1/2 cups flour
  • 1/4 teaspoon baking powder
  • 1/2 teaspoon baking soda
  • 2 teaspoons cinnamon
  • 1/2 teaspoon allspice
  • 1/2 teaspoon nutmeg
  • 1/4 teaspoon ground cloves
  • 1/2 teaspoon salt
  • 1/2 cup oats (NOT the instant crap)
  • 3/4 cup unsweetened applesauce (if you prefer a sweeter bread, feel free to use sweetened applesauce)
  • 1/2 cup chopped, toasted pecans (toast for ten minutes in a 350 degree oven, then cool.)
  • 1/2 cup wheat germ ( you can sprinkle them over the nuts and toast them in the same pan with the pecans, but watch carefully; the wheat germ can burn easily)
  • 3 tablespoons diced crystallized ginger
  1. Preheat the oven to 350 degrees and grease a 9×5 inch loaf pan. In a large bowl, whisk together the sugar, eggs, oil, vanilla extract and boiled cider (or apple juice concentrate). Add in the raisins and diced apple.
  2. In another bowl, combine the flour, baking powder, baking soda and the spices. Mix with the wet ingredients, stirring until just barely combined.
  3. Add in the oats, applesauce, pecan/wheat germ mixture and diced ginger. Stir until just combined.
  4. Pour the batter into the prepared pan. Sprinkle with some oats to make it purty 😛
  5. Bake at 350 degrees until a wooden skewer comes out clean, about 55 to 65 minutes. Let cool in the pan set on a rack for ten minutes, then turn it out onto the rack to finish cooling. Serve this warm with butter and jam or maybe some honey butter.

Easy Spiced Applesauce Oatmeal Quick Bread 3Copyright Notice: From Cupcakes To Caviar images and original content are copyright protected. Please do not publish these materials anywhere without prior permission.


Bon Appétit/ALDI $10.00 Challenge (Spicy Samosa Dinner Pie & Creamy Cucumber & Onion Salad)

Spicy Samosa Dinner Pie 4Creamy Cucumber Onion Salad 1


A couple of months ago, I was offered the opportunity to do a challenge for Bon Appétit and ALDI. Since Bon Appétit is one of my favorite magazines and web sites and I shop frequently at ALDI, it was a perfect fit for me. The challenge was to, like their resident chef did, to feed a family of four for under $10.00 dollars, using mainly ALDI ingredients. As a home cook who is always on a budget, that sounded cool to me.
A few years ago, I was under the impression that Aldi was a store that was limited in products, was all generic, didn’t carry GOOD products, etc. I have met many people who have thought the same. We all couldn’t have been more wrong! ALDI was started in 1961 in Germany (that, by the way, still shows as you can find a good amount of German products there, which is wonderful for those, like me, who lived in Germany at one time and still miss it!) and at this point, they have over 1400 stores in 32 states and are a major employer of more than 20,000 people. ALDI manages to maintain its low prices in a variety of ways- 1) Volume Purchasing. They don’t have 100 aisles and a stock of 20,000 items. They run fairly small and have an average of 1300 different items per store, running the gamut from fresh produce to meats to frozen goods to staples to some health and beauty products. Many of the things can’t be found elsewhere and are delicious. I recently bought some French Onion Soup in their frozen section that was wonderful to just heat and eat on a night when I didn’t feel like cooking. 2) They have their own brands. While you can find specials in there that are name brand, the majority of their products are their own brands and are tested, making them just as good, if not better, than the pricier name brand products. 3) Special Buys- ALDI has weekly special buys. These can include certain food products, small kitchen appliances there (I got a panini press there a few years back for under $20 dollars that we still use!) and seasonal items. ALDI’s is a blast to go to near Christmas. That whole German Christmas spirit comes out full force! And, 4) they are very definitely no frills. Not in a bad way, just not fancy. You won’t go there and find ladies hawking samples of the newest food craze, nor does ALDI have a bank or a pharmacy. This helps you get in and out without being distracted by 900 other things AND it allows them to save you some hard earned cash. Plus, at ALDI, you aren’t paying for them to supply you with things like cheap plastic bags that break if you put more than half a pound of food in them. You can either bring your own bags, which from what I’ve seen, is what most people do, or you can buy good old fashioned paper bags from them for 6 cents apiece. When it comes to the grocery carts, there is no teenage boy going out and gathering them up. The carts are made so that you insert a quarter in the slot of a cart that is attached to all the rest. That frees the cart, you shop, then when you’re done, reattach the cart and out pops your quarter. I like to use this as a lesson for my boys in paying it forward each time by leaving the cart there with the quarter in it for someone else to use. It’s the little things, right? 🙂
With ALDI products, as I mentioned above, you can find a little of everything. They have fantastic cheeses, which always draw me in. They also have convenience products, things like frozen egg rolls, which my husband adores or the squeezable applesauce packets, so loved by the little ones and that we frequently include in Joshies lunch. The other day, I bought some fantastic frozen manicotti for myself. 😀
Not sure where an ALDI is near you or even if there is one at all? If you check out this link, you can use their store locator to find a store near you. Curious about their products? This fact sheet shows you some of their products; things they have actually won awards for. Go check it out!
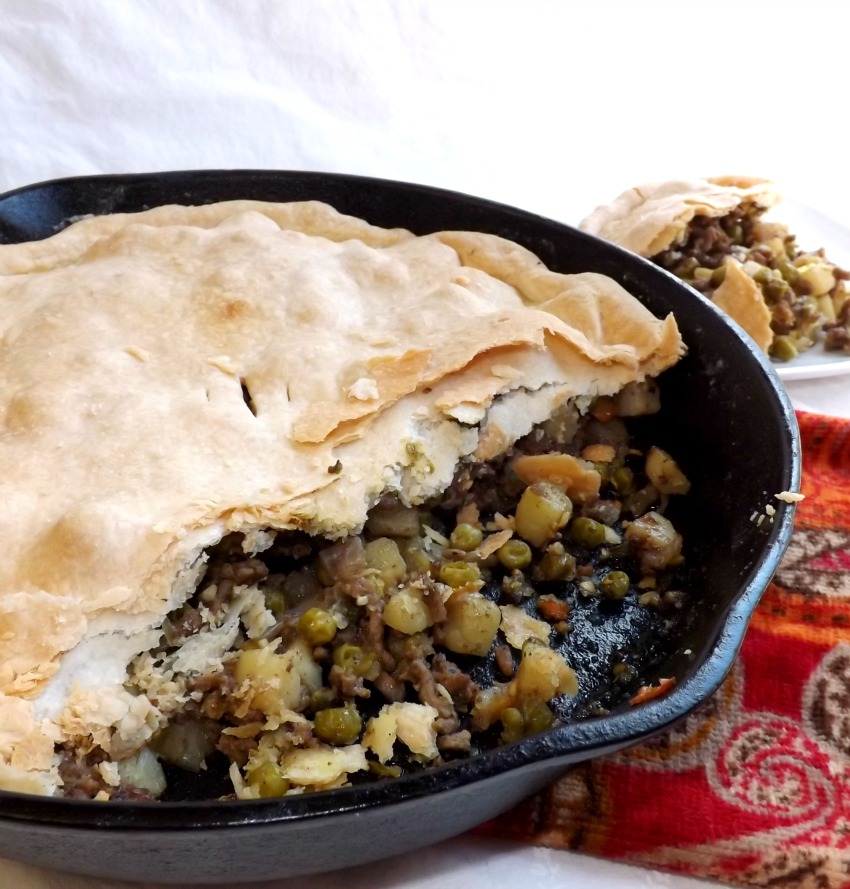
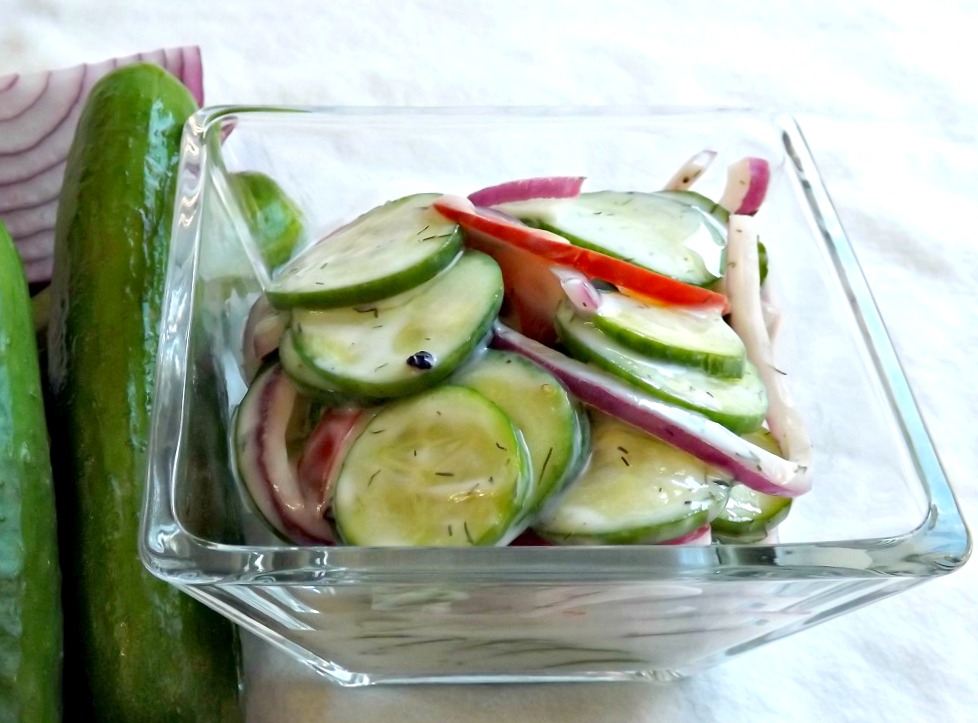
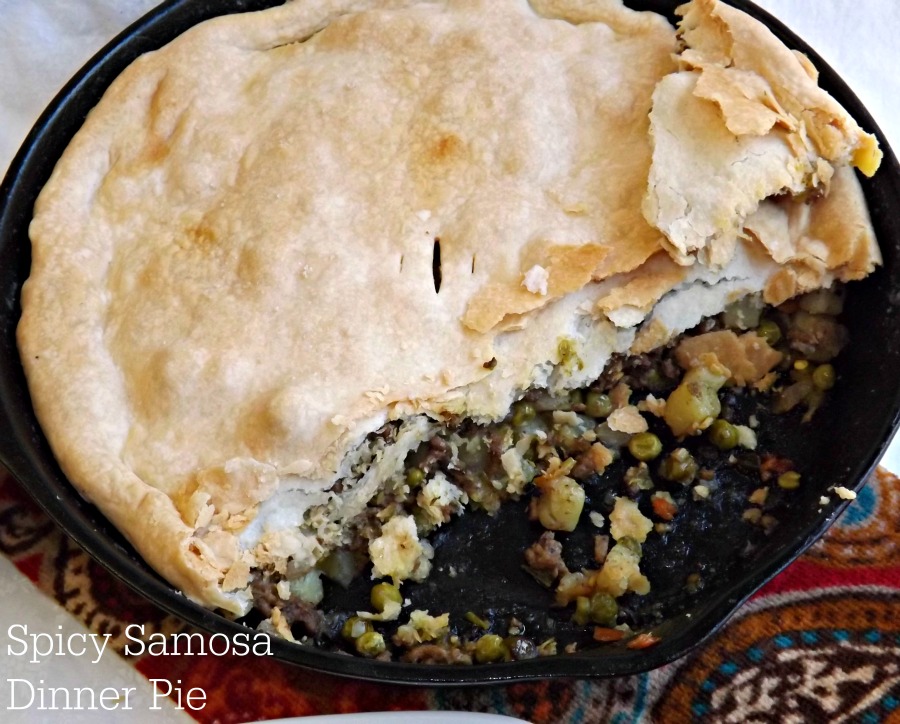
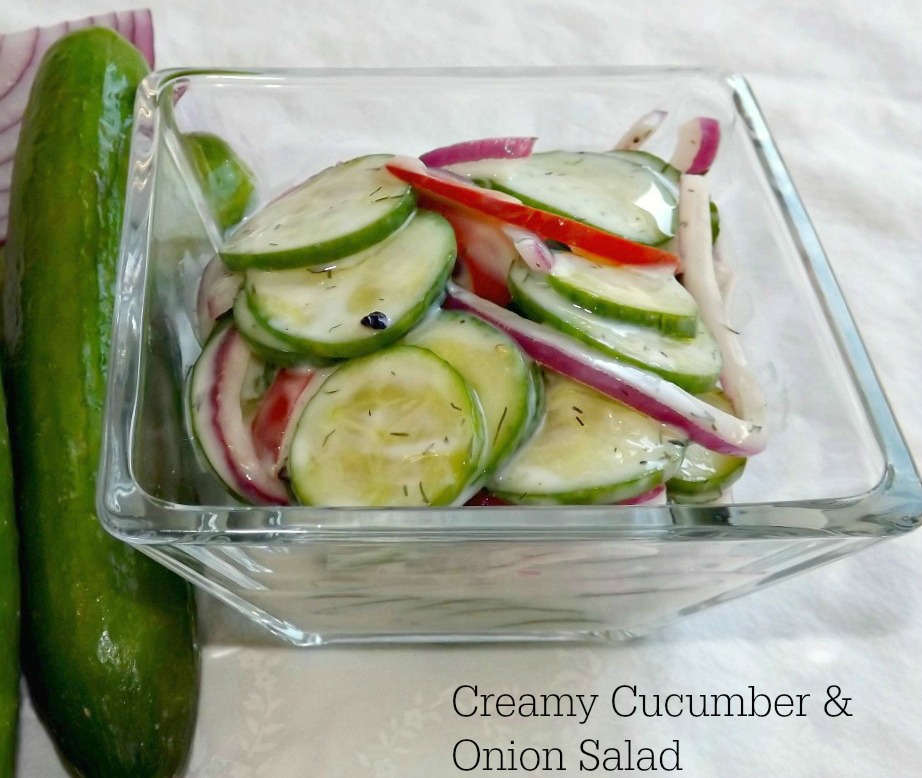
Now for the food! I wanted to do something a little bit different. I have mentioned before that I absolutely love Indian food. Well, I decided to try my own variation on the Samosa, making it easier by turning it into a one crust pie. This way, you’re not frying it and adding 5000 calories to it, plus the easy factor is definitely there. This pie is spicy, slightly exotic, yet still homey and comforting. I mean…pie! I served it with a cooling and creamy cucumber onion salad. You eat the pie and the mild burn hits you, then a bite of the salad leaves you saying, “ahhh”, lol. Here is my breakdown of cost. I was tickled to see that I came in a fair amount under the $10 dollar limit. Some of the ingredients I had to buy in larger amounts than what I used in the recipe, such as the ground beef, so I froze part and will use that another time and estimated my cost with just the parts I used.
For the pie-
Ground Beef- a 2lb package, of which I used half, was $8.00 dollars (this is delicious 80/20 beef, so not low quality in the least.)- $4.00
Can of diced potatoes- ( 15 ounce can)- 65¢
Frozen peas- 1 lb bag was 95¢ (I used 1 cup, so about 40¢)
Onion- 89¢ (I used a bit more than half, so we’ll estimate 50¢)
Red pepper- 90¢.( I used about 3/4 of it altogether, so about 23¢)
package of refrigerator pie crusts-$1.89- (I used one of the crusts, freezing the other for another time, so about 95¢)
Cucumber salad-
Bag of seedless cucumbers (which were baby sized and adorable, btw! 😛 )$1.89. I used about half, so 95¢
More onion and red pepper- included in cost above
Yogurt- a large 32 ounce container was $1.89 ( I used 1/2 cup, so about 25¢ worth.
Various spices, salt and pepper and the jalapeno, for both dishes- 25¢ or so.
Grand Total- $8.18.
So, for about $8 dollars, I fed myself, a 20 year old male, my husband and a six year old boy. And there is still a serving left of the pie for my husband for lunch tomorrow and some of the cucumber salad as well. Not bad, ehh? A filling meal that includes protein, carbs, veggies and even dairy for $8 dollars.
You know the drill. Get to cooking!

Spicy Samosa Dinner Pie

  • 1 pound ALDI ground beef
  • 1 15 ounce can Happy Harvest diced potatoes, well drained
  • 1 cup Seasons Choice frozen peas
  • 1 cup chopped onion
  • 1/2 cup diced red pepper
  • 1 tablespoon diced jalapeno (you could sub in a teaspoon of red pepper flakes if you prefer)
  • 1 tablespoon minced garlic
  • 1 teaspoon cinnamon (feel free to use a touch more if you like. I personally love cinnamon in savory dishes)
  • 1 1/2 teaspoons mild curry powder
  • 1 1/2 teaspoons garam masala
  • 1/2 teaspoon ground ginger
  • 1 1/2 to 2 teaspoons salt
  • 1 teaspoon freshly ground black pepper
  • 1/2 cup hot water or beef broth
  • 2 teaspoon lemon juice (bottles is fine, fresh is better)
  • 1 refrigerator pie crust, room temp
  • 1 tablespoon unsalted butter, melted
  • salt for sprinkling on the crust
  • Cucumber salad-
  • 2 cups thinly sliced seedless baby cucumbers (about 4 cucumbers)
  • 1/4 cup thinly sliced red onion
  • 1/4 cup thinly sliced red pepper
  • 1/2 cup Fit & Active plain yogurt
  • 2 teaspoons cider vinegar
  • 2 teaspoons sugar
  • 1 teaspoon dry dill weed
  • 1 teaspoon salt (taste after prep and add more salt if you feel it needs it. Tastes vary on salt)
  • 1/2 teaspoon freshly ground pepper
  1. Preheat oven to 350 degrees. In a large cast iron pan ( or other oven safe pan), combine the ground beef, onion, garlic, red pepper and jalapeno (if using). Brown the meat over medium heat, stirring frequently to soften the veggies and thoroughly cook the ground beef.
  2. When done, drain well, then return to pan. Add the drained potatoes, the peas, the spices, and the salt and pepper. Cook over medium heat, stirring frequently, for about five minutes. You want to get the spices from that harsh, raw taste to slightly cooked.
  3. Add in the hot water or beef broth as well as the lemon juice. This will help the pie not get dried out in the oven.
  4. Unroll the pie crust and lay it gently over the meat mixture. Tuck it in around the edges. Brush the crust with the melted butter, then sprinkle with some salt; about 1/4 teaspoon or so should do it. Cut a slit in the middle of the pie crust.
  5. Bake it at 350 degrees until the crust is golden brown, about 45 minutes. Remember; the filling is already cooked, so the only purpose of this is to cook the crust.
  6. While the pie cooks, make the cucumber salad. In a medium bowl, combine the cucumber, onion and red pepper. Give it a toss with a wooden spoon, then add in the yogurt, vinegar, sugar, dill, salt and pepper. Stir to combine. Let it sit for about 5 minutes, then stir it again, making sure to get the bottom of the bowl. Cover the bowl and refrigerate the salad until ready to serve. Stir once more just before serving. This salad is best on the day it’s made, so don’t make it before the day you want to serve it. The liquid from the cukes and the yogurt will make it watery otherwise.
  7. When the pie is done, let it cool for just a couple of minutes, then serve it up, with a side of cucumber salad!

Spicy Samosa Dinner Pie 1Creamy Cucumber Onion Salad 3

Streusel Topped Cinnamon Rolls With A Creamy Vanilla Drizzle

Streusel Topped Cinnamon Rolls With A Creamy Vanilla Drizzle

Streusel Topped Cinnamon Rolls With A Creamy Vanilla Drizzle


You ladies and gentleman know I love you to pieces (preferably small, easy to vacuum pieces. Just sayin’. I hate messes.), but no long post today. It’s one of those rare days where my silly factor is taking a nap. Now if I could just get my body to follow suit. 🙂

I wanted to play around with the ubiquitous cinnamon roll. Why? Because I can and because have you ever known me to make ANYTHING the “normal” way? So I added streusel. …………….

Why is it that I don’t see surprise on even one face? Here I thought that my usage of streusel would come as a shock!

I also added a bit more richness (cause cinnamon rolls just AREN’T rich enough typically, right?) by adding a layer of butter into the dough. It’s nothing to be fearful of doing; it’s not quite as if you’re making croissant dough or any other type of touchy dough. This is simply one layer of butter, two folds of the dough and rolling and voila; JUST enough to add a touch more layer to the rolls, similar to, but not as layered as those flaky layer biscuits from a can that every single human alive loves to peel into as many layers as possible.

This is an easy yeast dough; not temperamental at all. Since it is butter and egg rich, it takes a while to rise so don’t stress it when it hasn’t risen in 45 minutes or so as many doughs do.

The finished rolls are rich and tender, but surprisingly not too sweet. If you like a sweeter roll, either add more cinnamon sugar as the filling or maybe sprinkle some on top of the rolls before putting on the streusel. Personally though, I think they are fine as is. You have the soft fluffy roll, the sweet cinnamon sugar filling, all topped with crunchy streusel and then finished with a creamy glaze.

You know the drill…

Streusel Topped Cinnamon Rolls With A Creamy Vanilla Drizzle

  • Cinnamon Roll Dough-
  • 2 packets dry yeast
  • 1/4 cup warm water (about 110 to 115 degrees. No hotter or you’ll kill your yeast.)
  • 1 cup milk, warmed to 115 degrees (it’s ok if it is a COUPLE of degrees more or less, but again, no more that that)
  • 1/2 cup sugar
  • 2 teaspoons salt (please don’t omit. I have people write me and ask why I put salt in baked goods. Beyond boosting flavor, it also tends to act as a stabilizer to the yeast)
  • 1/2 cup unsalted butter, room temp
  • 3 eggs, room temp
  • 5 to 5 1/2 cups flour
  • 1/2 cup unsalted butter, cool, but not refrigerator cold; let sit out for about 30 minutes (no, this isn’t a typo. This is for the added layer. Feel free to omit it if you just want regular cinnamon rolls.)
  • Filling-
  • 1/2 to 3/4 cup sugar
  • 2 1/2 tablespoons cinnamon
  • 6 tablespoons unsalted butter, melted
  • Streusel-
  • 3/4 cup flour
  • 1/2 cup sugar
  • 1/8 cup brown sugar, packed
  • 1/4 teaspoon salt
  • 1/2 cup oatmeal
  • 1 teaspoon cinnamon
  • 1/2 teaspoon nutmeg
  • 1/2 cup (1 stick) unsalted butter, cold and sliced thin
  • Glaze
  • 3 ounces cream cheese, room temp
  • 1 cup powdered sugar
  • 1 teaspoon vanilla extract
  • 1/4 teaspoon almond extract
  • 1 to 3 tablespoons milk (will vary depending on how thin you want your glaze)
  1. Sprinkle the yeast over the warm water. Let sit for about five minutes. The yeast will begin to foam and get bubbly. In the bowl of a stand mixer (you can do this all by hand or with a strong hand mixer, but both will take more arm strength. I love my stand mixer, lol), combine the milk, sugar, salt, room temp butter and the eggs. Use the paddle hook to blend well.
  2. Put the dough hook on now. Stir in the dissolved yeast and 2 1/2 cups of the flour. Beat until it is a ragged looking mass. Add in the flour, one cup at a time, and let the machine knead each cup in before adding another. Continue letting the mixer knead it until it is a smooth, silky cohesive dough that still has a very slight tackiness to it. It took me 5 1/4 cups but it may take you a bit more or less.
  3. Lightly oil a large bowl. Dump the dough into the bowl. Turn it to coat both sides with the oil, then cover with a clean cloth and set in a warm place to rise. I usually turn my oven on for about 45 seconds, then turn it right back off and place the bowl on a cookie sheet in there. Let the dough rise until it is roughly doubled in size. This will take anywhere from an hour to two hours.
  4. While the dough rises, make the butter layer. Cut the butter into three equal pieces. Lay them on a sheet of wax paper, then cover with another sheet. Use a rolling pin to gently beat them down into a flatter piece. You may have to scoosh them back together a couple of times. Once they are mushed somewhat (I know; such technical terms I’m using today), use the rolling pin to roll them into a flat layer of butter. Take this and place it flat in the freezer while the dough rises.
  5. Now go ahead and make your filling and streusel. For the filling, simply combine the sugar and cinnamon. Voila; filling.
  6. For the streusel, combine all the dry ingredients. Use a pastry cutter to cut the butter into the flour.sugar mixture. When it has large clumps, put down the pastry cutter and get your clean hands in there. It’s the best way to make a streusel. Just rub your fingers together in the mix, picking up, rubbing, rinse, repeat, until you have a nice crumbly streusel with some large pieces and some small. Set it in the fridge for now.
  7. When the dough is ready, lightly flour a large board or clean counter. Punch down the risen dough. Dump it out onto the floured board and knead it a handful of times, just to smooth it out. Roll the dough out into a 18 by 12 rectangle (this does NOT have to be exact.). Get the butter out of the freezer and peel off one sheet of the waxed paper. Place it butter side down onto the dough. Peel off the other sheet. Now fold the dough into thirds, as if you were folding a letter to fit into an envelope.
  8. Let the dough rest for five minutes. Now, reroll it (it’s going to be harder to roll now. You just added frozen butter into it, lowering the dough temp considerably) into an 18 by 12 rectangle again. Fold it into thirds one more time. Let it rest five minutes. Now roll it into a 26 by 12 rectangle.
  9. Brush the melted butter evenly over the dough. Sprinkle the sugar/cinnamon mix evenly over the top of the butter.
  10. Going from one of the long sides, slowly and carefully roll the dough into a log. Try to keep it as tight as possible so that you don’t end up with cinnamon rolls with big gaping holes through them.
  11. Cut the ragged end of of each end of the roll.
  12. Use a sharp knife ( or thread, which is how I do it) to cut the remainder of the log  into 19 pieces. I know; strange amount, but that’s how it ended up 😛
  13. Butter a 13×9 inch pan and a 9 inch round cake pan. Place 12 of the rolls, about an inch apart in rows of three, in the 13×9 inch pan. Place the other 7 around the edges of the cake pan, not touching. Sprinkle evenly with the streusel, patting it down gently to help it adhere. Places the pans in a warm place (not the oven this time) to rise. Let rise until they are roughly double in size, about 45 minutes to an hour.
  14. Meanwhile, preheat the oven to 350 degrees.
  15. When the rolls have risen. Place them on a middle rack in the 350 degree oven. Bake until they are puffy and golden brown and the streusel is also browned, about 25 to 35 minutes. Remove form the oven and let cool in the pans, set on a rack.
  16. When they are totally cool, make your glaze. Simply whisk together all the glaze ingredients until creamy. Drizzle over the tops of the cooled rolls.

Streusel Topped Cinnamon Rolls With A Creamy Vanilla Drizzle.jpg 1

Copyright Notice: From Cupcakes To Caviar images and original content are copyright protected. Please do not publish these materials anywhere without prior permission.


Old Fashioned Apple Crisp

Old Fashioned Apple Crisp

Old Fashioned Apple Crisp


I obviously love baking. I mean, 90% of this blog is centered around baked goods of one type or another. I love quick breads, crisps and cobblers,, muffins, scones, biscuits, cookies, etc, etc, etc. But you notice something you don’t see in that list? Pies. I love to EAT pies, but with the exception of making both pecan and pumpkin pies on Thanksgiving and Christmas, I don’t like MAKING pies. Rolling a pie crust, crimping it, getting it in the pan, so on and so forth drives me batty. I know that relaxes some people, but I’m not one of those people. Kneading bread dough, shaping it into a perfect loaf? That, on the other hand, relaxes me, makes me feel accomplished and all that rot.

So, what does someone who doesn’t like making an apple pie do when she has a craving for apple pie? Other than going to the store and buying one from Marie Callender? 😛 She makes a crisp! What better way to get all the apple pie flavor without the hassle of a crust? Plus, there’s that whole streusel thing and Lord knows I use any excuse I can find to bake something with streusel.

This recipe came from Ina Garten. I didn’t do a bunch to change it. I took out the orange juice and all the citrus zest; I’m just not a fan of apples with lemon and orange zest, unless, by chance, cranberries are in the mix too. I also added 1/4 cup of flour to the filling, because I didn’t want a soupy mess of liquidy apples. I added a touch more cinnamon to the topping and a third LESS brown sugar, because, well, cinnamon and with the full amount of brown sugar, it would have been way too sweet. And you know when I’M saying something would be too sweet, it would be too sweet, lol. And I used a pretty wide variety of apples; Macoun, Winesap, Granny Smith, Jonagold and Mcintosh, because I wanted a variety of flavor and texture in this. Otherwise, all Ina all the time. Or something like that.

This is a wonderful crisp. It’s NOT however, made size wise for a family of two, unless they have neighbors they can give some too. This makes a good sized pan. You can always cut it in half. You have the wonderful buttery, cinnamony, crunchy streusel on top and underneath it are tender, warm juicy apples lightly flavored with sugar and spice. Top this with a scoop of vanilla ice cream or a puddle of heavy cream and you’ll be in heaven.

You know the drill…. 😀

Old Fashioned Apple Crisp

  • Filling-
  • 5 pounds assorted apples, peeled, cored and sliced into wedges
  • 1 tablespoon lemon juice (bottles is fine)
  • 1/2 cup sugar
  • 2 teaspoons cinnamon
  • 3/4 teaspoon nutmeg
  • 1/4 cup flour
  • Streusel-
  • 1 1/2 cup flour
  • 3/4 cup sugar
  • 1/4 cup brown sugar, packed
  • 1/2 teaspoon salt
  • 1 cup oatmeal
  • 1 teaspoon cinnamon
  • 1/2 teaspoon nutmeg
  • 1 cup (2 sticks) unsalted butter, cold and sliced thin
  1. Preheat oven to 350 degrees. In a large bowl (and I mean large if you’re going to have any room to stir without flipping apples all over the counter), combine the apples, lemon juice, sugar, cinnamon and nutmeg. Stir well, making sure to reach the bottom of the bowl, to make sure all the apples get coated.
  2. Dump the apple mixture into a heavily buttered 4 quart dish that you set inside of a large rimmed baking dish, or even a cookie sheet. This is just to catch any possible overflow. Also, remember, the larger the surface area the dish has, the quicker the crisp will cook plus the more streusel you can fit on top. 😀 The dish I used, while pretty, wasn’t able to fit all the streusel on it. But that’s ok; it just means I have streusel in my freezer again.
  3. Rinse and dry your bowl, then pour the flour, both sugars, the oats and the spices into it and whisk to combine.
  4. Dump the cold sliced butter into the flour mixture. Use a pastry blender to cut it in, cutting until you have pebble sized chunks. What I usually do is use the pastry cutter to start, then once it’s more or less mixed, I stick my hands in there and press it between my fingers for a minute or two. You’d be surprised at how much blended the streusel gets doing it that way.
  5. Sprinkle the streusel evenly over the top of the apple filling. You want a nice thick layer. If you have any left, just put it into a ziploc bag and freeze it for another use.
  6. Bake the crisp at 350 degrees until the top is golden brown and the edges show nicely bubbling juices, somewhere between 35 to 55 minutes. The time is so gapped because it will depend a lot on the juiciness of your apples as well as the size pan you’ve used (more surface area- quicker baking; deeper pan- longer baker).
  7. Let cool for about 20 minutes before serving. Trust me on this. Molten apples kinda burn.
  8. Serve with ice cream or heavy cream. Enjoy!
Old Fashioned Apple Crisp

Old Fashioned Apple Crisp

Copyright Notice: From Cupcakes To Caviar images and original content are copyright protected. Please do not publish these materials anywhere without prior permission.

Cheesecake Carrot Cake Muffins With Streusel Topping

Cheesecake Carrot Cake Muffins With Streusel Topping

Cheesecake Carrot Cake Muffins With Streusel Topping


I hate carrots. No; really. I do. Fine, I just kind of hate carrots. I totally can’t stand raw carrots. As for cooked and savory, I only like baby carrots cooked with a ton of salt and butter. Rather like a crunchy orange salt and butter delivery system, one might say. I DO however, love carrot cake. Go figure. I also dislike zucchini but love zucchini bread. I would wager the obvious reason is that the veggies add moistness but don’t leave behind a lot of their icky poo flavors. Yes, I’m 51 and just said “icky poo”. Just shush. If you’ve been reading my blog for a while, you already know not to expect normality in any way, shape or form.

Long story short, I wanted carrot cake. But I’m too lazy to make carrot cake. So, when I realized I had a bag of the funky orange sticks taking up room in my veggie drawer and no intentions of actually using them for the cake I had envisioned, I had to improvise. When I noticed that I hadn’t done a muffin recipe in a while, that made up my mind. Carrot Cake muffins it was! And what, I hear you saying, is the best part of carrot cake? Certainly not the carrots! 😛 It’s the cream cheese frosting. So i used what few working brain cells I have left and I came up with these. Carrot cake muffins stuffed with a creamy cheesecake filling and then for total overkill, just because I could, I topped them with some streusel I had in the freezer. Because the world would be a happier place if everyone had streusel all the time AND no freezer is complete if it doesn’t have a bag of streusel in it just waiting for times like this.

These turned out darn tasty. I know…wonderfully descriptive today, aren’t I? But really; they are. The muffins have just enough batter to hold together the carrots, raisins, pineapple and nuts. Then there is a creamy center, reminiscent of a good cheesecake. All of that is topped with a crunchy streusel. What more does on need in life? Fine, you can get a cup of coffee or tea to go with them. But seriously… that’s it. Your breakfast or mid afternoon snack will be complete with just those two things.

You know the drill…. 😀

Don’t let the long ingredient list throw you. This is pretty quick.

Cheesecake Carrot Cake Muffins With Streusel Topping

  • Streusel-
  • 1/2 cup sugar
  • 5 tablespoons flour
  • 1 1/2 teaspoons cinnamon
  • 1/4 cup unsalted butter, cold
  • 1/4 cup finely chopped toasted walnuts (optional; sometimes I use nuts in my streusels, sometimes not)
  • Cheesecake filling-
  • 6 ounces cream cheese, room temp
  • 1 egg yolk
  • 1/2 teaspoon vanilla extract
  • 1/2 teaspoon cinnamon
  • 1/4 cup sugar
  • Muffin-
  • 1 1/3 cups flour
  • 2 teaspoons cinnamon
  • 1/2 teaspoon nutmeg
  • 1/4 teaspoon ground cloves
  • 1/2 teaspoon salt
  • 1 teaspoon baking powder
  • 1/2 teaspoon baking soda
  • 1 cup finely chopped toasted walnuts (easily toasted by placing in a layer in a baking dish and toasting at 350 for about ten minutes; just until lightly browned)
  • 2 eggs
  • 2/3 cup honey
  • 1/3 cup neutral oil, like vegetable
  • 2 teaspoons vanilla extract
  • 2 cups grated carrots (It will take about 4 large carrots)
  • 1 8 ounce can pineapple tidbits in juice, well drained (Use the lid to press down on the pineapple to get excess juice out so you don’t end up with soggy muffins)
  • 1/2 cup raisins
  1. Preheat the oven to 375 degrees. Lightly grease or line with liners 12 muffin cups. You will have a bit of batter left, so use it for one jumbo muffin or another couple of regular sized ones.
  2. Make your filling and streusel and set both aside- for the filling, beat together all the ingredients in a small bowl until creamy. Simple as that.
  3. For the streusel, in a small bowl, whisk to combine the flour, sugar and cinnamon. Use a pastry blender to cut in the butter until you have chunks ranging from pea size up to nickel sized.
  4. For the batter, in a large bowl, combine all the wet ingredients- the eggs, honey, oil, vanilla, carrots, pineapple and raisins. Stir well.
  5. In another bowl, whisk to combine all the dry ingredients- the flour, spices, baking powder and baking soda and salt.
  6. Dump the dry ingredients into the bowl of wet one and stir JUST until combined. Don’t over stir. You’ll end up with tough, tunnely (yes, tunnely is now a word) muffins if you do.
  7. Fill each muffin cup with just enough batter to cover the bottom. Then top that with about a tablespoon of the cheesecake filling. Then, cover the filling with a healthy dollop of the muffin batter. You want to end up with filled, but not overflowing muffin cups.
  8. Sprinkle streusel over the tops of each muffin, gently pressing down to get it to adhere better.
  9. Bake at 375 until the muffins are golden brown and a wooden pick inserted through the side comes out clean (it’s fine if there is some cheesecake filling on the pick, just no loose muffin batter itself), about 20 to 24 minutes.
  10. Let cool in the pan for a minute or two, then gently pull them out (I use a spoon) and set them on a rack to finish cooling.

Cheesecake Carrot Cake Muffins With Streusel Topping 2

Copyright Notice: From Cupcakes To Caviar images and original content are copyright protected. Please do not publish these materials anywhere without prior permission.

Easy Pumpkin Cranberry Bread (Recipe Redo)

Easy Pumpkin Cranberry Bread

Easy Pumpkin Cranberry Bread


Both times I posted this, I debated for weeks, WEEKS I say, as to whether it should be called pumpkin cranberry bread or cranberry pumpkin bread. I walked the floors, I lost weight from not being able to eat, I didn’t sleep for days at a time! Why, you ask!? (Pretend you asked) All for YOU! Yes, YOU, dear and faithful reader! All two of you. For this show of love, I believe I should have multiple boxes of Godiva truffles sent to me, along with large cars, house and land deeds and cold, hard cash.

I am redoing this recipe for two reasons- 1) because the original photo I took sucked donkey toes. I mean, we’re talking really really bad. Then, there is 2) which is that as good as the bread was back then, it could still be better. Now however? It’s awesome. It can’t be better. It is pumpkin cranberry (cranberry pumpkin?) nirvana. You eat this and angels weep, but only because they don’t have any. It has the perfect blend of squashy pumpkin flavor and tart sweet cranberry flavor, all mixed up in a perfectly moist bread redolent of warm Autumn spices and a touch of orange for zing.
This is a very easy bread to make. No chopping of this ingredient, dicing of this one. It uses canned pumpkin and canned cranberry sauce. Both of which also add incredible moistness as well as flavor to this.

You know the drill… git to cooking.

Easy Pumpkin Cranberry Bread

  • 3 1/2 cups all-purpose flour
  • 2 teaspoons baking soda
  • 1 teaspoon baking powder
  • 3/4 teaspoon salt
  • 1 tablespoon cinnamon
  • 1/2 teaspoon nutmeg
  • 1/2 teaspoon allspice
  • 1 teaspoon ginger
  • 1/2 teaspoon ground cloves
  • 1 2/3 cup sugar
  • 1 teaspoon vanilla extract
  • 1 tablespoon fresh orange zest
  • 3 tablespoons fresh orange juice
  • 1 (16 ounce) can whole berry cranberry sauce (use a good quality brand; I have found over the years that the cheap store brand ones use more sugar then fruit and it shows in the taste. I prefer Ocean Spray )
  • 1 (16 ounce) can pumpkin (not pumpkin pie filling; just pureed pumpkin)
  • 2/3 cup vegetable oil
  • 1 egg yolk
  1. Preheat oven to 350 degrees. Butter or use cooking spray on one 8 inch and one 9 inch loaf pan. You can use both 9 inch pans if that is all you have, but you will have much flatter loaves and you’ll need to adjust your cooking time. Over the years, I have found this to be the best combination.
  2. In a large bowl, combine the flour, baking powder, baking soda, salt and spices. Whisk well. Set aside for now.
  3. In another bowl, combine the sugar, vanilla extract, orange zest and juice, cranberry sauce, pumpkin puree, oil and egg yolk. Mix well until it is relative smooth. You’ll have lumps from the cranberries of course.
  4. Dump the wet ingredients into the dry ones all at once. Use a wooden spoon or rubber spatula to combine them together JUST until mixed. You don’t want a bunch of flour of the bottom of the bowl, but don’t over mix it. That causes tough bread.
  5. Divide between the two prepared pans. Smooth the tops and bake at 350 until a wooden skewer inserted in the middle comes out with just a few moist crumbs, no loose batter, about 45 to 60 minutes. The 8 inch pan will probably finish before the 9 inch.
  6. Let cool in the pan on a rack for ten minutes, then carefully invert it into your protected hand and then re-invert it onto the rack. Let cool for about an hour before attempting to cut.

Copyright Notice: From Cupcakes To Caviar images and original content are copyright protected. Please do not publish these materials anywhere without prior permission.

Easy Pumpkin Cranberry Bread

Easy Pumpkin Cranberry Bread


Cinnamon Spice Apple Coffee Cake

Cinnamon Spice Apple Coffee Cake

Cinnamon Spice Apple Coffee Cake


Growing up in Chicago, places like apple orchards weren’t exactly on the list of weekend getaways. When my dad lived in one of those old hotels in Hyde Park, this one called The Saranac, he used to take me to The Museum Of Science And Industry or maybe The Field Museum when I visited him. On rare occasions during the Summer, we might head out to the Indiana State Dunes and spend the day getting sunburned…I mean, playing in the lake. Nahhh, I mean getting sunburned. Nobody worried about sunscreen back then. By all rights, none of us who grew up in the 60’s and 70’s should have any skin left. I remember a sunburn I got when I was 17 that left me the color of a Coke can and blistered. My dad wanted me to go to the ER, but I refused.

But I digress. Imagine that. Me. Going off on tangents.  As I was saying, there were no orchards in the middle of Chicago. Since living in KY (half my life now, actually), and raising my kids here, it has never failed to make me a bit jealous when my kids would go on field trips to apple orchards or “pick your own pumpkin” spots. It was always just so…. southern to me. In a wonderful way, mind you. So when the idea to go to an orchard with the boys popped into my head, I ran with it. The one we went to is so cool. The apples were fairly well picked over this late in September, but we still got some. But there was also a huge play area that Joshie and Jordan loved, a cafe that we hope to eat at next time and tons of homey apple and “countryish” products at a store there. I hate that it took me until I was this ancient to discover orchards!

So what did I make with what apples we got? Not a darn thing. We didn’t get enough to spare for anything but out of hand eating. It was just coincidental that I had made this cake Saturday.

This is one awesome coffee cake, if I do say so myself *preens a little* It’s a tamer version of a crumb coffee cake. I stuffed this with apples, cranberries and cinnamon chips, as well as a crumbly mixture on top and in the middle. This is ultra moist due to the apples with a lovely flavor due to, well, all the varied ingredients. This is such a perfect Autumn cake. Typical of many coffee cakes, this is even better in the days following baking it, as opposed to fresh from the oven. The flavors need time to meld and then it is spectacular. The recipe was very loosely based off of one I got from a yahoo groups newsletter over a decade ago. Anyone else remember those groups fondly!?

This is a tiny bit more involved than “throw and dump”, but nothing you can’t handle. Trust me.

You know the drill….

Cinnamon Spice Apple Coffee Cake

  • Filling/Topping-
  • 1 1/4 cups brown sugar
  • 1/2 cup lightly toasted, finely chopped pecans or walnuts.
  • 1/3 cup flour
  • 1/3 cup unsalted butter, melted
  • 1 tablespoon cinnamon
  • Cake-
  • 1/2 cup unsalted butter, room temp
  • 1 cup sugar
  • 2 eggs, room temp
  • 1 tablespoon vanilla extract
  • 2 2/3 cups flour
  • 1 1/2 teaspoons baking powder
  • 1/2 teaspoon baking soda
  • 1/2 teaspoon salt
  • 1 1/2 teaspoons cinnamon
  • 1/2 teaspoons ground cloves
  • 1/2 teaspoon ground nutmeg
  • 1 teaspoon ground ginger
  • 3/4 cup buttermilk
  • 1/4 cup of either fresh apple cider or (preferably, if you have it) boiled cider**
  • 2 1/4 cups of peeled and chopped apples (about 4 small apples)
  • 2/3 cup dried cranberries, soaked for 20 minutes in 3 tablespoons hot water, then drained
  • 1 bag Hershey’s Cinnamon Chips (you COULD make this optional, because I know these can be hard to find, but please try to find them!)
  1. Preheat your oven to 350 degrees and grease and flour a tube pan. Alternately, spray it with a flour/oil baking spray such as Bakers Joys Or Wiltons (which is my favorite) Set aside
  2. Make your filling- In a small bowl, combine the brown sugar, flour, cinnamon and nuts. Add in the melted butter and mix until it is thoroughly moistened and crumbly. Set aside.
  3. For the cake, in a large bowl, combine the butter and the sugar. beat on low speed with a hand mixer until light and creamy, about 2 minutes. Scrape the bowl down and add the eggs and vanilla extract. Beat until well combined.
  4. In a small bowl, whisk to combine the flour, baking powder, baking soda, salt and spices.
  5. Combine the buttermilk and apple cider/boiled cider in a measuring cup.
  6. Alternately add the flour mixture and the buttermilk mixture to the bowl with the butter, starting and ending with the flour (1/3 of the flour, 1/2 of the buttermilk, 1/3 of the flour,  remaining buttermilk, remaining flour), beating on low speed JUST until combined after each addition.
  7. Gently fold in the apples, cranberries and cinnamon chips.
  8. Spoon half the batter into the prepared tube pan. Evenly top with half the crumb mixture, then the other half of the cake batter. Then top with the last half of the crumb mixture. Gently pat it down to help it adhere to the top.
  9. Bake at 350 for 60 to 70 minutes or until golden brown and a wooden skewer inserted in the center comes out with just a few moist crumbs on it, no loose liquidy batter. Let it cool in on a rack in the pan for about ten minutes, then carefully run a butter knife along the sides of the pan and around the center hole. Do this a couple of times just to make sure it’s completely loosened.
  10. Carefully (use pot holders and/or a towel. This is till gonna be hot) invert the pan over your (protected) hand (works even better if you can use two hands and someone else does the inverting and shaking. Don’t ask me how I know this. Ahem.) and carefully shake the cake out. Invert it immediately back onto the rack to finish cooling.
  11. Let cool until completely cool before slicing, about two hours. Like I said above, this is even better the next day.

Copyright Notice: From Cupcakes To Caviar images and original content are copyright protected. Please do not publish these materials anywhere without prior permission.

**If you want to make your own quickie version of boiled cider (boiled cider has a much more intense apple flavor than regular cider, so is worth the trouble.), take 1 cup of fresh cider and pour it into a small pot. Bring to a boil over medium heat, then reduce the heat a bit and continue boiling until the cider has reduced down to about 1/4 cup. Let it cool before using.

Cinnamon Spice Apple Coffee Cake

Cinnamon Spice Apple Coffee Cake