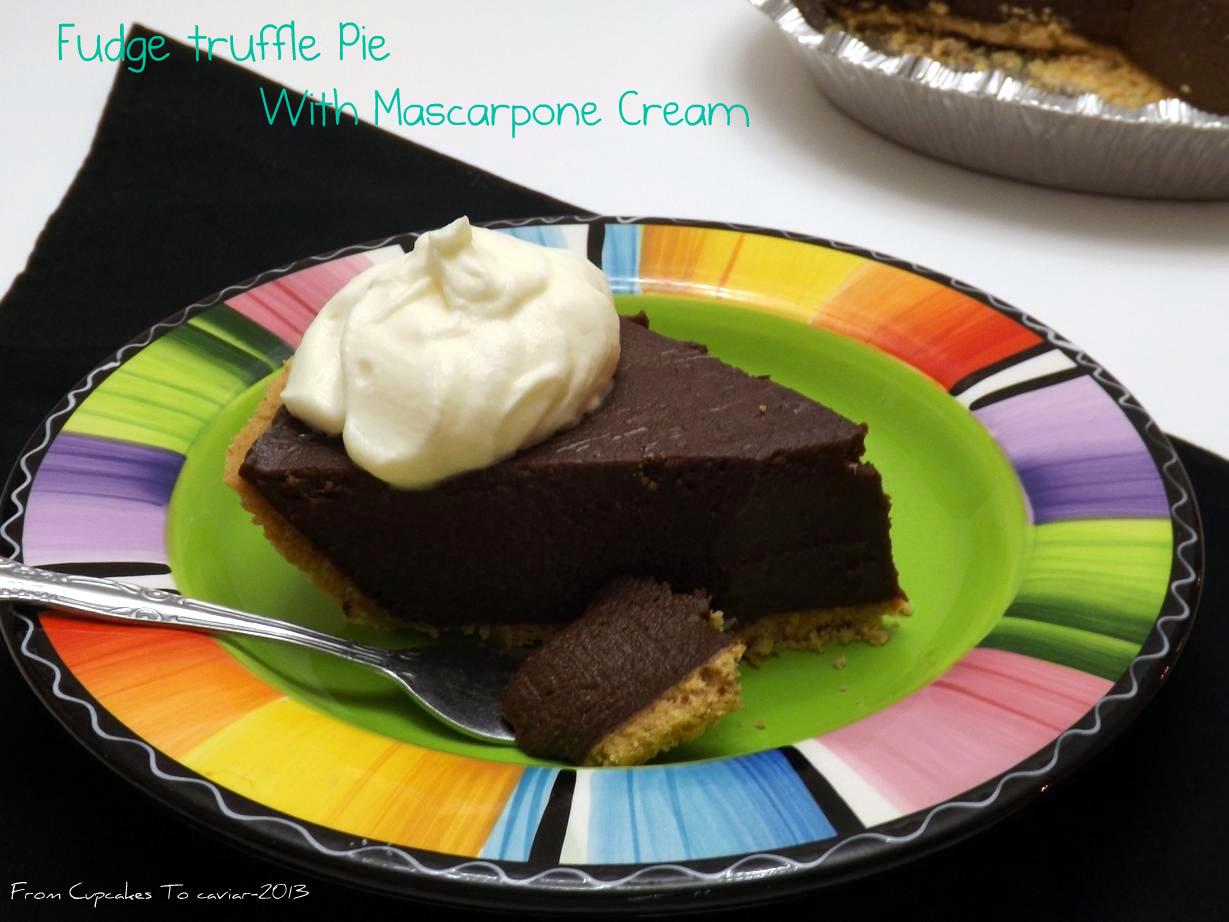
Fudge truffle Pie With Mascarpone Cream

Is there such a thing as too much chocolate? My husband has joked (ok, half joked) that it’s different for a man, that women are hormonally wired to want chocolate more than males do. I’m not sure that’s true, no matter how many jokes/pins/whatever there are combining women, PMS and chocolate. But I think of it this way. If HE thinks that women have this strange NEED for chocolate, who am I to argue? With that mindset,a ll he does is roll his eyes as I grab the Reeses Cup package from the check out lane or smiles when I talk about how he just must, absolutely must, get me some Fanny May chocolates. I mean… I NEED them, right? Why fight that line of thought? Heh.
This recipe however, come perilously close to too much. When you make it (and you must make it. If you’re female, tell anyone who asks that my husband, who is a medical professional, says that you need this pie. If you’re male, say you’re making it for your wife or sister or mother. Then eat it all yourself.
This pie is like a truffle in a crust. It’s rich, thick, smooth, supremely chocolatey and any other adjectives one can think of that mean “OMG, hand over this pie now and no one will get hurt!”. The mascarpone cream I added to it just adds to the decadence. Yet at the same time it cuts the richness a bit making it easier to fit in 4 or 5 more bites of pie. See? I’m always thinking of your needs here. I’m a pal that way.
No matter how much you love chocolate though, I suggest small slices. This pie can easily serve 12 people. Not to mention, I would guesstimate that a small slice of this has about 12,000 calories. Add some of the Mascarpone Cream and you’ve upped it to about 15,000 calories, give or take a thousand 😀
Fudge Truffle Pie With Mascarpone Cream Topping
- 6 eggs
- 1 1/2 cups sugar
- 1/3 cup cornstarch
- 1 3/4 cup heavy cream
- 2 cups whole (or 2%) milk
- 5 ounces unsweetened chocolate, chopped
- 1 tablespoon butter
- 4 teaspoons good quality vanilla extract
- 1 large premade graham cracker crust (feel free to use a deep dish pastry crust, but plan on leftover filling, which you can then eat warm with a spoon; not a bad predicament to be in)
- Mascarpone Cream-
- 8 ounces mascarpone
- 1 cup heavy cream
- 1/4 cup sour cream
- 1 teaspoon vanilla extract
- 1/3 cup powdered sugar
- Â Separate your eggs, putting the whites into a sealable container in the fridge. Save them for meringue cookies or a couple of egg white omelets. After eating this pie, you’ll want to watch your calories for a bit anyway hehe.
- Place the yolks in a small bowl or measuring cup. Beat lightly then set aside.
- For the filling, in a large nonstick pot, combine the sugar and the cornstarch. Gradually whisk in the cream and milk, then stir in the chocolate.
- Cook over medium heat, stirring constantly. Continue to cook until it is thick and bubbly. At first it will look like the chocolate just isn’t melting into it but keep going; it all comes together. Just don’t stop stirring or it will stick and burn and burned pudding smells and tastes disgusting and it makes baby kittens whimper..
- When it thickens, reduce the heat and cook for a couple of minutes more.
- Gradually stir about a cup of the filling mixture into the egg yolks, stirring the whole time you’re combining them. You have to temper your yolks. If you just dump them into the hot mixture, you’ll have chocolate filling with scrambled eggs mixed in. Yum??
- Stir the egg yolk mixture into the chocolate mixture. Bring to a gentle boil and cook for another 2 minutes, again stirring constantly.
- Take off the heat. Stir in the butter and vanilla extract.
- Pour the filling into the crust. Cover with plastic wrap and refrigerate for about 4 hours.
- About ten minutes (or up to a day; no more though) before you’re ready to serve, make your topping.
- In a medium bowl, whip the mascarpone until light. Pour in the powdered sugar and vanilla and beat until fluffy and combined. Fold in the sour cream with a rubber spatula. Add in the heavy cream and beat at low speed until the mixture is light, fluffy and looks like a soft custard. If not using right away, eat a spoonful
or sixthen put in a covered bowl in the fridge. - When ready to serve, cut the pie (this slices quite nicely. It’s a firm filling) into small slices and serve either with a dollop of topping on each slice or with the topping in a bowl so everyone can put on how much they’d like.