Maple Creme Brulee For Two

Maple Creme Brulee

There are some things in life that can only be called dangerous and dangerous with good reason. Bungee jumping? Dangerous. I understand that whole adrenaline rush idea but jumping off of a 300 mile high surface into mid air connected to only a piece of frayed yarn (yeah yeah I may be exaggerating just a bit here but not much) isn’t my idea of a woohoo good time. Though I admit to a strange hankering to sky dive, which is the exact same thing, only from a moving plane this time. holding a plastic grocery bag over your hand and hoping it expands enough to keep you from becoming part of the scenery.

Race car driving? Dangerous. Again; I can see the appeal. Hell, I see people in my own town driving like bad versions of Mario Andretti and I’ve been known to have a lead foot at times when I am sure I am *ahem* not being watched she says tactfully.ร‚ย  But getting into a large chunk of metal with an engine that is about 2 inches in front of you and hoping that you can drive well enough to where said engine doesn’t end up in your lap whilst only being protected by a helmet and a body suit that is NOT made of titanium or something good like that? Yeah. Dangerous.

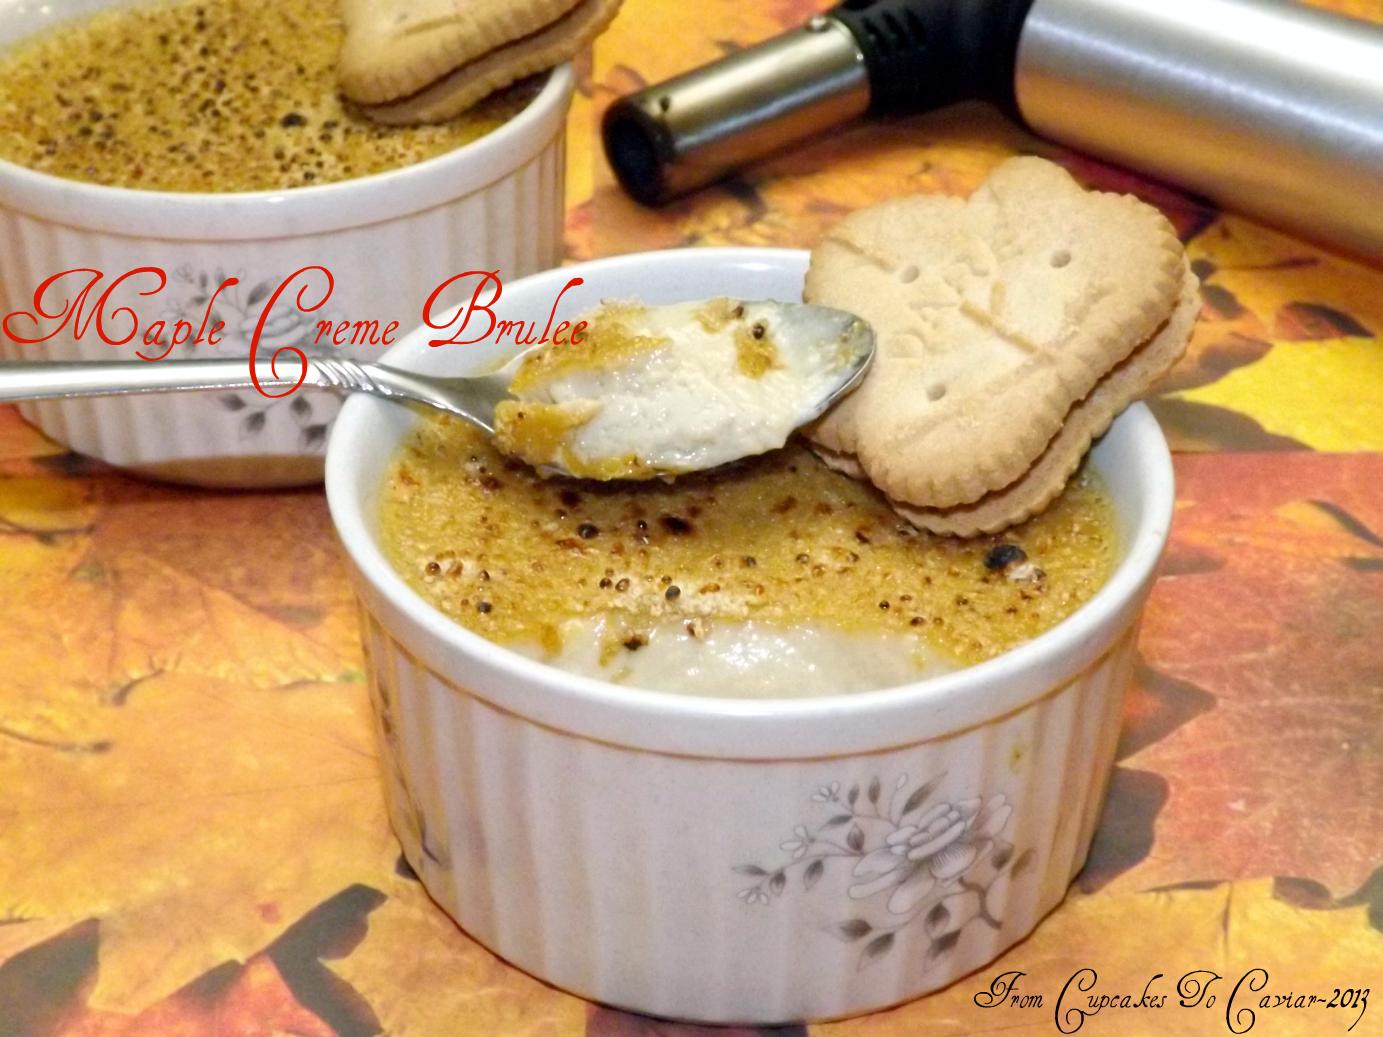
For me personally? Having a full bag of gummy candy near me? Dangerous. A pint of Haagen Dazs Sea Salt Caramel Gelato sitting in front of me? Dangerous. It will soon be empty and I will be smacking myself upside the head for being a glutton at the same time that I’m sticking my face down in the carton sucking up the last drips. Creme Brulee? Dangerous. Any flavor whatsoever. But this one was particularly so with my love of all things maple. Thank God that it only makes 2 servings. Because if it made more, I would have eaten more than the one I had. Creme Brulee is, contrary to what many think, an extremely easy dessert to make. It tastes like it took you all day but in reality if you can hold a whisk in your hand and separate eggs, you’re good to go. Just don’t eat this thinking it is low calorie. It’s more like enough calorie to keep you alive for say, a week. So as I always say… git to cookin’.

Maple Creme Brulee (For Two)

  • 3 egg yolks
  • 1 cup heavy cream
  • 1/3 cup maple syrup (the real thing, not Mrs. Butterworth)
  • 1/4 teaspoon maple flavoring (can be found with the vanilla extract in stores)
  • 1/8 teaspoon salt (USE the salt… it brings out flavor)
  • 2 to 3 tablespoons of either maple sugar or demarara sugar
  1. Preheat the oven to 300 degrees. Place 2 8 ounce ramekins or custard cups into an 8 or 9 inch square pan.
  2. In a large measuring cup (makes it easier to pour later), whisk together all the ingredients except the maple sugar. That will be your crackly topping later. Pour the liquid evenly between the two ramekins.
  3. Place the pan with the ramekins into the 300 degree oven then carefully pour very hot water into the pan to where it goes about halfway up the sides of the ramekins.
  4. Bake at 300 for about 45 minutes or until the top has only a slight jiggle in the very middle when you gently shake it.
  5. Take the ramekins out of the hot water so they don’t keep cooking and set them aside to cool to room temp, then place in the fridge until serving time.
  6. When ready to serve, sprinkle half the sugar onto each creme brulee and either use a kitchen torch or the broiler to caramelize the sugar. if doing it under the broiler, make sure your ramekins are broiler safe. Not all of them are.


Berry Mascarpone Cheesecake Bars

Mascarpone Berry Cheesecake Bars-001

I have decided to build an ark. Yep. An ark. Because I am pretty sure it is never ever going to stop raining here in my part of Kentucky. Usually here in mid May, we are hovering around the 80’s and already worrying about drought. This year however, it has rained almost every day for almost 2 weeks and the temp, while pleasant, is most certainly not hovering near the 80’s. Right now it’s 62.

But!!! Being me, I will not be filling my ark with two of every animal. Nope. Noah already did that and I don’t want to be a copycat. There will be animals of course. I’ll have monkeys. I like monkeys. And cats. And platypus for comic uses. But no elephants unless one of you wants to offer poop scooping services. And you’d darn well better believe I’m leaving mosquitoes behind. And centipedes. Those things ick me out. They have got to be the most prehistoric bug ever. If some director wanted to make a killer horror movie, he/she would only need to have a few scenes with centipedes crawling over the tied up heroine. *shivers*

So what will my ark be filled with? Duhhhh man, this is ME. What do YOU think? CANDY!! Twelve (why stop at two) of every kind of chocolate, lemonheads and of course my current craze, fruity gummi candy. I may also throw some cheetos on the ark just cause.

But, if you’re one of those weirdos who wants their fruit with no preservatives and actually *gasps* REAL, try these cheesecake bars. I based them off of the ubiquitous blackberry pie bars that you can find everywhere online, including right here on my blog . The pie bars originally came from The Pastry Queen cookbook. These cheesecake bars are based on that recipe. They use the same crust but the filling is changed up. These are quite yummy. The crust is sweet and buttery and the filling is creamy, tangy and sweet all at the same time. Plus- they have crumbs on top. Butter, fruit, mascarpone and crumbs. Need I say more? They couldn’t be any easier to make so you know the drill… get to cookin’!

Berry Mascarpone Cheesecake Bars

  • Crust and crumbs-
  • 3 cups flour
  • 1 1/2 cups sugar
  • 1/4 teaspoon salt
  • 1 1/2 cups unsalted butter, cold
  • Filling-
  • 4 eggs
  • 2 cups sugar
  • 1/2 cup sour cream
  • 8 ounces mascarpone cheese, room temp
  • 8 ounces cream cheese, room temp
  • 3/4 cup flour
  • 1/2 teaspoon almond extract
  • ร‚ย 1 1/2 teaspoons vanilla extract
  • 1 16 ounce bag frozen raspberries, thawed and drained well
  • 1 16 ounce bag frozen blackberries, thawed and drained well
  • Fresh berries to scatter on top (optional)
  1. Preheat oven to 350 degrees. Butter a 13×9 inch pan then line it with parchment paper and butter the paper.
  2. Combine the 3 cups flour, 1 1/2 cups sugar and the salt in a large bowl. Using a pastry blender, cut in the cold butter until the mixture resembles fine crumbs. Set aside 2 cups of the mixture. Press the rest into the bottom of the prepared pan.
  3. Bake crust at 350 degrees for about 15 minutes or until it is golden brown. Let rest while you prepare the filling.
  4. In a large bowl, using a hand mixer, together the mascarpone, cream cheese and sour cream. Add the sugar and beat just until well combined. Add the eggs, vanilla extract and almond extract and beat well. Mix in the flour. Gently fold in the drained berries.
  5. Spoon the mixture over the prepared crust. Sprinkle evenly with the crumbs that you held back earlier.
  6. Bake at 350 degrees about 55 minutes. You want the top to be firm but still to have a little jiggle in the center third of the bars, just like with any other cheesecake. The crumbly top will be a nice light golden brown. This will firm up as it cools so don’t overcook it.
  7. Let this cool for at LEAST an hour or so before cutting, but it’s preferable to cover it and let chill overnight. Use a sharp serrated knife that you’ve heated under hot water if you want to get clean cuts.

Chocolate Bundt Cake With A Creamy Coconut Filling

Chocolate Bundt Cake With A Creamy Coconut Filling

Chocolate Bundt Cake With A Creamy Coconut Filling


Ya know, for a woman who once claimed to not like coconut, I have noticed that my tune has changed and I have quite a few coconut recipes in here now. I’ve always thought that that aspect of human physiology was interesting. We can hate or love something for years and then all of a sudden, we do a 360 on how we feel about it. Other than Mounds Bars or Almond Joy bars, just 2 years ago you’d be hard pressed to find me saying anything nice about coconut. Coconut flavor I was fine on as well as coconut milk (I could happily drink it with a straw ๐Ÿ˜› ) but actual coconut? No way.

What about you? Anything that you have changed your mind on in either direction as you’ve aged? Food wise that is.

All that said, obviously the recipe for today contains coconut. What? You were expecting goose liver perchance? Some Morels? Not sure either of them would have gone as well with this cake. And believe me, coconut goes well in this. the first two “taste testers” I served this to took a bite and then their faces went into that “omg, this is good” look that all food bloggers love to see ๐Ÿ˜€

This is a very moist cake, which makes it a good keeper if you make sure it stays covered. The coconut filling is very reminiscent of a Mounds bar but with a bit of an almond flavor to it (if you’re not a fan of almond extract, feel free to omit it.)ร‚ย  Then there is the chocolate ganache glaze. Really? Do I need to describe it? Chocolate ganache. Enough said. Go… shoo… bake. Thank me later.

Chocolate Bundt Cake With A Creamy Coconut Filling

  • Filling-
  • 2 cups (one small bag) shredded sweetened coconut flakes
  • 1/2 cup plus 2 tablespoons sweetened condensed milk
  • 1/4 teaspoon vanilla extract
  • 1/8 teaspoon almond extract
  • Cake-
  • 3 cups flour
  • 3/4 cup sifted (yes, sifted; cocoa always has those little lumps it leaves behind otherwise) unsweetened cocoa powder (not hot chocolate mix)
  • 1 teaspoon baking powder
  • 1/2 teaspoon baking soda
  • 1/2 teaspoon salt
  • 2 cups unsalted butter, room temp
  • 1 1/4 cups sugar
  • 1 cup firmly packed light brown sugar
  • 1 tablespoon vanilla extract
  • 1/2 teaspoon coconut flavoring
  • 5 eggs, room temp
  • 2 cups sour cream (NOT low fat)
  • Glaze-
  • 5 ounces semisweet chocolate, chopped
  • 1/2 cup heavy cream
  • Garnish-
  • 1/2 cup toasted coconut
  1. Combine all your filling ingredients in a small bowl and set aside.
  2. For the cake- Preheat oven to 350 degrees and grease and flour a 12 cup bundt pan. If, like me, you only have a 10 cup pan, also grease 5 king sized muffin cups because if you try to fit all this batter into a 10 cup pan, you WILL have it overflow all over your oven. Been there, done that, learned my lesson.
  3. Whisk together your dry ingredients in a medium bowl.
  4. In a large bowl, beat the butter at high speed until creamy. Add the sugars and continue to beat until light and fluffy, about three minutes. Beat in the vanilla extract and coconut flavoring. Add the eggs, one at a time, beating well after each addition.
  5. Beginning and ending with the flour mixture, add it in three batches, alternating with the sour cream.
  6. Spoon a little less than half of the batter into the prepared bundt pan. (If using a ten cup pan, FIRST fill the 5 prepared muffin pans about 2/3 full THEN go to the bundt pan, using about half of the remaining batter. Don’t use the coconut filling in the cupcakes; just think of them as extras to hoard for yourself :-p )
  7. Carefully spoon the coconut filling over the batter in the pan. Make sure it is in the middle of the pan, not touching either side or it will stick and make the cake difficult to remove.
  8. Spoon the rest of the batter carefully over the top of the filling, smoothing it down where needed.
  9. Bake at 350 for about an hour and ten minutes for the 12 cup pan, about 50 minutes for a ten cup (about 20 minutes for the cupcakes) or until a wooden skewer inserted in the cake (make sure to get the cake not the filling) comes out with just a few moist crumbs on it.
  10. Set on a wire rack and allow to cool until just barely warm then turn the cake out onto the rack to finish cooling completely before glazing.
  11. For the glaze- heat your cream just to boiling in the microwave. Pour over the chopped chocolate in a bowl and let sit for about 3 minutes, Stir to combine. Let it sit for a bit to thicken up somewhat. Spoon over the cooled cake. Garnish with the toasted coconut.
  12. If you have any glaze and/or coconut left (which you will) just dump the coconut into the ganache, stir well then put it into the fridge until it firms up. You can then scoop it out and form it into small truffles. Or just spoon it out and eat it in front of the TV watching bad reality show reruns. I won’t tell.

Print Friendly and PDF


Creamy Coconut Flan

Creamy Coconut Flan

No long winded story and bad jokes tonight. I’m sleepy and on a massive sugar crash from this flan. ๐Ÿ˜›
Ok, maybe a short story based on the whole sugar high/crash idea.

I remember when my brother, sister and I were kids. Every year we would get our mother a large heart shaped box of Fanny May candy for Valentines day. We used her money to buy it of course and I am fairly sure that any change went for things like Lemonheads and ice cream. Well, each and every year, mom would put the opened box into the fridge. She wasn’t a huge sweets eater (obviously I get my love of them from my sweets binging diabetic father hehe) so would put it there with, I’m sure, the idea that when she wanted a piece (ONE piece) she could get one (again… ONE piece. Who does that!?). Well, every.single.year. mom would invariably come to us with a heart shaped box asking what had happened. Why? Because what she held was a practically empty box bearing only one or two pieces of candy that had a bite out of the side, those pieces being the ones none of us kids liked.

Mom always said she hoped I had kids just like me. I did. I now have a “stash” of candy and junk food in my closet that the kids are supposed to stay out of. HA! yeah, right. The ones living at home go in it all the time and the ones who come and visit head straight to the stash, coming out bearing junk food galore and innocent expressions.

On a side note, taking a drink of Pepsi Throwback after eating a huge serving of flan isn’t advisable. It has absolutely no flavor according to my “sweeted out” taste buds plus I think my pancreas just cried a little, then died.

This is one yummy flan btw. Sweet (oh my, is it sweet), quite coconutty, with that mouth feel texture that everyone loves (man, that sounds vaguely obscene. but then I’m tired and everything is making me titter). The caramel sauce on the top is the perfect topping. I used to make flan just for the topping. I swear I did. I’m weird. This is intensely coconutty so if you’re so so about coconut flavor this may be one you need to pass by.

Creamy Coconut Flan

  • 1 cup sugar
  • 4 eggs
  • 3 egg yolks
  • 1 can sweetened condensed milk
  • 1 can cream of coconut (found with the drink mixers- do NOT sub coconut milk)
  • 1 cup heavy cream
  • 1 tablespoon vanilla extract
  • 1/4 cup coconut vodka
  • Toasted coconut for garnish (optional)
  1. Preheat the oven to 325 degrees.
  2. Pour your sugar into a small saucepot. Heat it over medium high heat until it is melted and a nice golden brown color. Don’t walk away once it starts melting. It doesn’t take long to go from melting to scorched and wasted.
  3. Pour the sugar onto the bottom of 8 one cup ramekins, swirling to coat the bottom of the ramekins with the melted sugar.
  4. Whisk the eggs and egg yolks in a large bowl until foamy. Add in the condensed milk, cream of coconut, cream, vanilla extract and vodka. Whisk until well combined. Strain through a fine mesh strainer into another bowl (preferably one with a pour spout) or large measuring cup.
  5. Pour the flan mixture evenly into the prepared ramekins. Set the ramekins into two deep baking dishes. Set into the oven then carefully add hot water to each pan to go about halfway up the sides of the ramekins. be careful not to slosh any INTO them though.
  6. Bake at 325 degrees until the center is almost set, about 30 to 40 minutes.
  7. Carefully remove from the pan (I used tongs) and set on a wire rack for about an hour, then transfer to the fridge to chill for at least an hour.
  8. Carefully slide a butter knife all around the edges of each flan and invert onto a plate. If it doesn’t come out,ร‚ย  place the ramekin into hot water for a minute or so to loosen it up, then try again. Garnish with the toasted coconut if using.

Print Friendly and PDF

Chocolate Chip Double Berry Scones

Chocolate Chip Double Berry Scones 2-001

I can hear the outcry now… “MORE scones, lady!!!??? What the heck?? Can you do anything but scones or citrus pies or risotto!?”

Yes. yes, I can. But I wasn’t thinking the other day when I, on my Facebook page asked everyone which they would prefer- these scones or a quick bread I am trying. They chose the scones. Sooooo, being a woman of my word, I made them. Because honesty is just how I roll. Well, when I trip on our land, downhill quickly is also how I roll but I won’t blog about that. Though photos would probably be hilarious.

Moving on- been interesting in our household lately. My (very pregnant) daughter and her boys are with us through mid August while her husband goes through Basic Training and AIT (the on the job training for whatever you will be doing part of the military) so having 2 extra little ones (they are 3 and 6) has been chaotic to say the least. But I love knowing that when they move, they will, for a time at least, until it fades, have some memories of living with gramma and grampa. My daughter is due in a few weeks so I’ll have time with the baby (girl) for a while too ๐Ÿ™‚

Plus, I’ve been having some health issues again. Not gonna go into detail here yet but I’ll cue you all in when things are more settled as to treatment. Until then, I’m just gonna continue to bake fattening things for all of you. Why? Cause I lurves you of course!!! Seriously. You have no idea what it means to me to know that people actually come here to my tiny blog, read my inane words and sometimes actually even make the foods I post.

These scones turned out delicious. I got the base recipe from The Pastry Queen Cookbook (you should have noticed by now that I love this cookbook) but changed it around. I just KNOW you’re surprised at that news. The only problem I had (which is my fault not the books) was shape. After I added the berries, I didn’t want to knead the dough, thus mushing the berries and toughening the dough, so I just reshaped it. BUT… I wasn’t able to get it back into a decent circle. so I tried making it more rectangular and cutting the scones from that. It turned out rather laughable ๐Ÿ˜› These taste absolutely amazing… light, tender, flaky with a perfect mix of berries and chocolate and an orange glaze that just complements it all. But the way they look? Kinda wonky lol. But I promise you; you won’t care once you make some and taste them how they look. Also, you may have better luck shaping the dough than I did ANYWAY thus negating the issue. So don’t let looks fool you. Just look at the nicely glazed surface… see the pieces of berry peeking out alongside some chocolate. Then go bake. And I promise… no more scones…. for a few days anyway ๐Ÿ˜›

Chocolate Chip Double Berry Scones

  • 3 cups flour
  • 1 cup sugar
  • 1 tablespoon baking powder
  • 1/2 teaspoon salt
  • 10 tablespoons unsalted butter, COLD
  • 1 tablespoon vanilla extract
  • 1 1/2 cups heavy cream
  • zest from one large orange (about 1 to 2 tablespoons)
  • 1 cup semi sweet or bittersweet chocolate chips
  • 1/2 cup fresh raspberries
  • 1/2 cup fresh blackberries
  • Glaze-
  • 1 cup powdered sugar
  • 2 teaspoons orange zest
  • 1/3 cup orange juice
  1. Preheat oven to 375 degrees. Line a buttered baking sheet with parchment paper then butter the paper.
  2. In the bowl of a stand mixer fitted with the paddle attachment (as always, you can use these directions with a hand mixer), combine the dry ingredients on low speed, including the orange zest.
  3. Cut the butter into small pieces, then add to the flour. Beat on low speed until the butter is in small pea sized pieces. Then add in 1 cup of the cream and the vanilla and continue beating on low speed. You want the dough to come away from the sides of the bowl in a clean ball of dough, no floury remnants left behind. If it still looks dry, add more cream, about a tablespoon at a time until it forms the dough ball.
  4. Turn out onto a lightly floured board and gently knead the chocolate chips into it. You’re not trying to work the gluten up like in bread dough. That will make the scones tough.
  5. When the chocolate is incorporated, gently pan the dough out into a fairly thin circle or rectangle. Lay the berries down on one side of the dough, then fold the other side down over them. Press gently to seal.
  6. Reshape the dough (circle if you want wedges, rectangle if you want squares or diamonds) and cut into either 10 wedges or if making squares or diamonds (for the diamonds, cut into squares then cut them in half diagonally), cut into 12 pieces. Brush each with some of the leftover cream and sprinkle with sugar.
  7. Bake at 375 for about 15 minutes for wedges or 10 to 12 minutes for squares or diamonds. You want them a nice golden brown on top.
  8. For the glaze- in a small bowl, mix together the glaze ingredients. Whisk well to get rid of lumps.
  9. Pour the glaze out onto a shallow lipped plate.
  10. Dip the top of each scone into the glaze. Let dry for about ten minutes then dip each one again. Let dry a bit before serving though when they are warm and sticky they are awfully hard to resist ๐Ÿ˜€

Print Friendly and PDF

Chocolate, Cherry & Pistachio Scones

Chocolate, Cherry & Pistachio Scones

Chocolate, Cherry & Pistachio Scones


I’ve mentioned a couple of hundred times by now that I’m not one of those people who does things by the seasons. Nope, I’m that weirdo at the grocery store with no coat and flip flops when it’s 20 degrees out. I’m the reason you’re smelling bbq and woodsmoke in January and suddenly craving grilled chicken. I’m the one making heart cookies in August. While at the same time making a nice comforting warming beef stew or chili. I’m that person posting Pumpkin bread in May and having everyone who comes here (all two of you hehe) wonder what the heck I’m on and why I’m so bass ackward.

Yes. I’m weird. This however is why you like me, right?

*crickets*

From what I’ve seen, most people tend to seem to bake scones during the Winter, many times even around the holidays. This may have something to do with everyone being far wiser than I and not turning on their ovens in the middle of a heat wave. I have never claimed wiseness though so it’s all good. I claim only insanity, a warped sense of humor and an unhealthy love for Cheetos and almost any sort of Gummy candy (right now my current addiction is These Brachs Juicy Berries Gummies. Oh my gosh, I love them and talk about lack of wisdom… it’s unwise for a bag of them to be near me or I’ll eat every.single.one.

But… today wasn’t about gummy candy (tonight when I watch Glee however, all bets are off). Today was about scones. This recipe was originally an Ina Garten one but I found it long ago on the now defunct blog “Gingerbread Bagels”. I don’t know the blog closed of where Lindsey, the owner, disappeared to, but I still think of her and hope she’s ok. Originally, this was just dark chocolate and dried cranberries but we all know I’m genetically incapable of doing a recipe the way it was written. So now I have left my mark on this one and love how I changed it ๐Ÿ™‚

These scones are probably my favorite scones ever. They are flaky and tender… a little bit crispy on the outside and tender on the inside. The chocolate and cherries go so well together and the orange zest and almond extract add a lovely flavor to these. Add in the yummy pistachios and the bit of crunch they add and it’s scone Heaven.

You know the drill. Get to baking!

Chocolate, Cherry & Pistachio Scones

  • 1 1/2 cups mini chocolate chips
  • 1 5 ounce bag dried cherries
  • 1/2 cup chopped salted pistachios
  • 2 cups flour
  • 1/3 cup sugar
  • 1 tablespoon baking powder
  • 1 teaspoon salt
  • 2 teaspoons orange zest
  • 1 1/2 sticks COLD unsalted butter, diced
  • 1/2 cup COLD heavy cream
  • 2 large eggs
  • 1 tablespoon vanilla extract
  • 1 teaspoon almond extract
  • Glaze-
  • 1/2 cup powdered sugar
  • 1/2 teaspoon vanilla extract
  • 2 to 3 tablespoons heavy cream (may need more or less to make glaze drizzling consistency)
  1. Preheat oven to 375. Line a buttered baking sheet with parchment paper and then butter the paper.
  2. Combine the flour, baking powder, salt and orange zest in the bowl of a stand mixer. Add in the cold butter and mix on low speed with the paddle attachment until the flour has only small lumps the size of peas left in it. (Alternately, do the same with a hand mixer or pastry blender)
  3. Whisk together the 2 eggs, 1/2 cup cream, vanilla extract and almond extract. Pour slowly into the flour mixture and continue mixing at low speed until dough comes together in a sticky ball from the side of the bowl.
  4. ร‚ย Dump onto a lightly floured board. Pat down into a circle of about 3/4 of an inch thick. Cut into 8 wedges with a lightly floured knife or pizza cutter.
  5. Lay close together but not touching on the baking sheet. They will rise and touch as they bake and you’ll have nice soft sides where they do, crispy ones where they didn’t.
  6. Bake at 375 for about 17 minutes or until they are nicely browned and firm on top. Don’t over bake or you’ll lose that great texture!
  7. When done, let cool for about minute in the pan, then carefully transfer over to a wire rack to finish cooling.
  8. For glaze, simply whisk together all the glaze ingredients in a small bowl. Drizzle over the cooled scones.

Print Friendly and PDF

Chocolate Chip Butterscotch Cookie Cake (With An Adult Twist)

Chocolate Chip Butterscotch Cookie Cake

Chocolate Chip Butterscotch Cookie Cake

I’ve mentioned before that I’m not much of a drinker. I like my wine a time or two a week and I like some sweet liquors every once in a while; things like Baileys, Amaretto (it’s wonderful in hot tea) and Butterscotch Schnapps. Yep… they actually make a schnapps with that flavor.ร‚ย  And add Pinnacle Vodka in there sometimes too. I’m not normally a vodka drinker but the ones they make are actually creamy tasting and if you’ve read my blog for more than five minutes, you know creamy tasting and I are BFF’s from way back. ๐Ÿ˜€

When I was a kid, I loved those hard yellow butterscotch discs. Still do actually, though my teeth (or lack thereof hehe) can’t handle them anymore. So, years back, when I saw the schnapps with that flavor, I had to try it. And lo and behold, it tastes exactly like one of those candies. The problem is that I DON’T drink enough (laughs cause I’m whining that I don’t drink heavily. Go figure.) so a bottle lasts me approximately as long as it takes to go from birth to puberty. So I like to think of ways to use the stuff up that doesn’t involve me and a headache from syrupy booze.

Today, I was looking through my copy of Dam Good Sweets and I noticed a page I tagged. It was for Chocolate Chip Cookie cake. That alone sounded good and I was going to make it but then boozy inspiration entered my head (that sounds like I was sloshed when I thought of it lol. Y’all know what I meant right?) so I played around with the recipe. Not much… just enough to make it say “Janet Made Me!!” How, you ask? Simple. I added butterscotch chips as well as the chocolate and I added a slug of butterscotch schnapps to the batter. I also omitted the almond extract they called for and used dark brown sugar instead of light.

This worked out nicely. You can definitely taste the butterscotch flavor in the dough. Combined with the two different flavors of chips that are all melty and ooey gooey and the soft chewy cookie with crispity (yes, that too is now a word) edges, this all becomes one decadent treat. I had originally thought about sending it in to my husbands work with him, but no way is that happening now that I’ve tasted it hehe.

Now go bake a cookie!

Chocolate Chip Butterscotch Cookie Cake

  • 2 cups semi sweet chocolate chips
  • 1 1/2 cups butterscotch chips
  • 1/2 cup heavy cream
  • 9 1/2 tablespoons unsalted butter, room temp
  • 1 cup flour
  • 1 1/2 teaspoons baking powder
  • 1/4 teaspoon salt
  • 1 cup brown sugar
  • 1 teaspoon vanilla extract
  • 2 tablespoons butterscotch schnapps (you could sub 1/4 teaspoon of butterscotch candy flavoring if you wanted to)
  • 1 egg
  1. Make your ganache- this will be the glaze later. Put 2/3 of a cup of the chocolate chips in a bowl. Microwave the cream until boiling, then pour over the chocolate chips in the bowl. Let sit for about a minute then stir well to melt the chocolate and make a smooth mixture. Cover and set aside. You can make this hours before hand if you want. Just leave out because it will harden in the fridge.
  2. Preheat oven to 350 degrees. Line a buttered 9 inch cake pan with a round of parchment paper (easiest way is to trace the outline of the with pencil on parchment then cut it out) then butter or spray the paper.
  3. Whisk the flour, salt and baking powder in a small bowl. Set aside
  4. In a large bowl, combine the butter, brown sugar, vanilla and schnapps. Mix with a hand mixer until well combined and fluffy. Scrape down the bowl, then add the egg.
  5. After the egg is well combined, stir in the flour mixture.. Stir just until well combined, then add the rest of the chocolate chips and the butterscotch chips
  6. Bake at 350 for about 25 minutes or until the top is golden brown and puffy and the edges look set. The middle will still look and feel somewhat soft..
  7. Let cool in the pan on a wire rack for about an hour. Run a butter knife around the edges of the pan. Carefully lay a plate over the top of the pan and invert the cookie, then do that again onto another plate to get it back right side up.
  8. Spoon your cooled ganache into a sandwich bag. Snip off the corner and pipe the ganache onto the top of the cookie. Eat the leftover ganache hehe.
  9. Serve this to hungry kids who will love you (the alcohol has cooked off). Or just do the usual… hide in the closet with it and don’t share. I’m cool with that too.

Print Friendly and PDF

Lemon Icebox Pie With Honeyed Whipped Cream

Lemon Icebox Pie With Honeyed WHipped Cream 2-001

I know, I know, I just did a citrus pie. What can I say? I’m in a tangy frame of mind. Spring and Summer makes me want sweet tart desserts. Ok, so Fall and Winter make me want sweet tart desserts. So does Christmas. And Groundhog Day. And Thursdays. And…well, you get the point.

I’m not one of those weirdos who says that I would always choose lemon over chocolate, but I do love me a good lemony dessert. I come by that honestly if the love for it can be genetic. One of the only desserts I can recall my mother making was lemon meringue pie. She made an awesome one too.ร‚ย  Plus, my dad loved lemon meringue pie. Hmmm, wonder if there is a connection there. maybe my mom learned because my dad liked it? Or maybe my dad loved it because my mom made it? Who knows? I don’t have many memories of the two of them together so I guess it will remain a mystery.

My father would have loved this pie. It’s not lemon meringue but it has all the thing in it he (and I) loved; lemon, creaminess, whipped cream… ok, so my dad would have loved it because it had sugar lol. I’ve said it before- he was a diabetic with an insatiable sweet tooth.

I originally saw this recipe on The Galley Gourmet. Her blog is one of my absolute favorites and one I aspire to be like though I doubt it will ever happen with my lack of photography skills hehe. When I checked out the cookbook she mentioned in her post, I immediately went to Amazon to check it out and ten minutes later, I was 10 bucks poorer. But it’s definitely worth it. The book (Dam Good Sweet) has quite a few tempting recipes in it that I’ll be trying. Being me however, i had to change it up a little. Mind you, it was very very little. All I did was add some vanilla to it because I adore the combo of lemon and vanilla and I made a honeyed whipped cream for the top of it because who can resist the classic pairing of honey and lemon. I was tickled with the results of that idea. The honey whipped cream goes so well with the lemon flavor. I also didn’t freeze it, just chilled it because I’m not big on frozen pies. Anddddd, I used a premade graham cracker crust but I will post the recipe for the crust in the book. Feel free to do it either way. It worked just fine in the premade if you’re feeling as lazy as I was. So go see if you have any sweetened condensed milk and go buy the prettiest lemons you can find. This pie is delicious!

Note- this takes a lot of egg yolks so plan on making some egg white omelets for dinner that night or some meringue cookies the next day. Just store the whites in a covered container. They will last about 3 days.

Lemon Icebox Pie With Honeyed Whipped Cream

  • crust-
  • Premade graham cracker crust OR
  • 14 whole graham crackers
  • 1/4 cup sugar
  • 6 tablespoons butter, melted
  • Filling-
  • 2 cans sweetened condensed milk
  • 1 1/4 cups strained lemon juice (will take about 5 to 6 lemons)
  • 8 egg yolks
  • zest from 2 lemons
  • Honeyed whipped cream-
  • 2 cups heavy cream
  • 1/4 to 1/3 cup honey (depends on how sweet you want it. I prefer it only mildly sweet because the pie is pretty sweet on it’s own)
  1. To make the crust-
  2. Preheat oven to 350 degrees. Break the graham crackers up into small pieces and place in the bowl of a food processor with the sugar and pulse until they are fine crumbs.
  3. Pour in the melted butter and pulse a few times, until the mixture holds together if squeezed.
  4. Transfer the mixture to a 9 inch springform pan and press onto the bottom and about an inch up the sides of the pan. Set aside.
  5. Whisk the condensed milk with the lemon juice. In another bowl, whisk the lemon zest with the egg yolks for about a minute or so. Pour the lemon juice mixture into the egg mixture and mix well.
  6. Place the pan on a rimmed baking sheet and pour the mixture into the crust. Place into the oven and bake for about 25 minutes or until the center is jiggly, rather like a soft set custard. Remove from the oven and let cool for an hour on a wire rack.ร‚ย  Loosely cover with plastic wrap and either chill or freeze for at least six hours.
  7. When ready to serve, make your cream. In a medium bowl, combine the heavy cream and the honey. Start with the 1/4 cup honey if you’re not sure how sweet you want it. You can taste midway through beating and see if you want more. Beat until soft peaks form. Either cover the pie with the cream or serve on the side. Or just take the whole bowl in a closet and eat it. I won’t judge.
Lemon Icebox Pie With Honeyed Whipped Cream

Lemon Icebox Pie With Honeyed Whipped Cream


Print Friendly and PDF

Key Lime Chess Pie

Key Lime Chess Pie 1

I’ve always had a thing for food culture and food history. One of my prize possessions is the full set of Time Life Foods Of The World cookbooks. The firs time I read one of them was when I lived in Germany and I became immediately hooked. The books are a bit dated now (they were printed in the late 60’s through early 70’s but that is actually part of their charm. But they are a wonderful combination of a cookbook, a travelogue and personal anecdotes from each author. When the internet became a larger part of everyday life, I looked for the books on Ebay and found them. By the time I managed to piece together one set, I had extras and now have almost 2 full sets of the books. I have yet to decide which one of my kids get the books when I die hehe.

One of the things I love about food history is how the things we eat has changed so much and it’s fun to compare. back in the day, people routinely ate things like offal and marrow. I remember my mother, a depression baby, sucking the marrow out of bones and how it grossed me out because I was form a different time period than she. And how many of you have ever had a tomato aspic or jellied beef? Or a Marlborough Pie or Shoofly Pie? Heck, I know many people from the generations younger than myself who have never even had jello or a jello salad. That was such a common place dessert or side dish years back but my theory is that the younger crowd today has far more choices when it comes to sweets so things like jello have fallen out of favor.

One of the things that always sounded interesting to me was Chess Pie. The addition of cornmeal to what would otherwise be a typical custard pie seemed unusual enough to be yummy. But the “normal” chess pie sounded overly sweet, even to me lol. So when I saw a recipe for Key Lime Chess Pie in The Southern Foodie, I knew I wanted to try it. I mean, y’all know me. Turn down something made with lime? Not to mention custardy, aka creamy? yeah right… and I hated Twinkies too.

This turned out pretty good. I was leery at first about the amount of butter used in the crust. I worried it would be greasy. But it seems to have worked, making the crust almost cookie like though a bit less butter would be ideal in my opinion. The filling is nice and tart from the lime but not too tart. The only issue I have is that the directions weren’t very clear on pie pan size. I used a regular 9 inch pan and ended with 1) a very thick crust and 2) too much filling for the pan. So I will say here and repeat in the recipe. Either use a 10 inch deep dish pie pan (hard to find I know), make this in say, a 13×9 inch glass pan or plan on putting some of it into ramekins as I did today.

Key Lime Chess Pie

  • Crust-
  • 1 1/4 cups graham cracker crumbs
  • 1/3 cup plus 1 tablespoon flour
  • 1/3 cup plus 1 tablespoon powdered sugar
  • 11 teaspoons unsalted butter, melted (the recipe called for 12.5 tablespoons but I think a tad less would be ideal with no chance of excessive greasiness. Make your own call there.)
  • Filling-
  • 8 eggs (yes, 8)
  • 4 cups sugar
  • 1/2 cup milk or cream
  • 1/2 cup Key Lime juice (you can find it bottled with the regular lemon and lime juices at the store)
  • 2 tablespoons flour
  • 2 tablespoons cornmeal
  • juice (and zest; my addition there) of one lime
  • 6 tablespoons unsalted butter, melted
  1. To make the crust, preheat oven to 350 degrees then combine all the crust ingredients and pat into the bottom of a deep dish large pie pan or a 9 inch pan and a couple of ramekins.
  2. Place the pan in the 350 degree oven and bake for 7 minutes, then set aside to cool.
  3. For the filling, In a large bowl, combine the eggs, sugar, milk (or cream) and key lime juice. Whisk until well combined.
  4. Add the flour, cornmeal, lime juice and zest and butter. Stir to combine.
  5. Pour into the pie shell and bake at 350 until the top is golden brown and the only the very center of the pie is jiggly. The edges and halfway through should look and feel set not liquidy.

Print Friendly and PDF

Extra Rich Cinnamon Rolls With Cream Cheese Icing

Extra Rich Cinnamon Rolls-001

Surprise, surprise… a recipe from me with the words extra rich in the title. Never expected that huh? Not with the dearth of fattening recipes here. What makes these extra rich? Mashed potatoes in the dough. Get back here! Sheesh. Ever had potato bread? Same idea, different result. I didn’t make a batch of garlic mashed and shove the extra into cinnamon rolls *gags a little*. Mashed potatoes (plain, NOTHING added; just the taters) are very common in yeast bread. They add a richness to the dough but with no potato flavor. They also make the dough more tender and help it to rise better. matter of fact, when you make mashed potatoes, it’s a good habit to save some of the cooking water if you make yeast risen doughs often. You can sub it for part or all of the liquid (part is better if the original recipe calls for milk) and you will see an amazing difference in the finished product.

These cinnamon rolls were supposed to have pecans in the filling, but if you follow my facebook page at all, you may have seen my update about the two pans of burned pecans. Sigh. talk about idiocy. I put one in to toast then had a major “ooo, shiny thing!” moment and forgot about them. Slapped myself around for a bit then put in another pan. Words With Friends on facebook may or may not have had something to do with the other pan burning. Needless to say, after about 12 dollars worth of pecans torched, I was not trying again. So the rolls have raisins in half the batch. Feel free to sub pecans (I will put the amounts for either one in the recipe). Just stay away from word games when toasting them. Also, this makes a HUGE batch of rolls. I got 2 13×9 pans with 12 each and 6 more in a 8×8 pan. In my household which currently consists of myself, hubby, two teen boys, three boys 6 and under and a pregnant woman, they will get eaten. But in “normal” homes, you may want to cut this in half. Or make your neighbors happy.

This originally came from The Pastry Queen Cookbook. Adapted some for a stand mixer and ingredients changed a LITTLE but not much.

Extra Rich Cinnamon Rolls

  • 2 medium russet potatoes
  • 4 packets dry yeast
  • 3/4 cup plus 1 teaspoon sugar
  • 1 cup unsalted butter, melted
  • 3 large eggs
  • 2 teaspoons salt
  • 9 cups flour (I TOLD you this was big batch) (I actually used more like ten cups; it will depend on the moisture of your potatoes)
  • Filling-
  • 4 cups pecans, toasted for about 8 minutes at 350 degrees then coarsely chopped or 3 cups good quality raisins (not dried shriveled rocks)
  • 4 cups firmly packed brown sugar (I used dark brown)
  • 4 tablespoons cinnamon (no, that’s not a typo… look at the amount of ingredients and this makes sense)
  • 1 teaspoon nutmeg
  • zest from one large orange (optional)
  • 1 cup unsalted butter, melted
  • Icing-
  • 1 8 ounce package cream cheese, room temp
  • 1/4 cup heavy cream
  • 3 to 4 cups powdered sugar
  • 1 teaspoon vanilla extract
  • 1/4 teaspoon orange extract (optional)
  1. To make the rolls- fill a large pot with water and set on high to boil. Peel and chop the potatoes and add to the pot. Cook until the potatoes are tender. Reserve three cups of the cooking water, then drain off the rest. Mash the potatoes and set aside. Let the potato water cool until it is between 110 and 115 degrees.
  2. In a medium bowl,ร‚ย  combine the cooled potato water, yeast and the one teaspoon of sugar. Stir until the yeast is dissolved. Let sit until foamy, about five minutes.
  3. In a large bowl, whisk together the potatoes, 3/4 cup sugar, 1 cup melted butter, eggs, salt and yeast mixture.
  4. Pour mixture into the bowl of a stand mixer. Turn mixer onto low and add the flour, in 3 cup increments. If the dough still seems wet (you want slightly sticky but not obviously moist) add more flour, a 1/4 cup at a time. Don’t go over 10 cups. Again, it’s ok if the dough is somewhat sticky. If you make it too dry, the rolls will also be dry. Sticky dough equals tender moist rolls in the end.
  5. Place the dough in a large greased bowl, making sure to oil the top of the dough some and then cover with a clean towel. Place in a warm place to rise and let rise until doubled in bulk, about an hour.
  6. Meanwhile, mix together the brown sugar, cinnamon, nutmeg and orange zest (if using) in a large bowl. Prepare 2 13×9 inch pans by lining with foil then greasing the foil. Heat oven to 375 degrees.
  7. When risen, punch down dough then divide itร‚ย  in half. On a floured board or counter, roll half into a 1/4 inch thick rectangle. Brush with half the butter,ร‚ย  sprinkle with half the brown sugar mixture and half the raisins or pecans. Carefully roll the dough up from one long end. Roll as tightly as you can.
  8. Using a sharp serrated knife, cut each roll of dough into 12 to 15 pieces. This will depend on whether or not your roll ended up bigger than 1/4 inch and looks like it is about the length of an adult python. Place 12 in each 13×9 inch pan. If you get more than 12 from each roll,ร‚ย  foil and grease a 8×8 inch pan and put the remainder in the 8×8 pan. Allow to rise until puffy but not quite doubled, about 45 minutes
  9. Bake at 375 degrees for about 25 minutes or until a nice light golden brown.
  10. Let cool in pan set on wire rack.
  11. For icing, combine icing ingredients in a medium bowl. Beat until smooth and creamy. Spread on slightly warm rolls. But first, eat about half of it straight off of a spoon then blame me when your husband asks why there is so little icing for the rolls.


Print Friendly and PDF